Introduction
Flexible Calendar for Jira Cloud is a comprehensive calendar planning solution designed for project managers, event planners, HR managers, and anyone who needs a more visual approach to calendar planning. Our straightforward interface and easy-to-use platform set us apart from other calendar planners, making it simple to manage tasks, events, and resources in Jira.
Create New Calendar Back to top
- Click "Add Calendar" in the upper right corner of the screen, then choose create.
-
Enter required information about your Calendar:
- Name: The name of your calendar will be used when displayed in the list of calendars, when searching, and so on
- Color: Events or Issues on the calendar will be painted in this color
- Basic: In this mode, it is possible to display and create only custom events
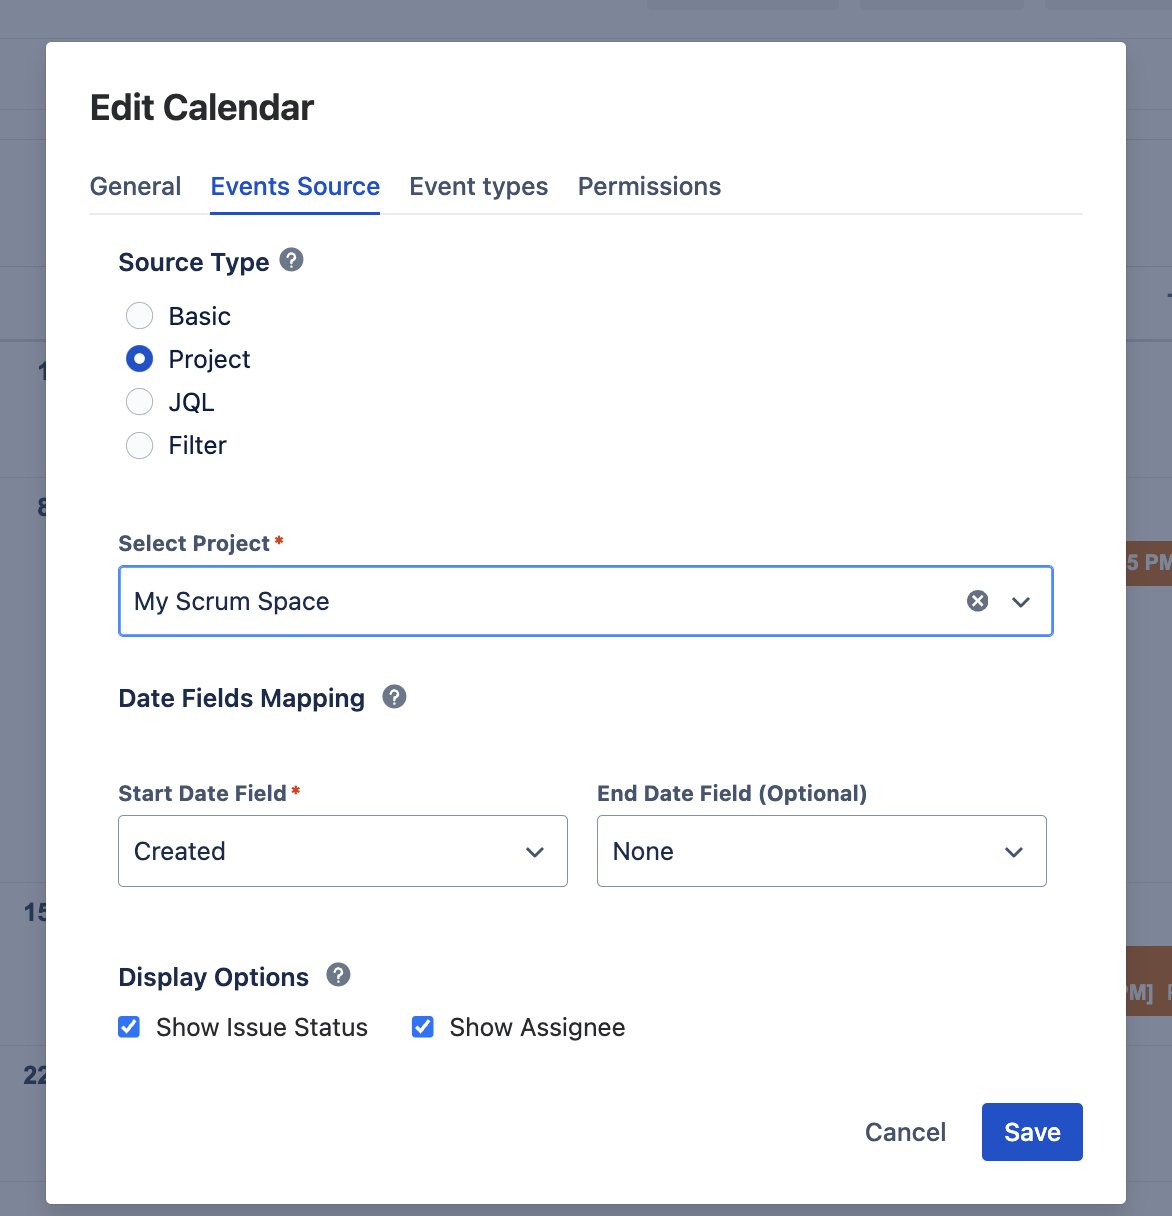
- Project: In this mode, you can select a specific project to display tasks
- Filter: Creating a calendar via the Jira filter
- JQL query: Creating a calendar via the JQL query
- Display Options: Select fields to display on Jira issues.
- Start: Start day field of Jira task (can be Jira system or custom field)
- End: End day field of Jira task (can be Jira system or custom field). If empty, any task will be displayed for a duration of one day
Note: Select editable start and end date fields to enable drag and drop functionality for tasks. Depending on field types (date only or date time), events will be scheduled as All Day or not. - Click Create to finalize your new calendar.
Add Existing Calendar Back to top
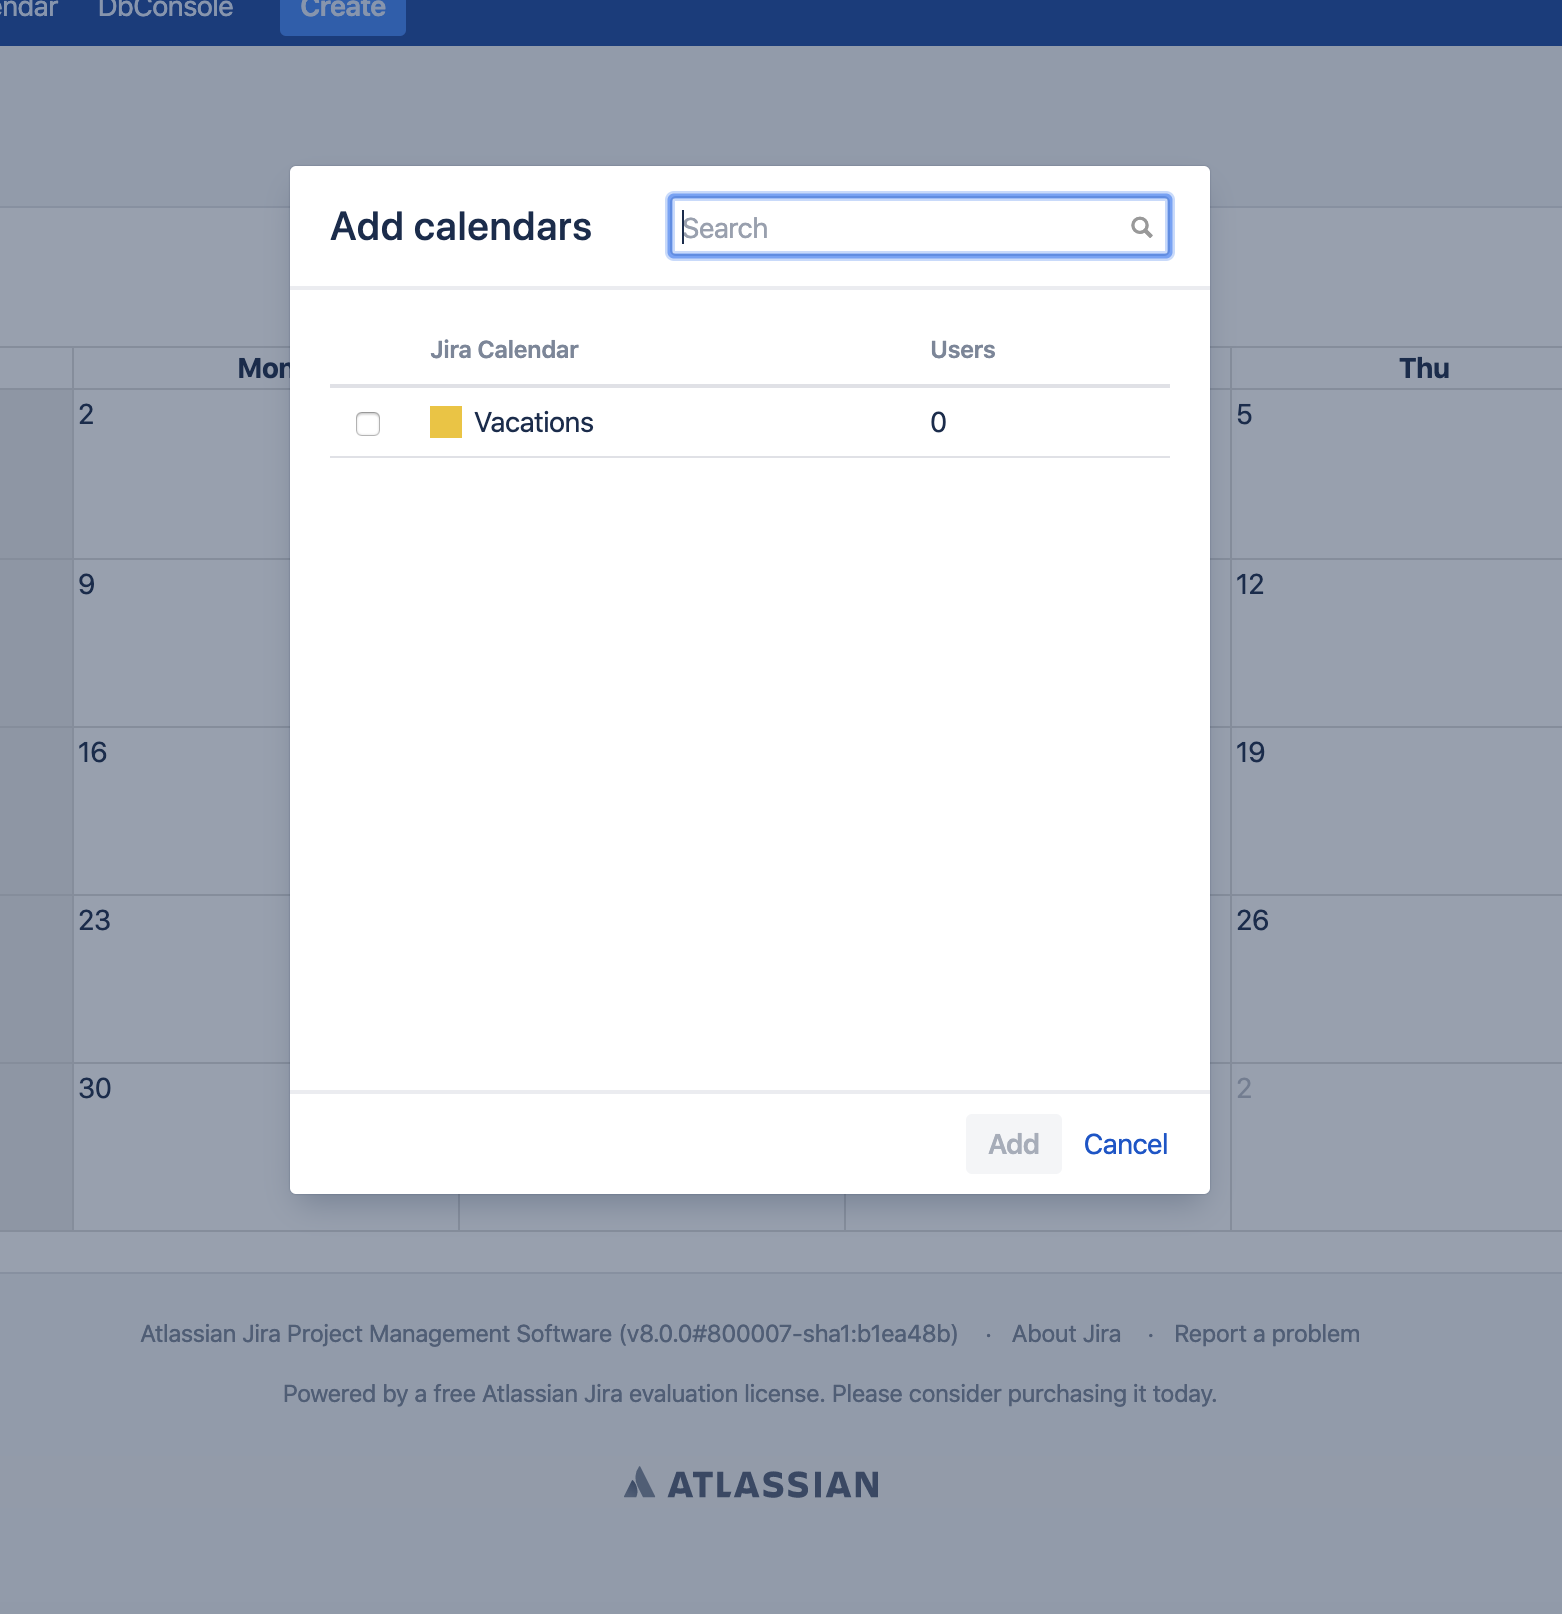
- Click "Add Calendar" in the upper right corner of the screen, then choose add existing.
- Select existing calendar from the list (all calendars to which you have permission are displayed).
- Click Add to add the calendar to your view.
Create New Event Types Back to top

- Click the three dots to the right of the calendar name for which you want to create a new event type.
- Open "Event Types" tab in the calendar settings.
- Click "Add new Event" button to create a new event type.
-
Enter required fields:
- Name: The name of the Event Type
- Icon: Icon to represent this Event Type
- Reminder: Select the time when event participants should be notified about the event start (this is the default reminder, which can be overridden or disabled during event creation)
- Click Create to save the new event type.
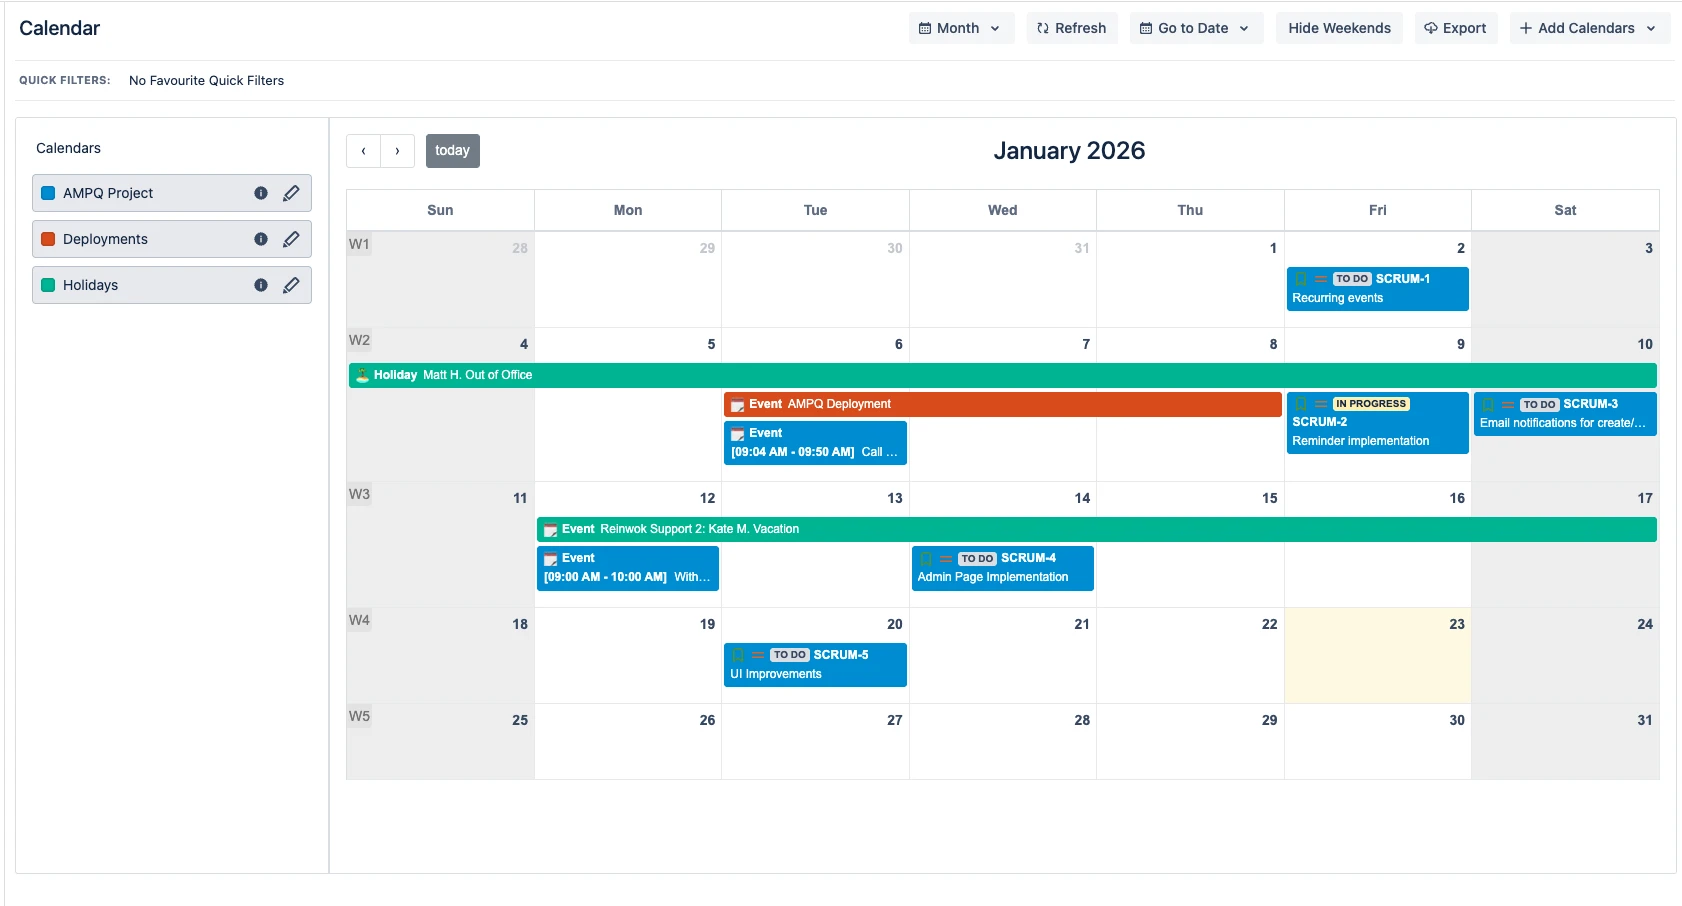
Create New Event Back to top
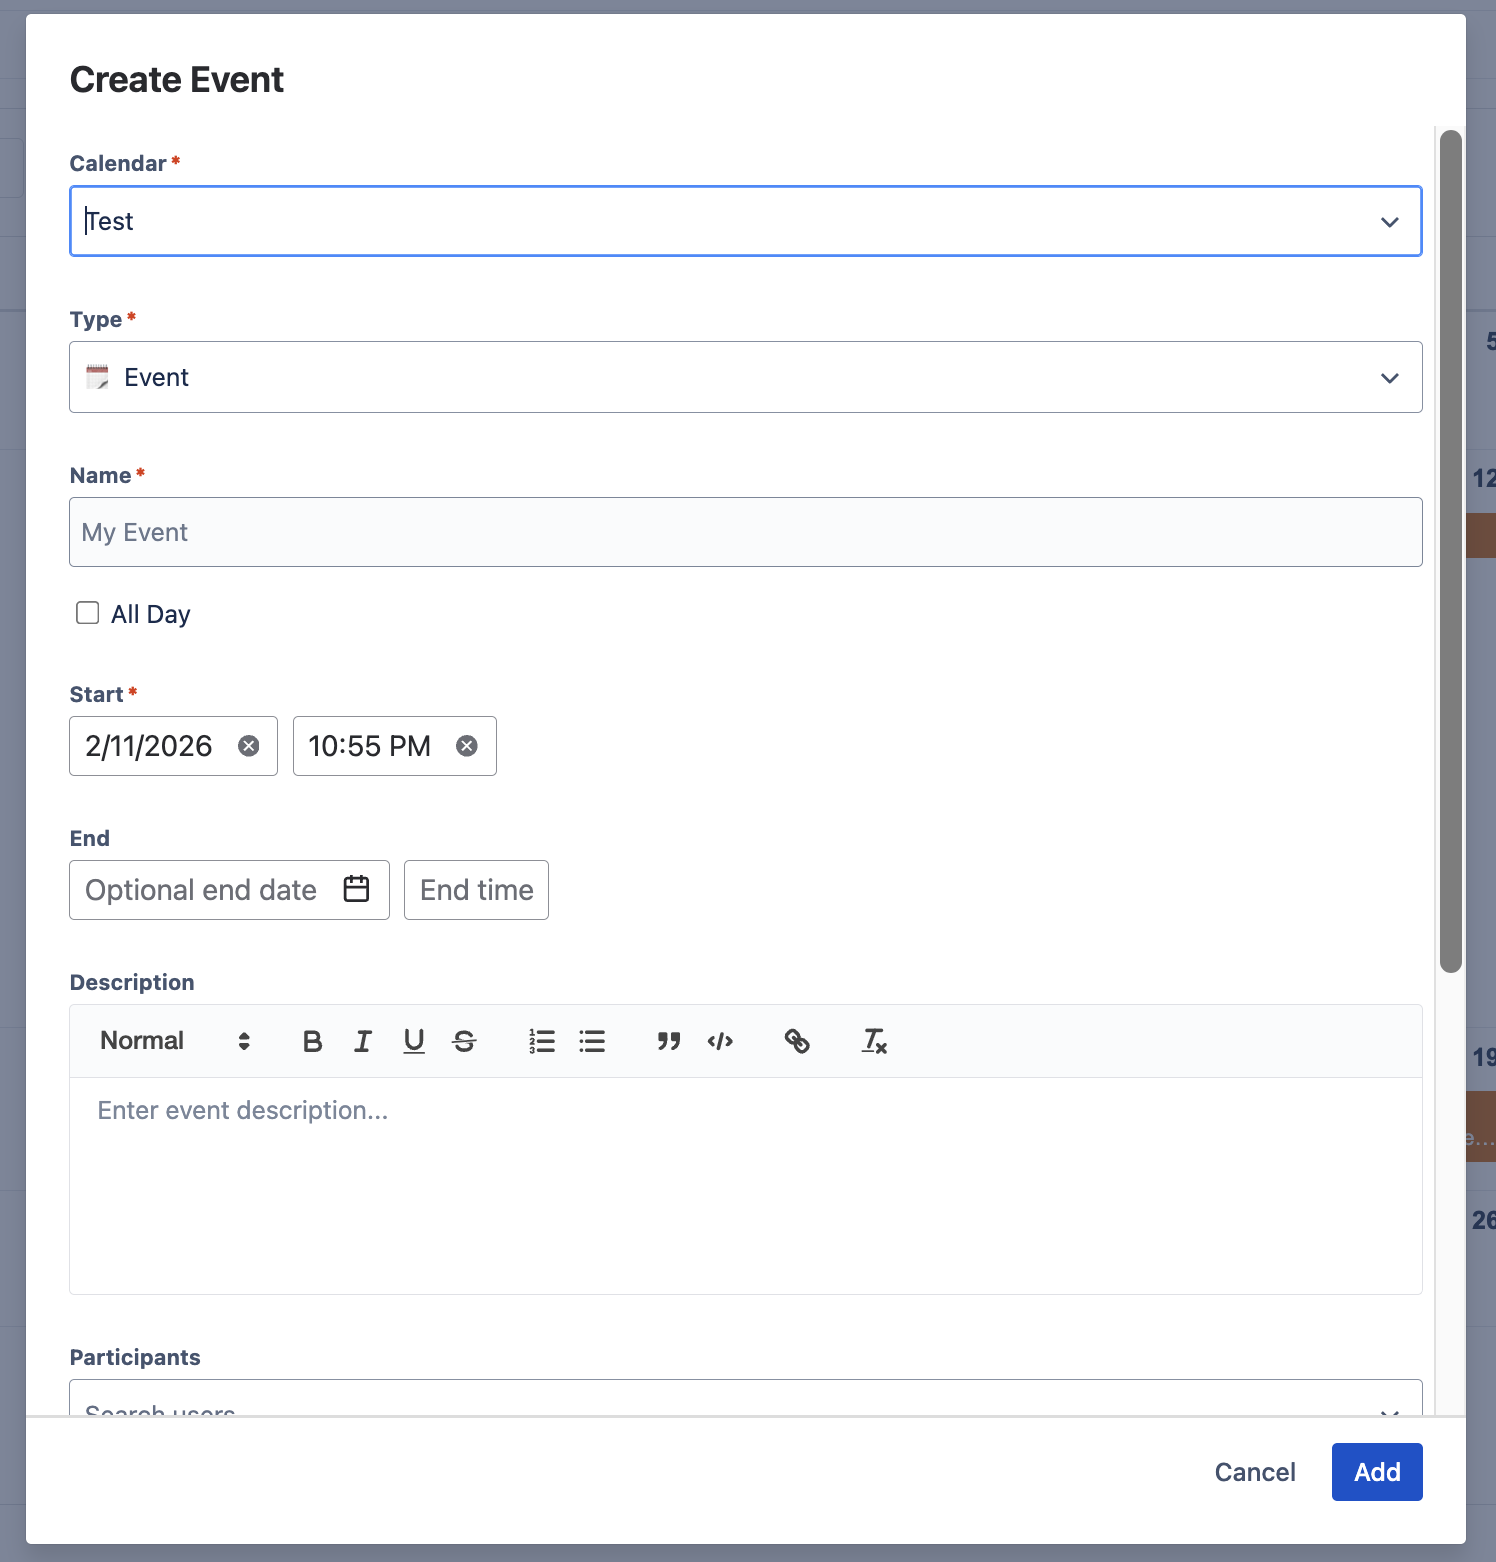
- Double-click on the calendar day block where you want to create an event.
- Select the calendar on which the event will be created.
- Type the name of your event that will be displayed in the calendar.
- Select the event type from the Type drop-down menu.
- Choose if it should be an All Day event or specify exact times.
- Specify start and end dates for your event.
- Select users who will participate in the event.
-
Configure reminder — Each event type has a default reminder setting. You can override it for this specific event:
- Keep the default reminder inherited from the event type
- Change to a different reminder interval (e.g., 15 minutes, 1 hour, 1 day before)
- Disable the reminder entirely for this event
- Add a link — Attach a URL to the event, for example a link to a video conference meeting (Zoom, Google Meet, Microsoft Teams), a shared document, or any relevant resource. Participants can open the link directly from the event details.
- Link Jira issues — Connect the event to one or more Jira issues. This creates a two-way relationship: linked issues appear in the event details, and the event appears in the Linked Events issue panel. Useful for associating meetings with the tickets being discussed, or linking milestone events to related deliverables.
- Click Create to save the event.
Create Recurring Events Back to top
- Double-click on the calendar day block.
- Select the calendar on which the event will be created.
- Type the name of your event.
- Select the event type from the Type drop-down.
- Choose All Day option if applicable.
- Specify start and end dates for your event.
- Select participants for the event.
- Select recurrent mode from the "Repeat" dropdown.
- Specify recurrence rule (daily, weekly, monthly, etc.).
- Click Create to save the recurring event.
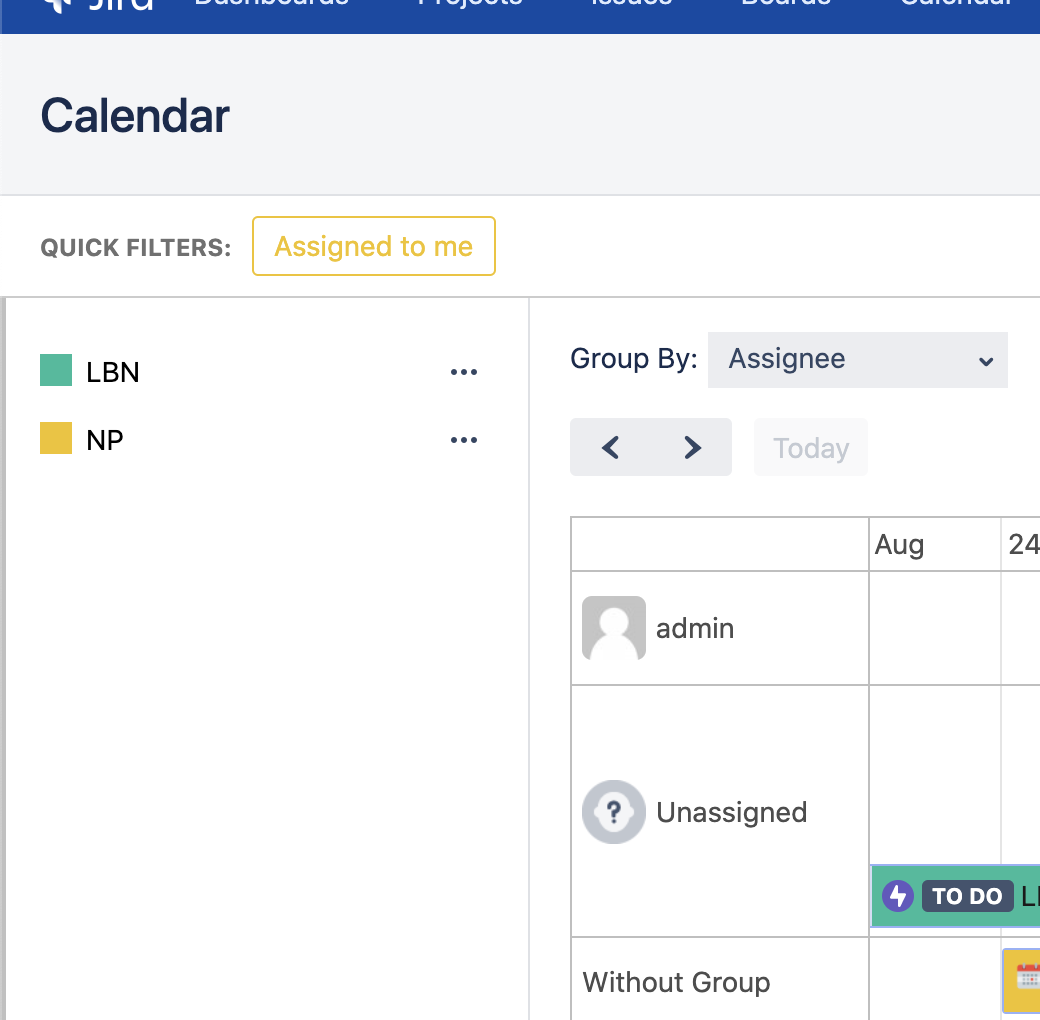
Timeline View Back to top
Timeline view allows you to visualize tasks in a horizontal timeline format with powerful grouping options.
Group Tasks by Project

Group Tasks by Issue Type
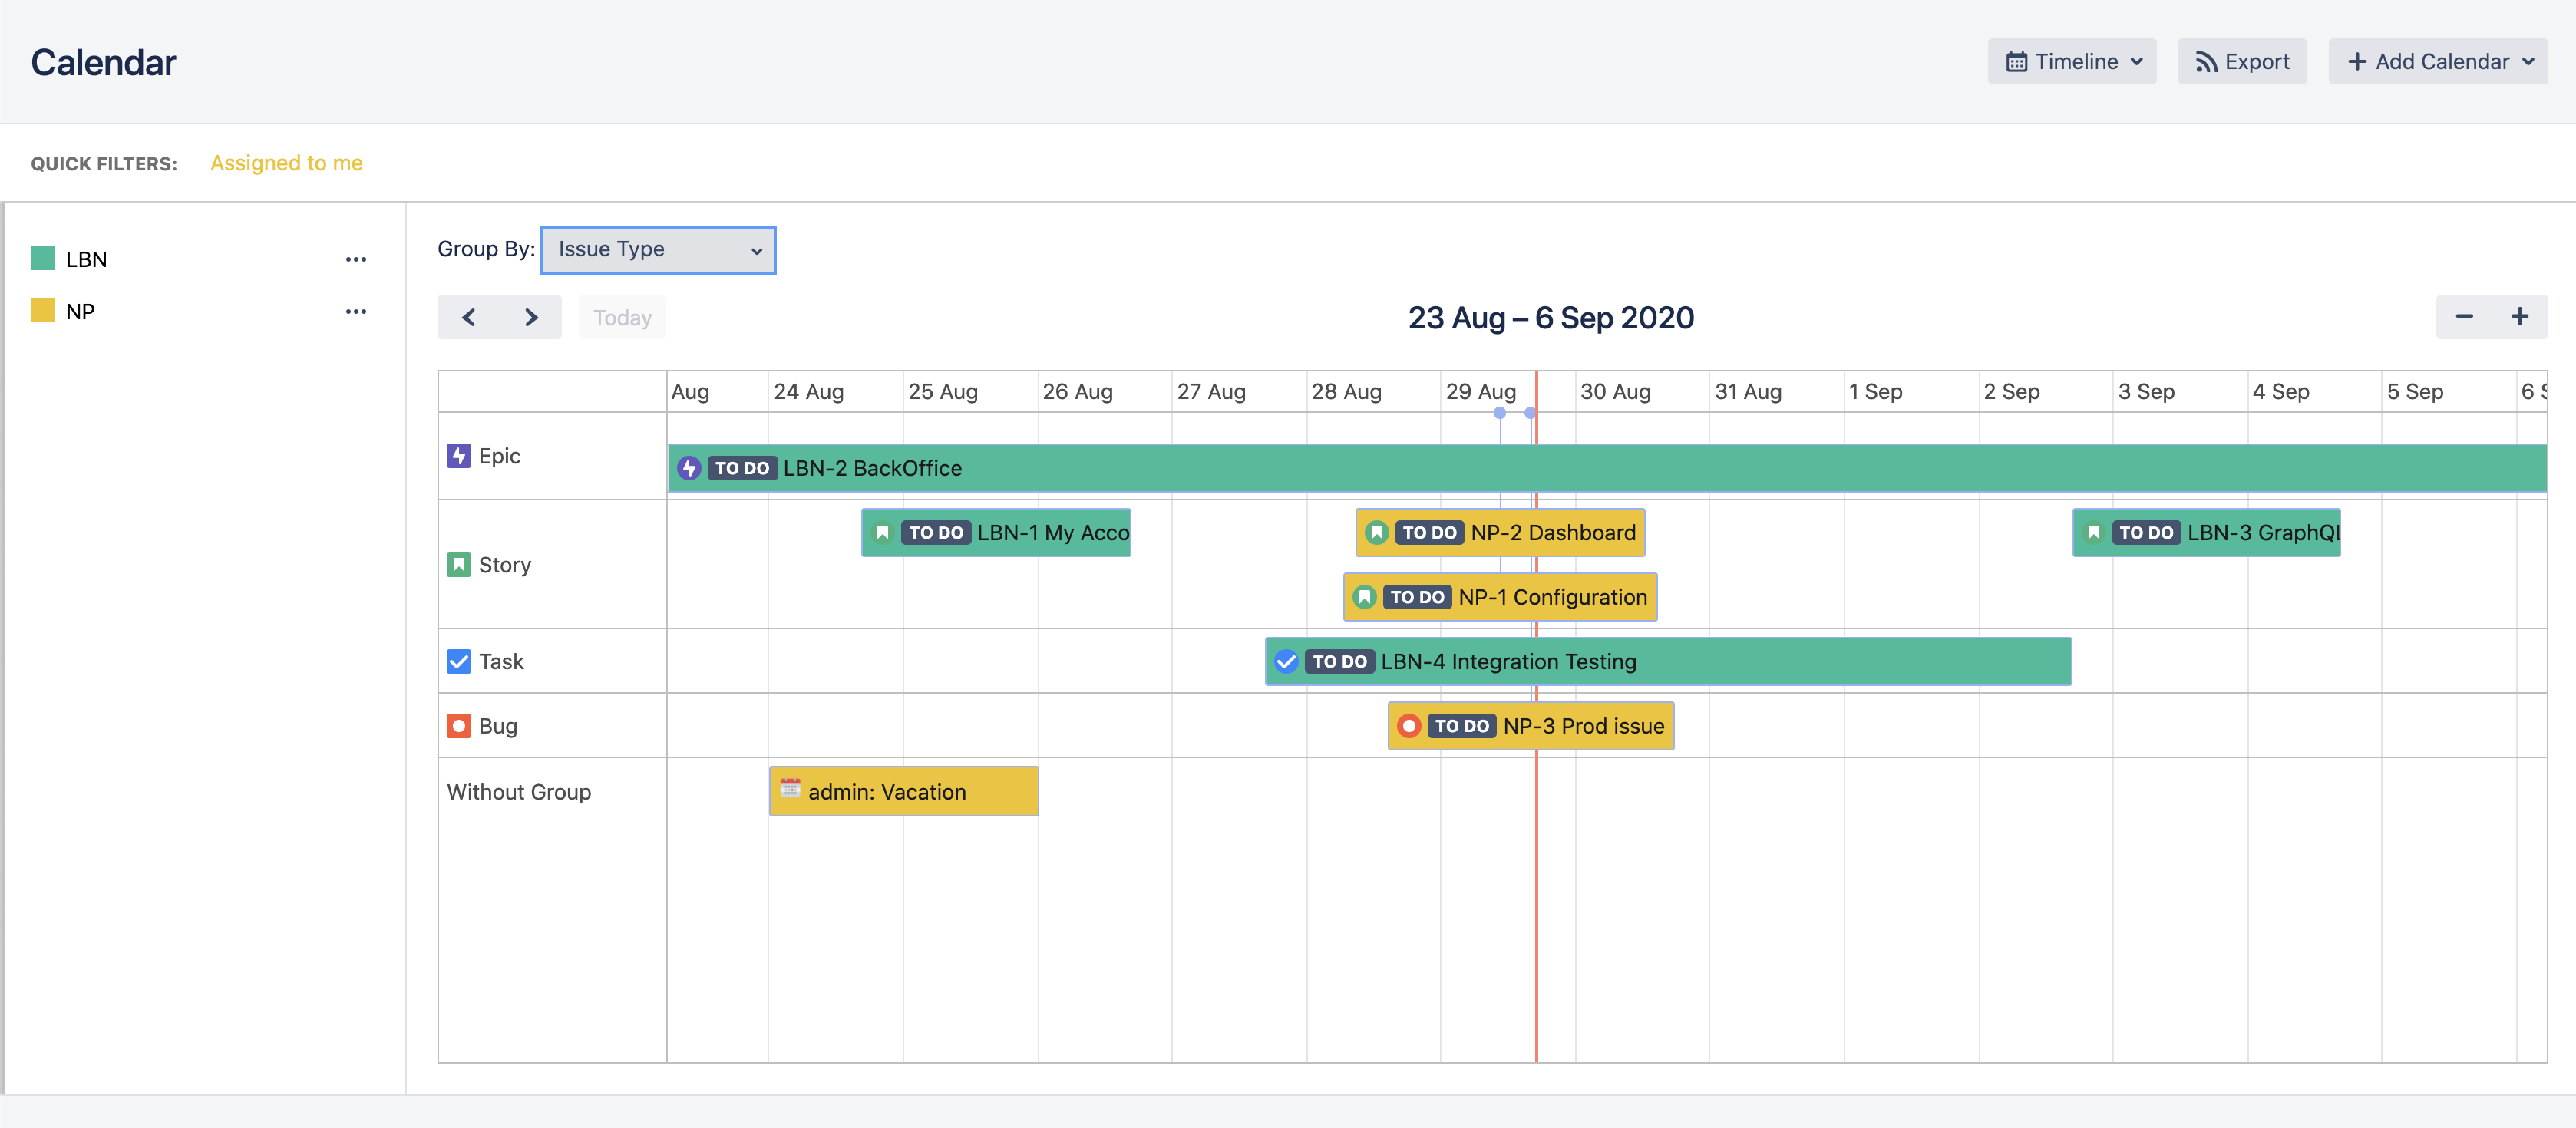
Group Tasks by Assignee

- Click on "Views" dropdown on the top right corner.
- Select Timeline from the available views.
- Select "Group By" field from the dropdown (custom events display in the "Without Group" section).
- To drag and drop events in timeline view, click on the event first
- Change timeline scope using + and - buttons at the right of the calendar header
- Create new events by clicking the three dots next to the calendar name and selecting "New Event"
Agenda View Back to top
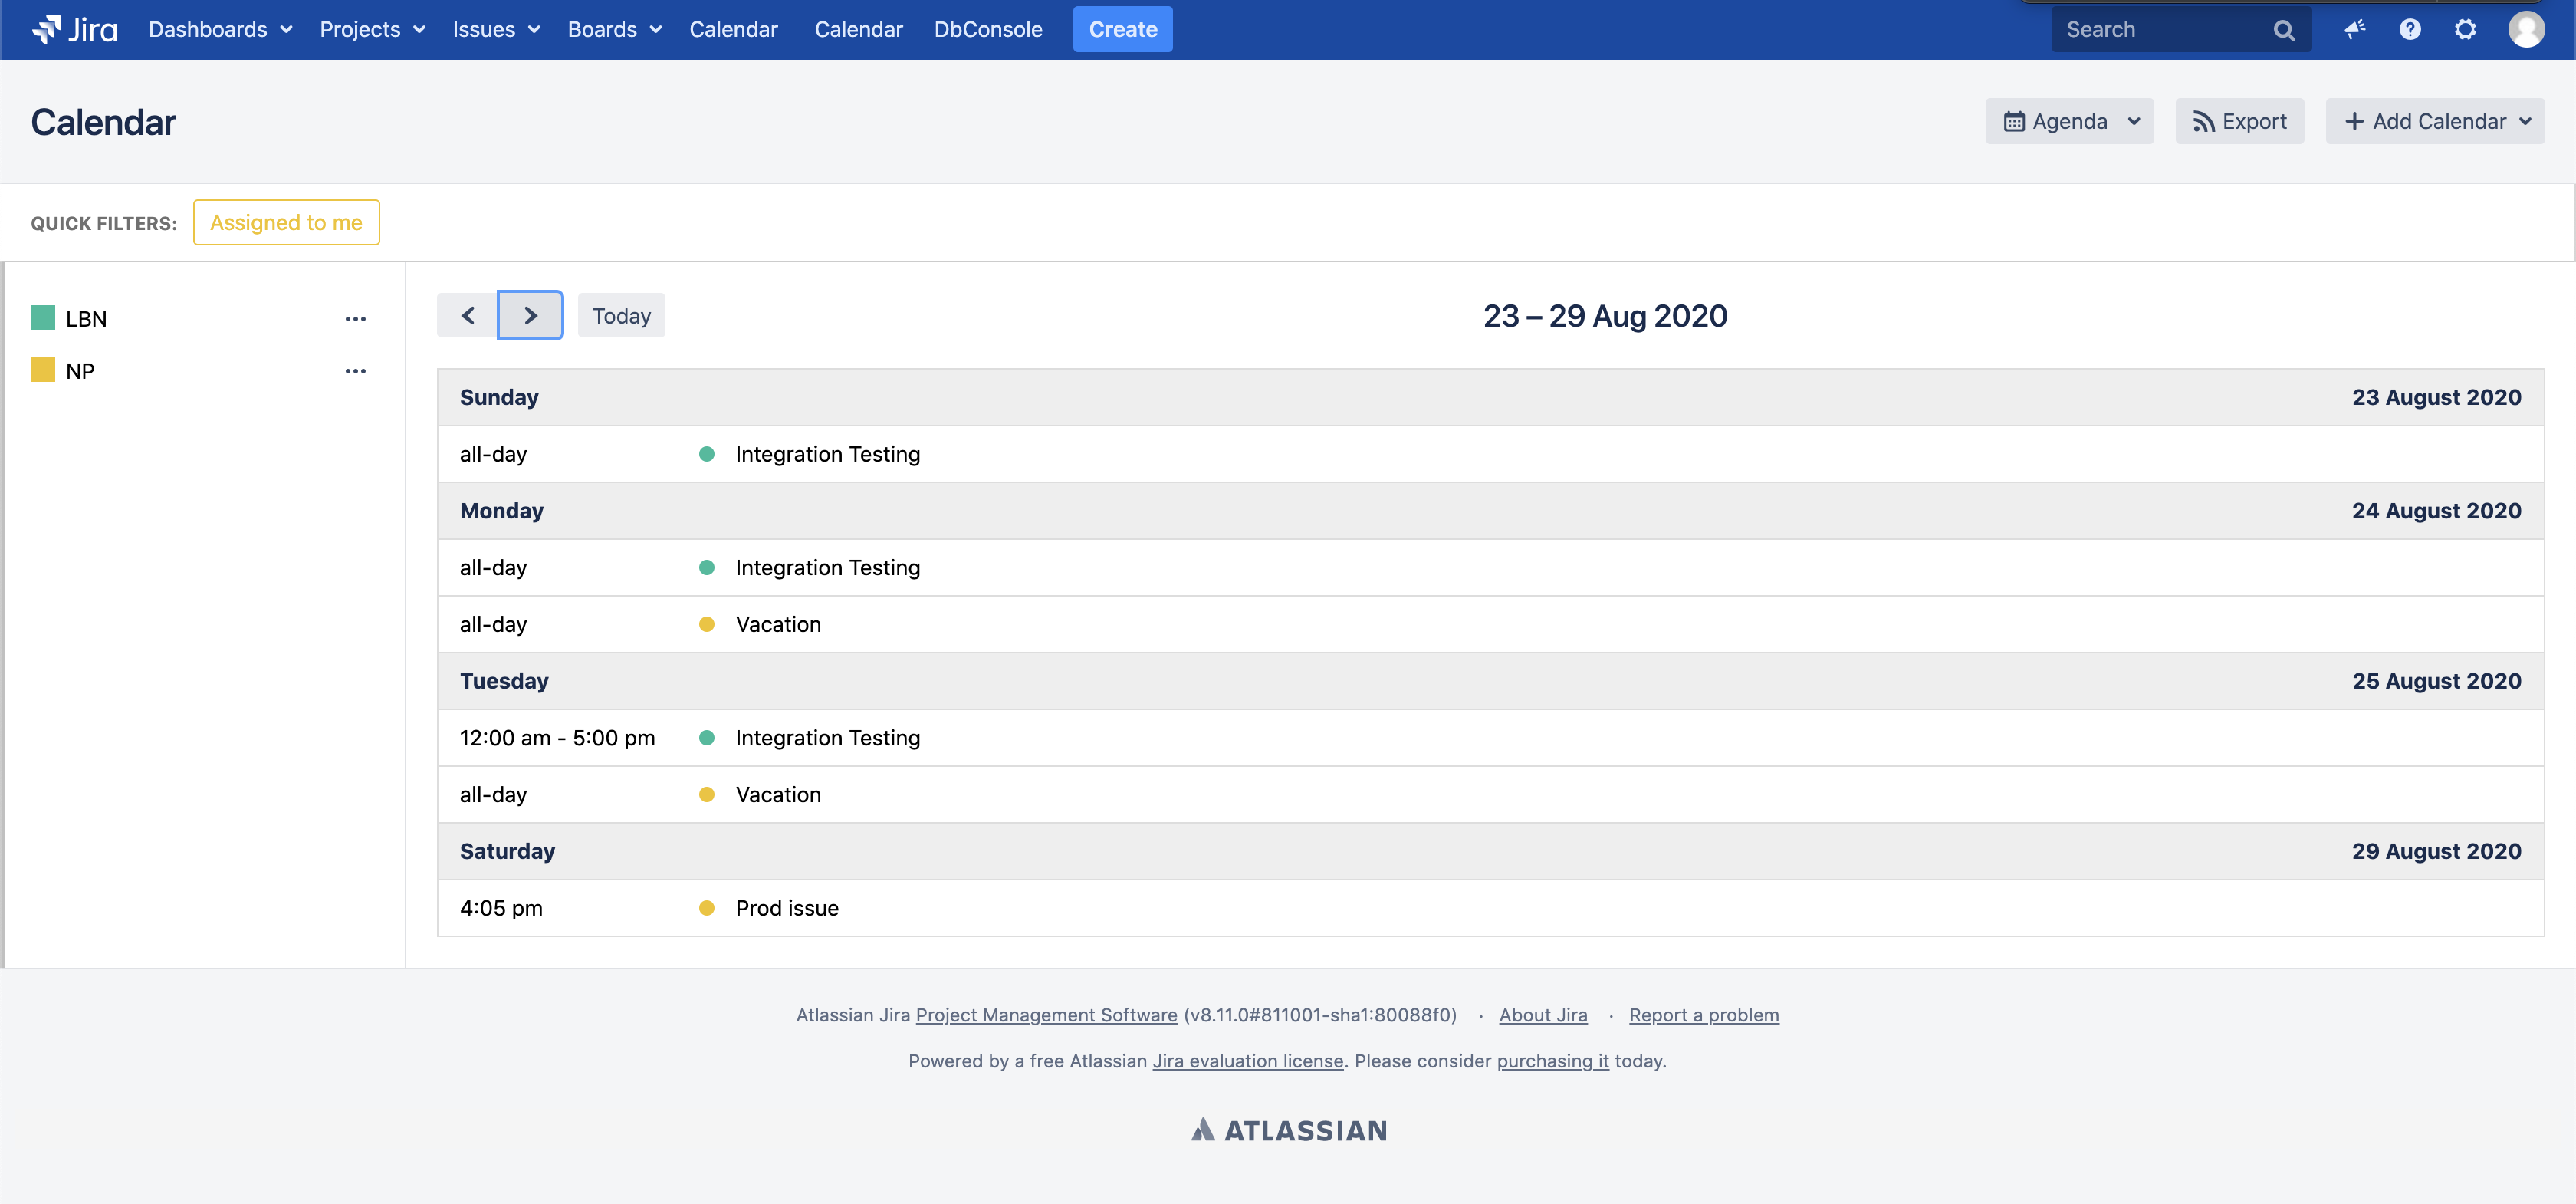
- Click on "Views" dropdown on the top right corner.
- Select Agenda to view your events in a chronological list grouped by day.
Calendar Permissions Back to top
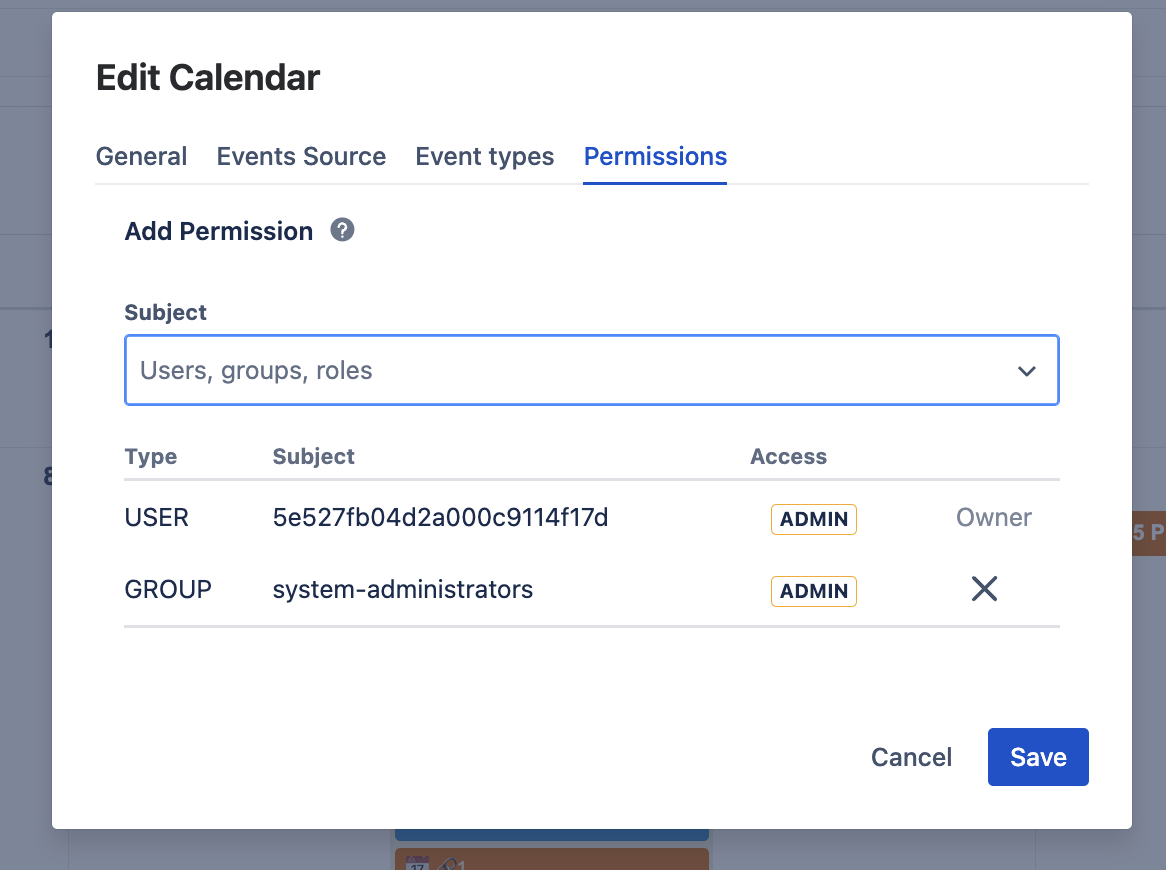
- Click the three dots to the right of the calendar name you want to configure.
- Click Edit button to open calendar settings.
- Open "Permission" tab in the settings dialog.
-
Choose users or groups and assign permission levels:
- ADMIN: All possible actions are allowed
- USE: All actions allowed except calendar edit and new event types creation
- Read Only: Users can only view existing events/issues. No edit, delete, or move actions allowed
- Click Save to apply the permissions.
Create Quick Filters Back to top
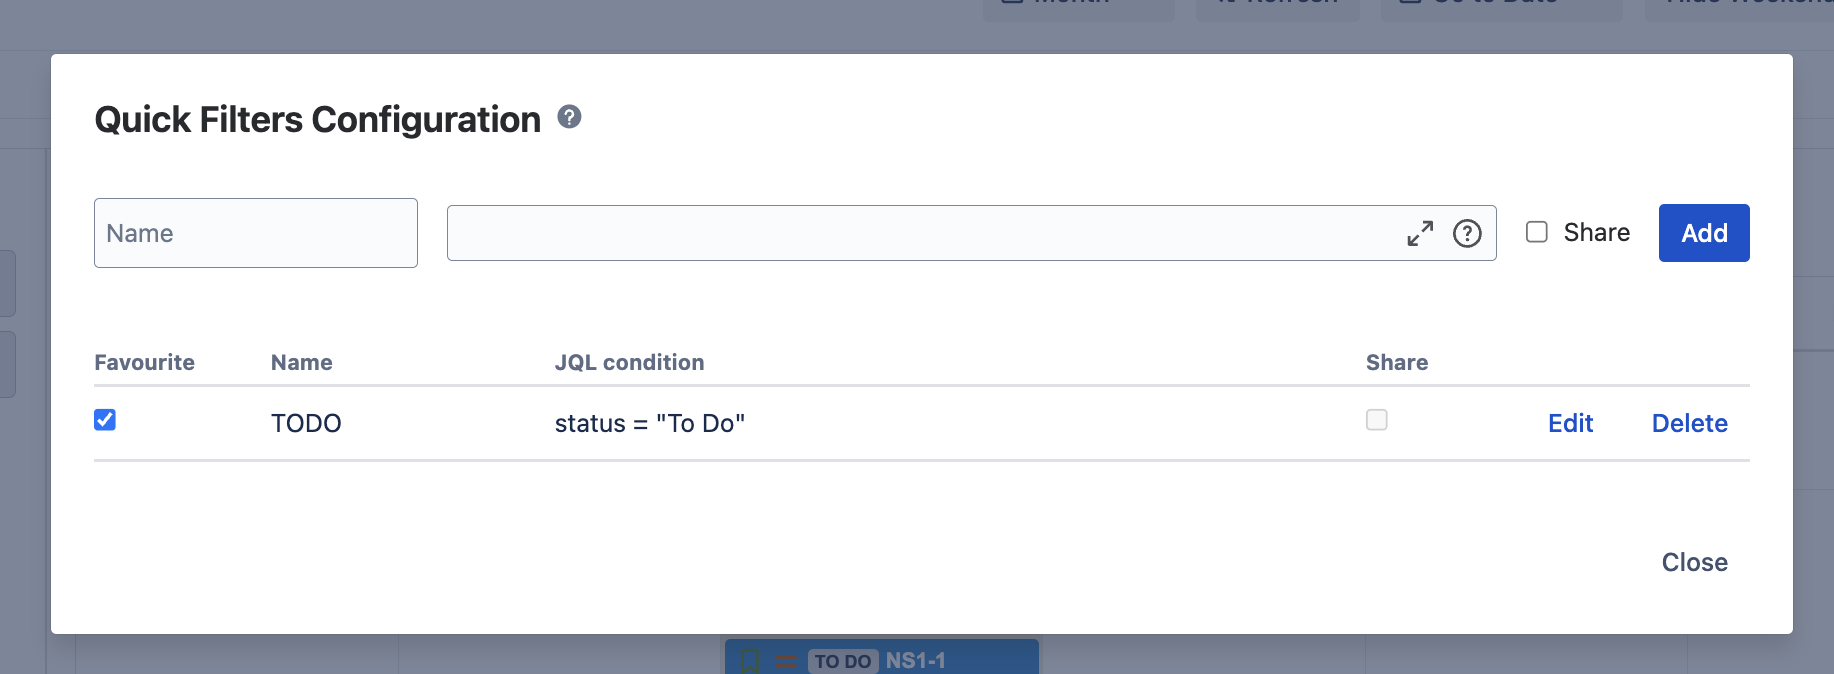
- Click the three dots to the right of the calendar name.
- Click "Configure quick filters" from the menu.
-
Enter required fields:
- Name: The name of the Quick Filter
- Condition: JQL condition to filter events
- Share with other users: Select if other users can use this quick filter
- Click Save to create the filter.
- Enable the filter by clicking the checkbox near the filter name.
- Click Close to exit the configuration.
- Apply quick filter by clicking on it in the calendar view.
Issue Panel — Linked Events Back to top
The Linked Events issue panel allows you to connect calendar events directly to Jira issues. This creates a two-way relationship between your calendar planning and project work, giving teams full visibility into which events are associated with each issue.
Use Cases
- Sprint Planning: Link sprint planning and review meetings to related stories and tasks
- Release Coordination: Connect release milestones and deployment events to related tickets
- Incident Management: Associate post-mortem meetings and follow-up reviews with bug tickets
- Project Milestones: Link milestone events (deadlines, demos, presentations) to epics and deliverables
- Client Meetings: Link client review sessions to the issues being discussed
Enable Linked Events Panel
The panel can be enabled for an individual issue or for all work items in a project.
Enabling the Panel on an Issue
- Open any Jira issue — Navigate to an issue in your project.
- Click the "View app actions" button — Located above the issue title (gear icon), this button provides access to app panels.
- Select "Linked Events" — From the dropdown menu, click on Linked Events to display the panel.
- Panel appears below issue description — The Linked Events panel will now be visible in the main issue view.
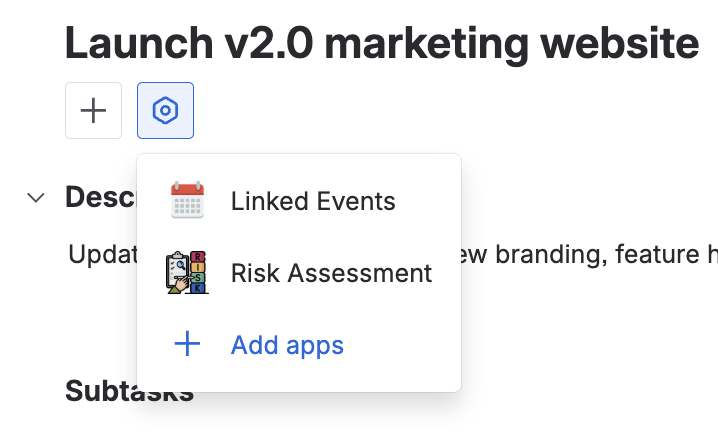
Click the "View app actions" button above the issue title and select Linked Events to enable the panel
Show for All Work Items
To enable the Linked Events panel on every issue in your project at once, use the "Show for all work items" option. This is useful when you want event linking available across your entire project.
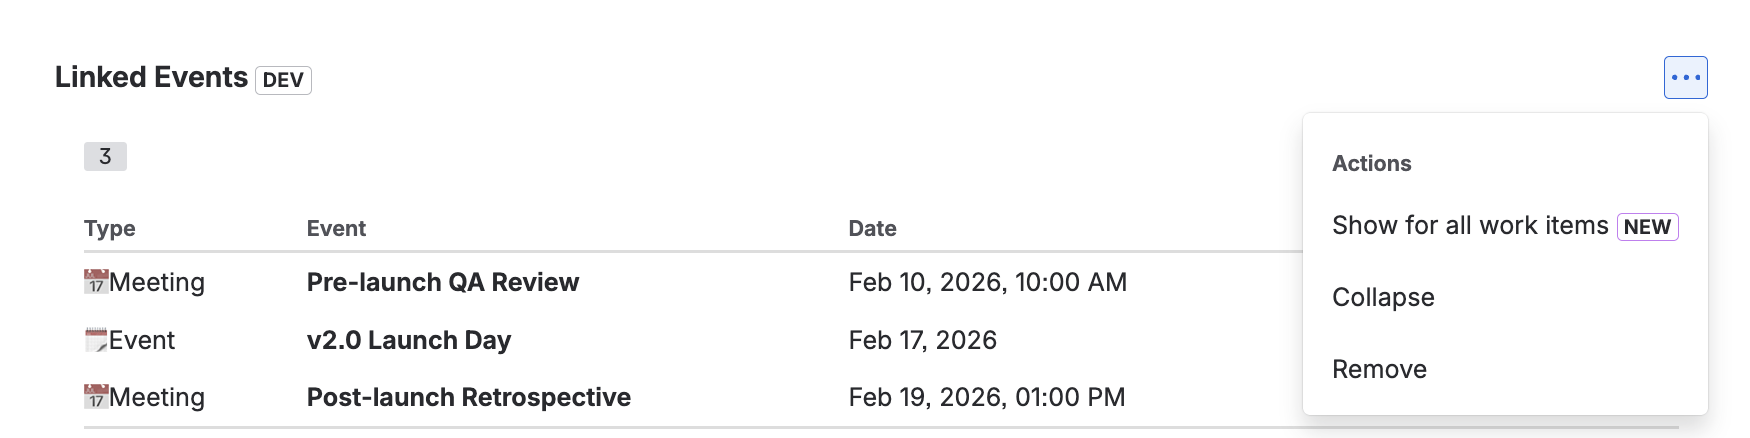
Action menu showing "Show for all work items" option to enable the panel project-wide
- Click the three dots menu (...) on the top right corner of the Linked Events panel.
- Select "Show for all work items" — This will enable the Linked Events panel on every issue in the project.
How It Works
The panel's action menu dynamically shows different options based on the current state:
- Show for all work items: Appears when the panel is not yet enabled globally. Selecting this will display the panel on all work items throughout the project.
- Hide from all work items: Appears after enabling the panel for all work items. Selecting this will hide the panel from all work items in the project.
- Collapse: Minimizes the panel on the current issue while keeping it enabled.
- Remove: Removes the panel from the current issue only.
Using the Linked Events Panel

Linked Events panel showing linked calendar events with type, name, date, and action buttons
The panel displays all events linked to the current issue in a table format showing the event type, event name, date/time, and action buttons.
- Link an existing event — Click the "+ Link" button to search for and link an existing calendar event to the issue.
- Create a new linked event — Click the "+ Create" button to create a new calendar event and automatically link it to the issue.
- View event details — Click "View" on any linked event to open the event details popup.
- Unlink an event — Click "Unlink" to remove the association between the event and the issue (the event itself is not deleted).
Export Calendar to PDF & Excel Back to top
Export your calendar events to PDF or Excel format with customizable date ranges and column selections. This feature allows you to create professional reports of your calendar data including both Jira issues and custom events. The maximum export range is 1 year (365 days).
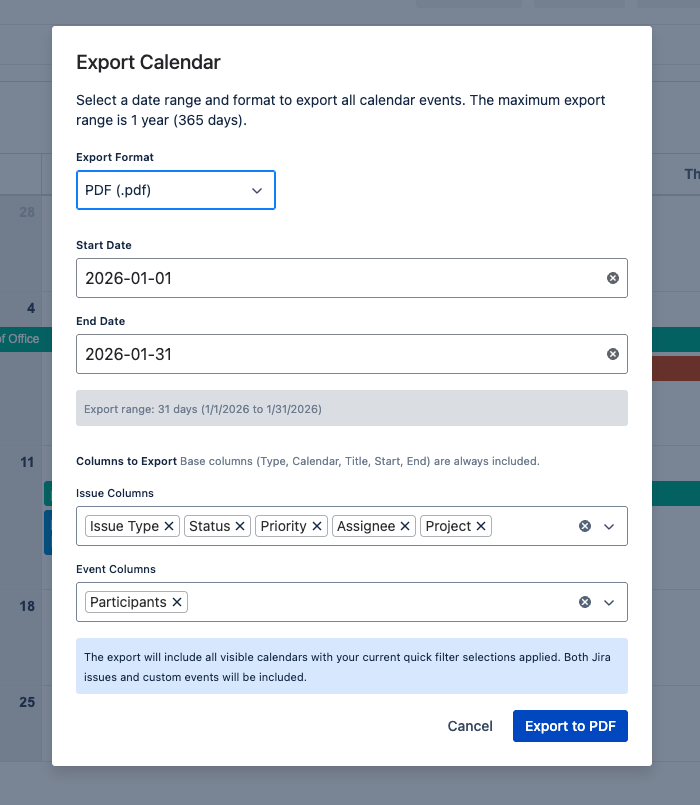
- Click the Export button in the calendar toolbar.
- Select Export Format: Choose either "PDF (.pdf)" or "Excel (.xlsx)" from the dropdown menu.
- Set Start Date: Select the beginning date for your export range.
- Set End Date: Select the ending date for your export range (maximum 365 days from start date).
-
Configure Issue Columns: Select which Jira issue fields to include in the export:
- Base columns (Type, Calendar, Title, Start, End) are always included
- Add additional fields like Issue Type, Status, Priority, Assignee, Project, etc.
- Configure Event Columns: Select which custom event fields to include (e.g., Participants).
- Review Export Range: The dialog shows the calculated export range in days.
- Click "Export to PDF" or "Export to Excel" to generate and download your calendar report.
Export Details
The export includes all visible calendars with your current quick filter selections applied. Both Jira issues and custom events will be included in the report. PDF exports are formatted for easy printing and sharing, while Excel exports provide editable spreadsheets for further analysis and data manipulation.
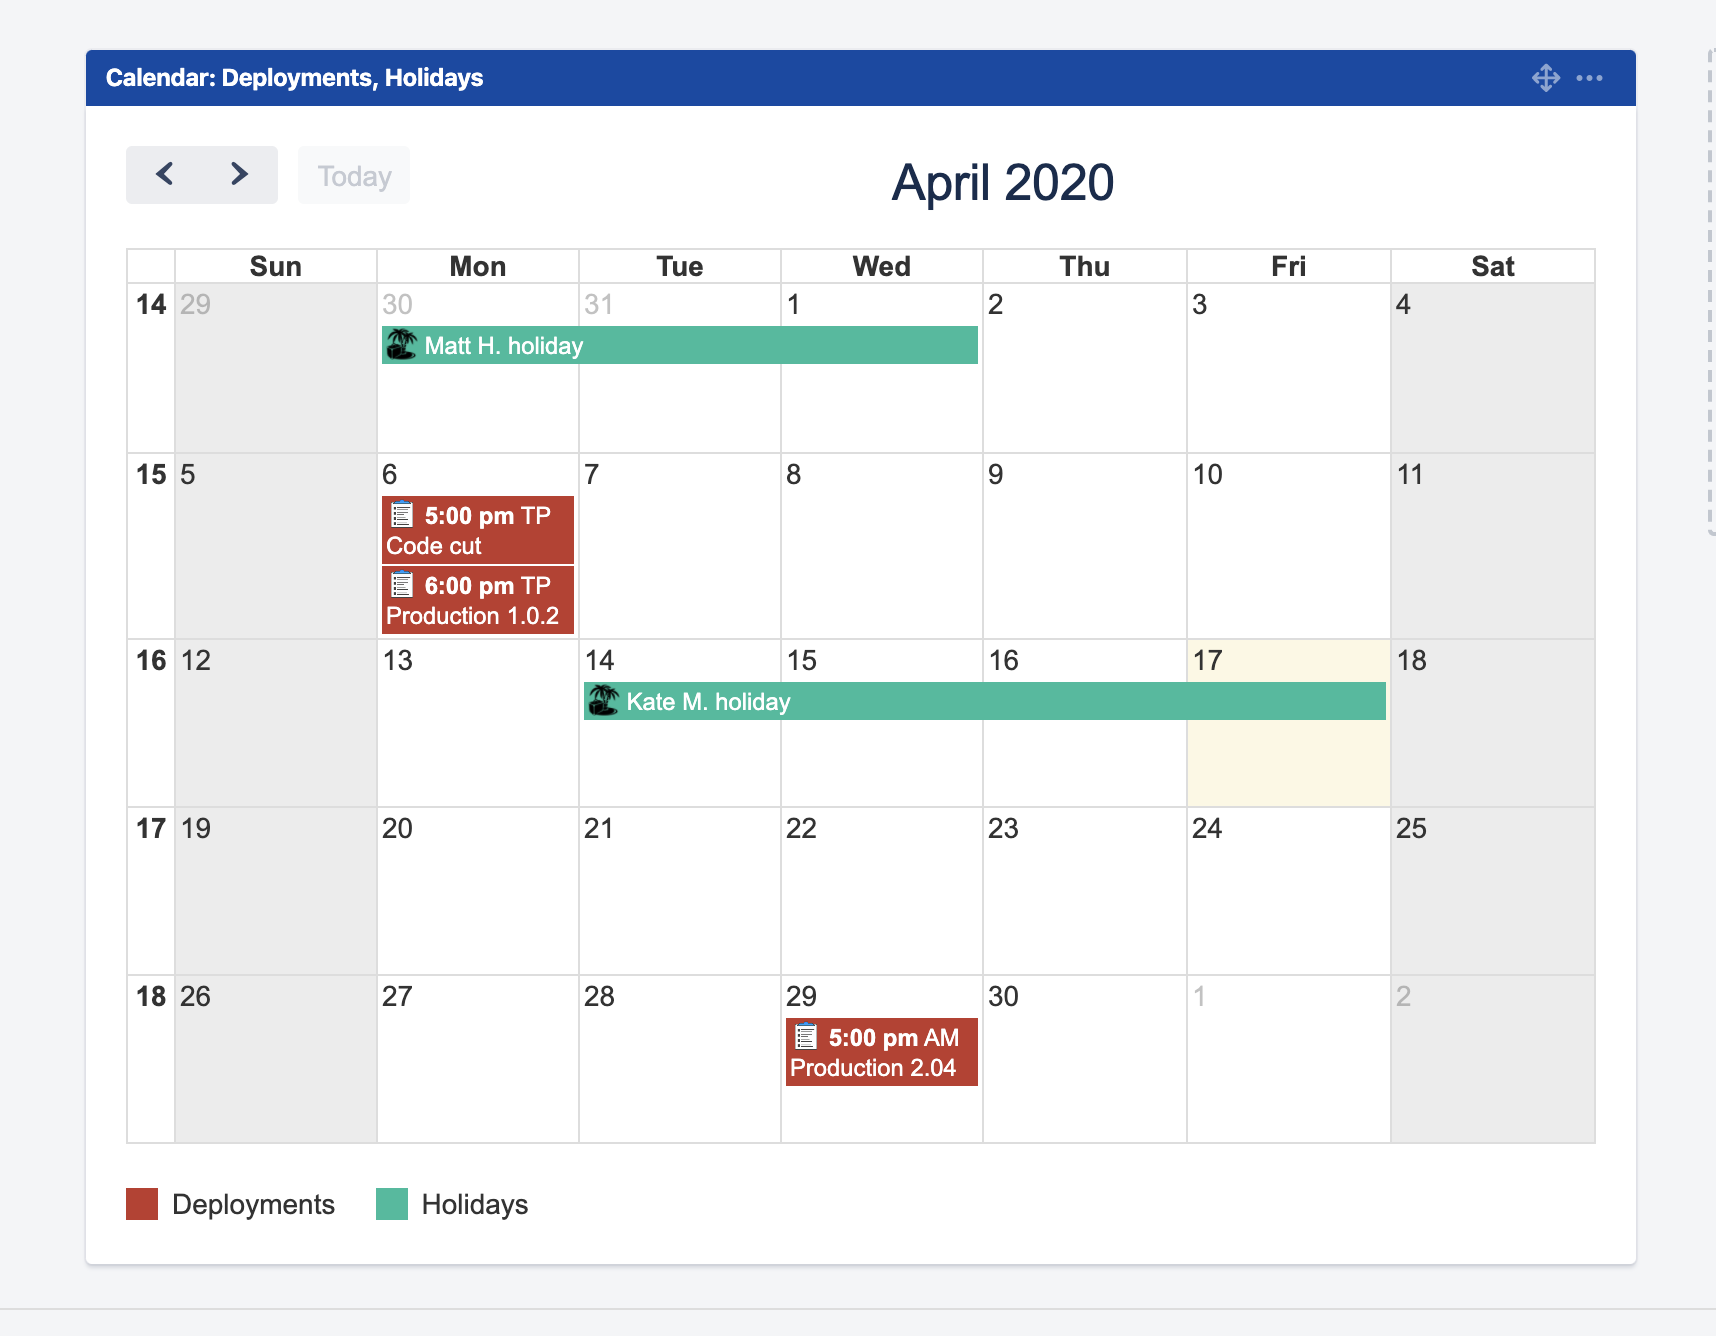
Configure Calendar Gadget Back to top
- Go to the Jira Dashboard where you want to add the gadget.
- Click "Add Gadget" button on the top right corner.
-
Click "Load all gadgets" if the "More gadgets available" popup appears.

-
Find "Flexible Calendar" gadget and click "Add Gadget" button.

-
Configure the gadget:

- Calendars: Select calendars that should be displayed
- Scope: Choose the calendar scope (Month, Week, Day, etc.)
- Weekends: Display weekends on the calendar or not
- Display Mode: Switch between Full and Compact views. Full mode shows complete event details, while Compact mode displays only the event name and linked Jira issue key with its summary
- Click Save to add the gadget to your dashboard.
Upcoming Events Gadget Back to top
View upcoming events directly on your Jira dashboard. This gadget displays events from selected calendars in a convenient list format, helping you stay on top of your schedule without navigating away from your dashboard.
- Go to the Jira Dashboard where you want to add the gadget.
- Click "Add Gadget" button on the top right corner.
- Find "Upcoming Events" gadget and click "Add it now" button.
-
Configure the gadget:
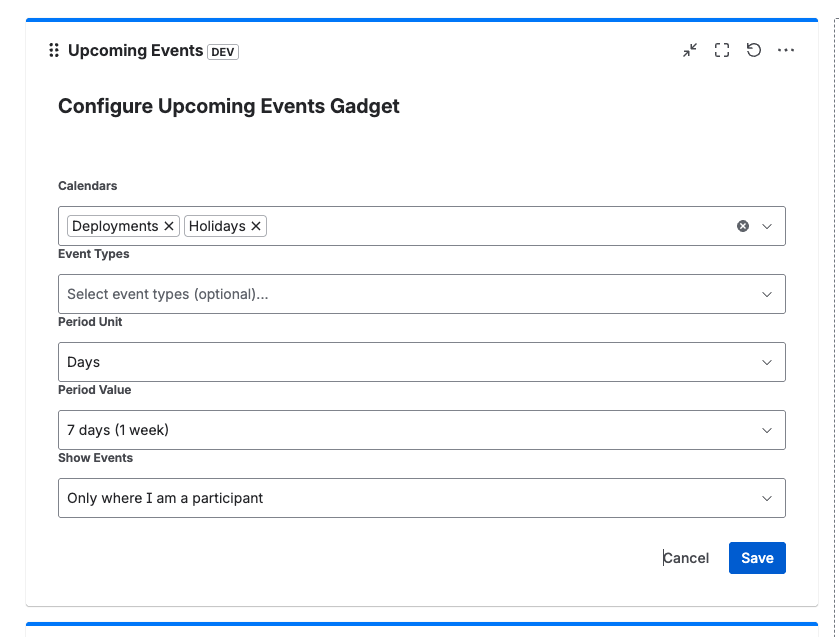
- Calendars: Select one or more calendars to display events from
- Event Types: Filter by specific event types (optional)
- Period Unit: Choose the time unit (Days, Weeks, Months)
- Period Value: Set how far ahead to display events (e.g., 7 days, 1 week)
- Show Events: Choose to show all events or only events where you are a participant
- Click Save to add the gadget to your dashboard.
-
View your upcoming events:
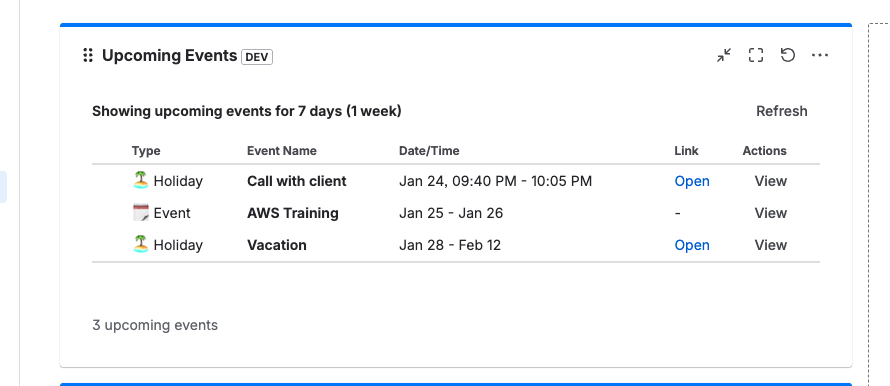
The gadget displays events in a table format showing the event type, name, date/time, and action buttons. You can click "View" to see event details or "Open" to access linked Jira issues.
Admin Configuration Back to top
Configure global settings for working days, business hours, and group visibility. These settings apply to all calendars and control access to the Flexible Calendar.
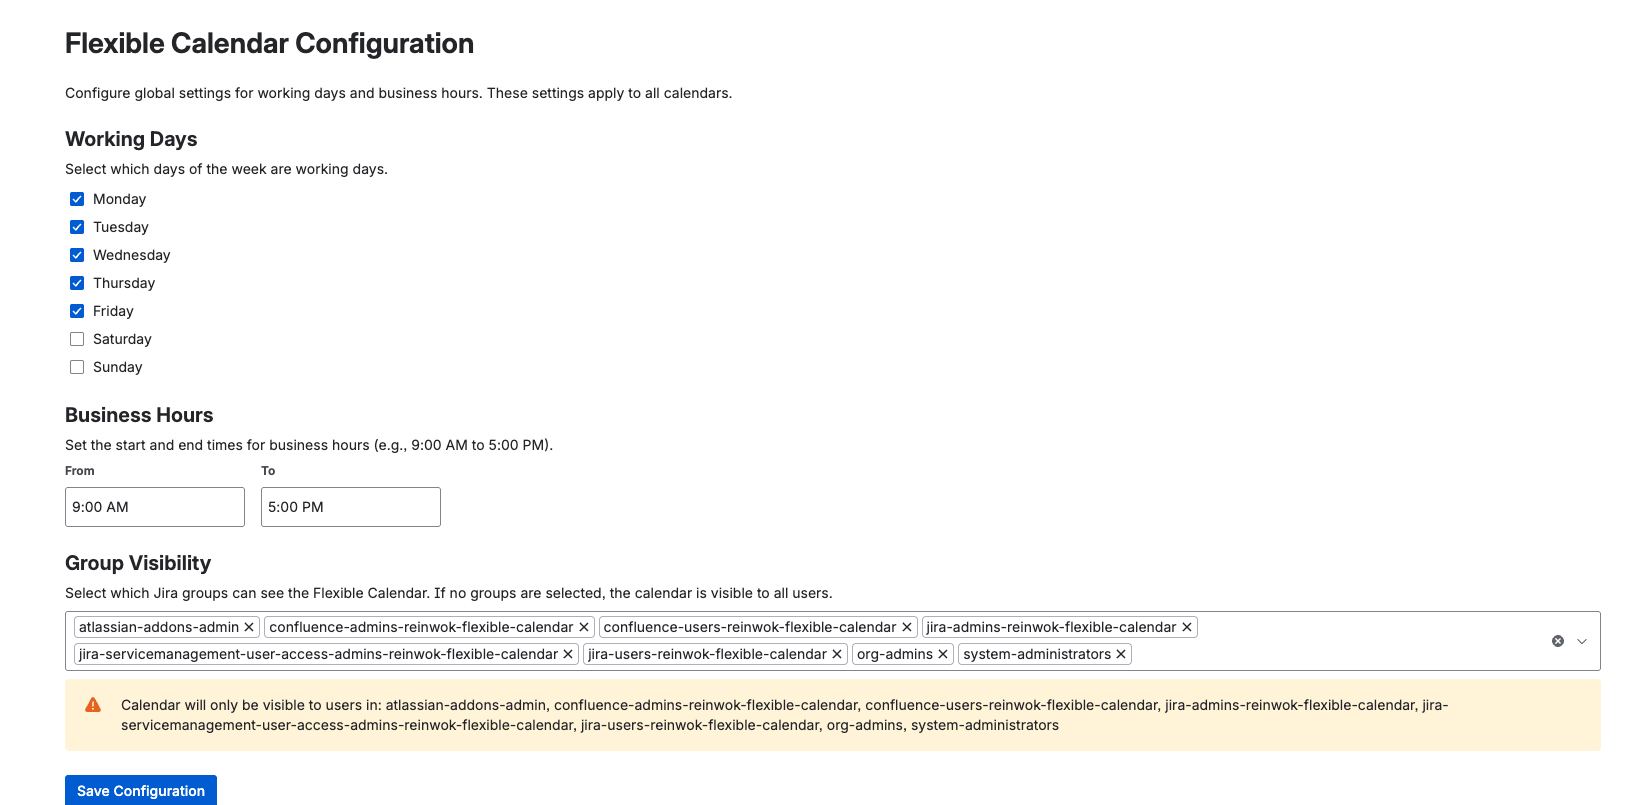
- Navigate to Flexible Calendar Configuration: Access the global configuration page from Jira settings.
- Configure Working Days: Select which days of the week are working days (Monday through Sunday).
- Set Business Hours: Define the start and end times for business hours (e.g., 9:00 AM to 5:00 PM).
-
Configure Group Visibility: Select which Jira groups can see the Flexible Calendar:
- If no groups are selected, the calendar is visible to all users
- Add specific groups to restrict calendar visibility to only those group members
- Multiple groups can be selected to grant access to users in any of the selected groups
- Review Warning: The system will display which groups have access to the calendar.
- Click "Save Configuration" to apply the global settings.
Important Notes
Group visibility settings are global and apply to all calendars. This is different from individual calendar permissions which control what actions users can perform on specific calendars. Group visibility determines whether users can see the Flexible Calendar feature at all.
Need Help?
If you have questions or need assistance with Flexible Calendar for Jira Cloud, our support team is here to help.
Contact Support