Introduction
Calendar for Jira (Resource Timeline & JSM Calendar) Data Center is a comprehensive calendar planning solution designed for project managers, event planners, HR managers, and anyone who needs a more visual approach to calendar planning. Our straightforward interface and easy-to-use platform set us apart from other calendar planners, making it simple to manage tasks, events, and resources in Jira.
Create New Calendar Back to top
- Click "Add Calendar" in the upper right corner of the screen, then choose create.
-
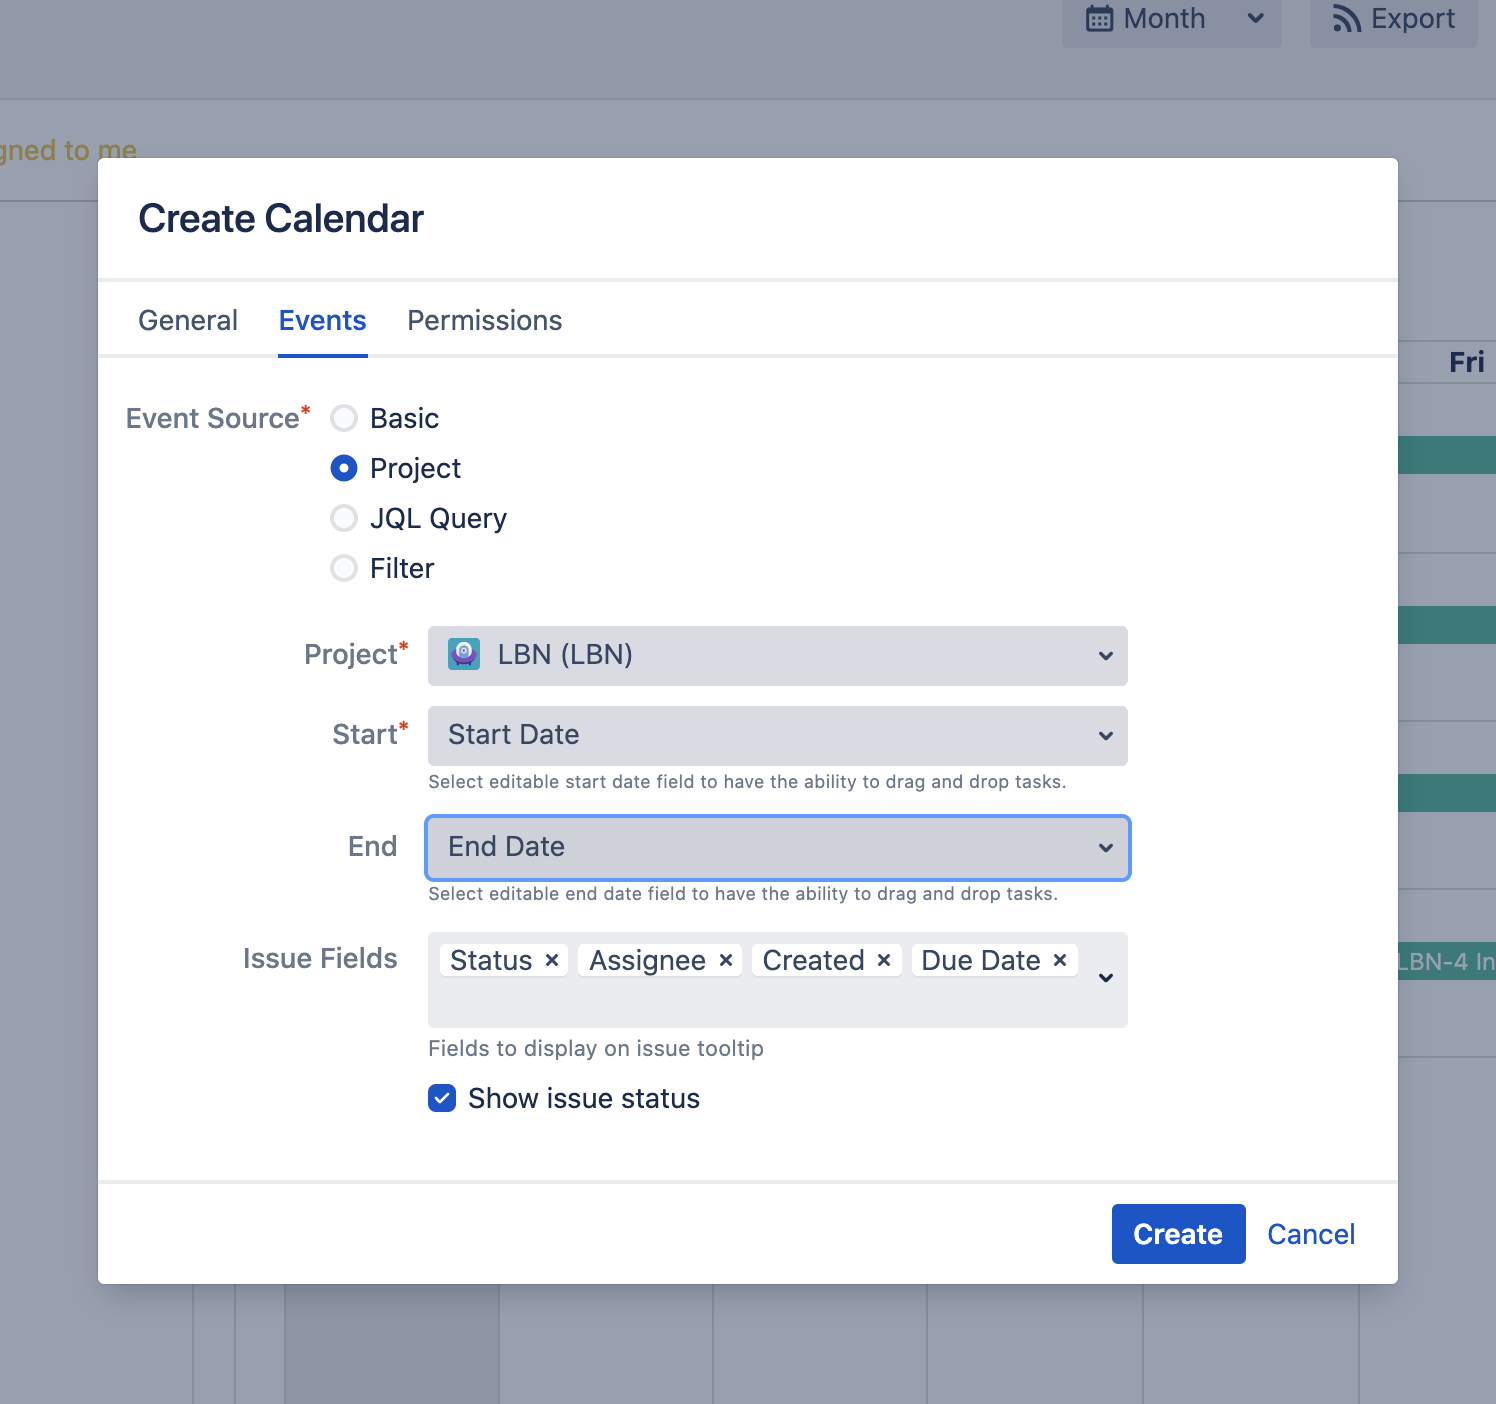
Enter required information about your Calendar:
- Name: The name of your calendar will be used when displayed in the list of calendars, when searching, and so on
- Color: Events or Issues on the calendar will be painted in this color
- Basic: In this mode, it is possible to display and create only custom events
- Project: In this mode, you can select a specific project to display tasks
- Filter: Creating a calendar via the Jira filter
- JQL query: Creating a calendar via the JQL query
- Issue Fields: JIRA fields that should be displayed on issue card
- Start: Start day field of Jira task (can be Jira system or custom field)
- End: End day field of Jira task (can be Jira system or custom field). If empty, any task will be displayed for a duration of one day
Note: Select editable start and end date fields to enable drag and drop functionality for tasks. Depending on field types (date only or date time), events will be scheduled as All Day or not. - Click Create to finalize your new calendar.
Add Existing Calendar Back to top
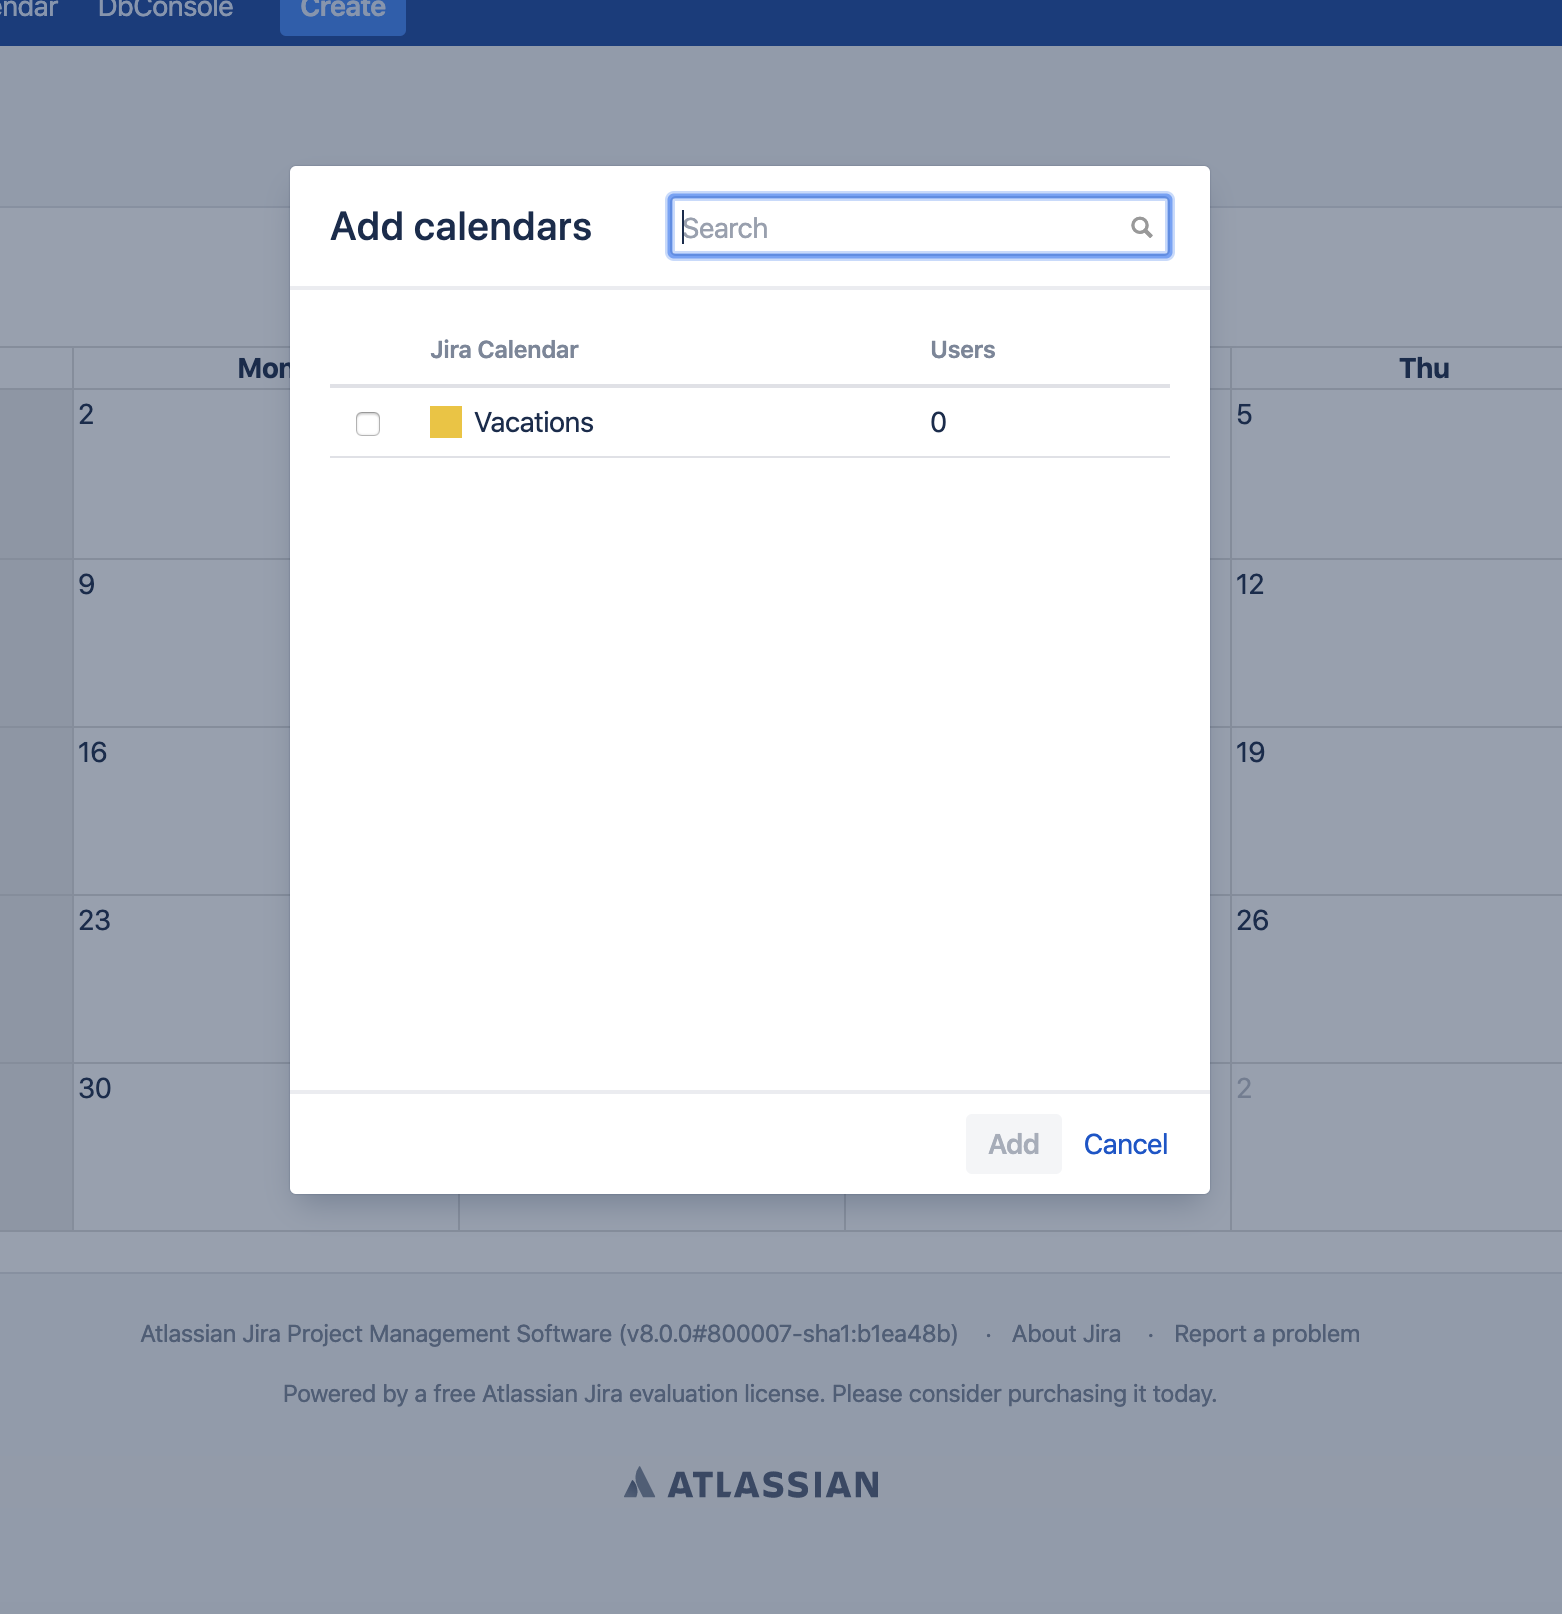
- Click "Add Calendar" in the upper right corner of the screen, then choose add existing.
- Select existing calendar from the list (all calendars to which you have permission are displayed).
- Click Add to add the calendar to your view.
Subscribe to External Calendar Back to top
Subscribe to external calendars from Google Calendar, Outlook, Apple Calendar, and any other application that provides an ICS feed URL. Centralize all your events in one place within Jira.
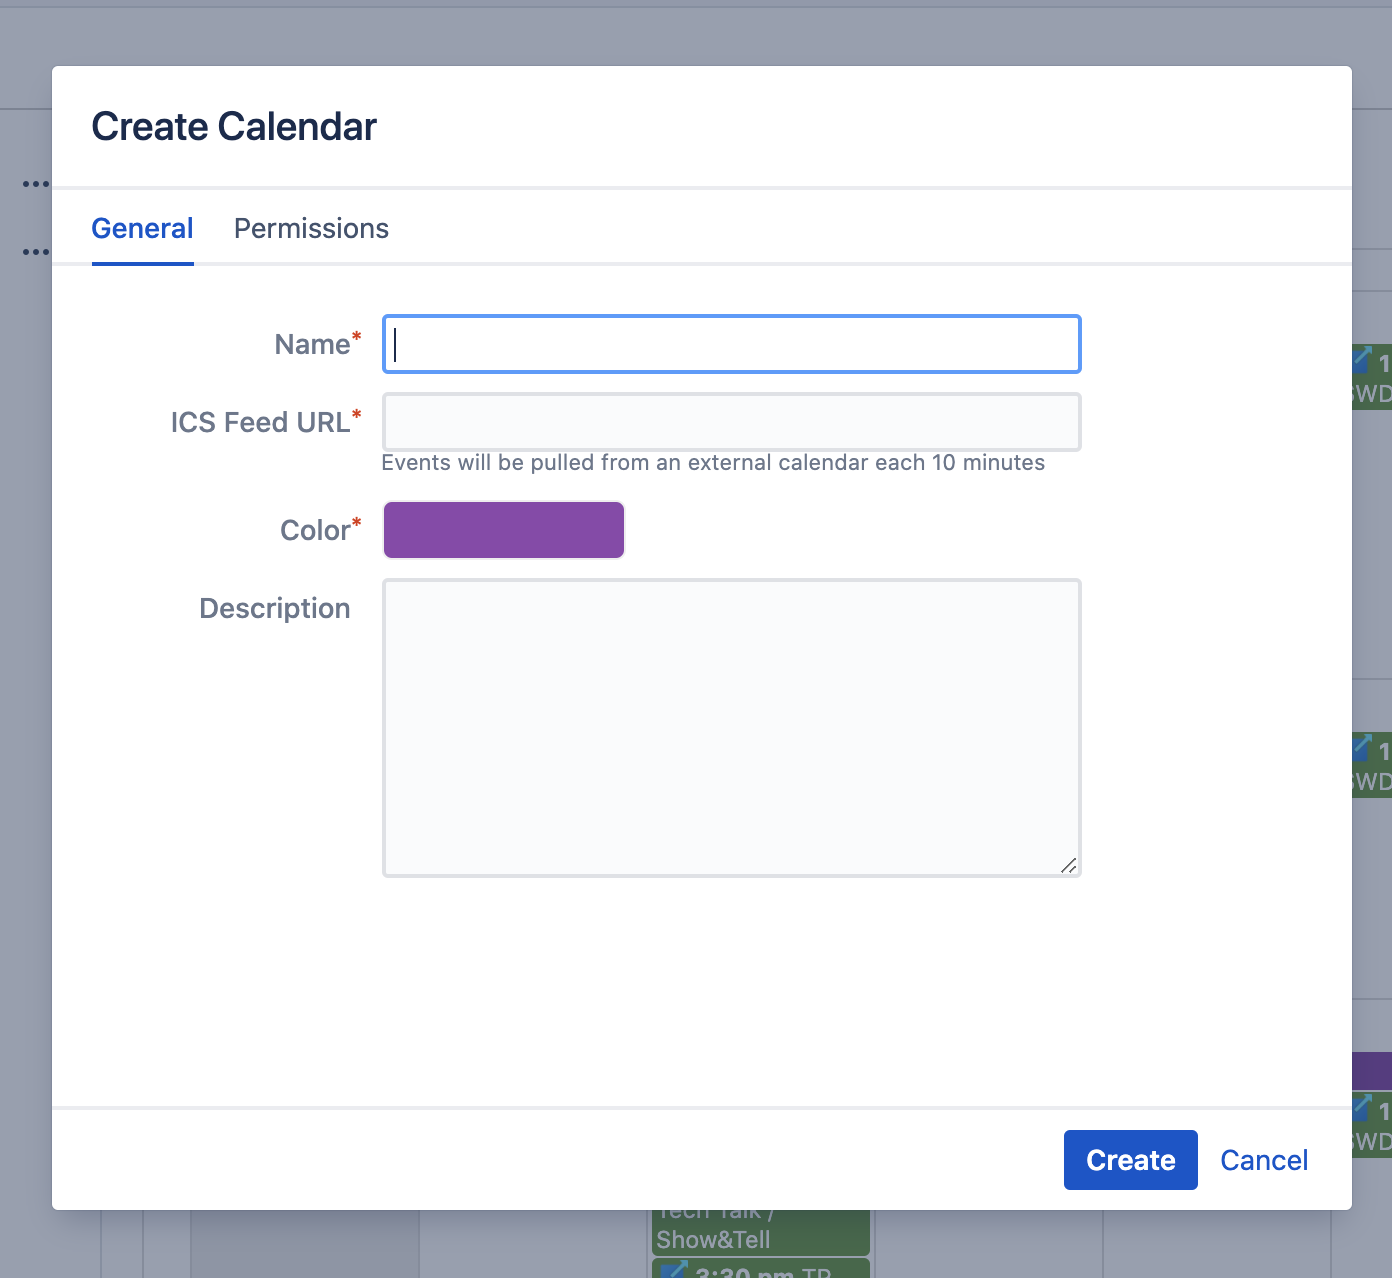
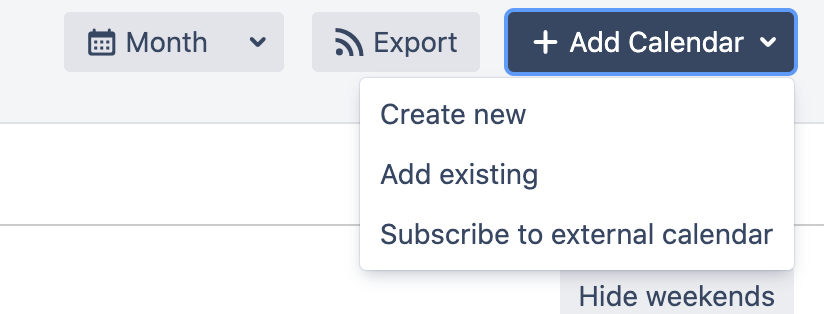
- Click "Add Calendar" in the upper right corner, then choose "Subscribe to external calendar".
-
Enter required information:
- Name: The name of your calendar for display purposes
- ICS Feed URL: The URL to the external calendar
- Color: Events from the external calendar will be painted in this color
Note: Events will be pulled from the external calendar every 10 minutes automatically. - Click Create to subscribe to the external calendar.
Automatic Sync
External calendars are automatically synchronized every 10 minutes. Any changes made in the source calendar (Google Calendar, Outlook, etc.) will be reflected in Jira after the next sync cycle. External calendar events are read-only within Jira.
Create New Event Types Back to top
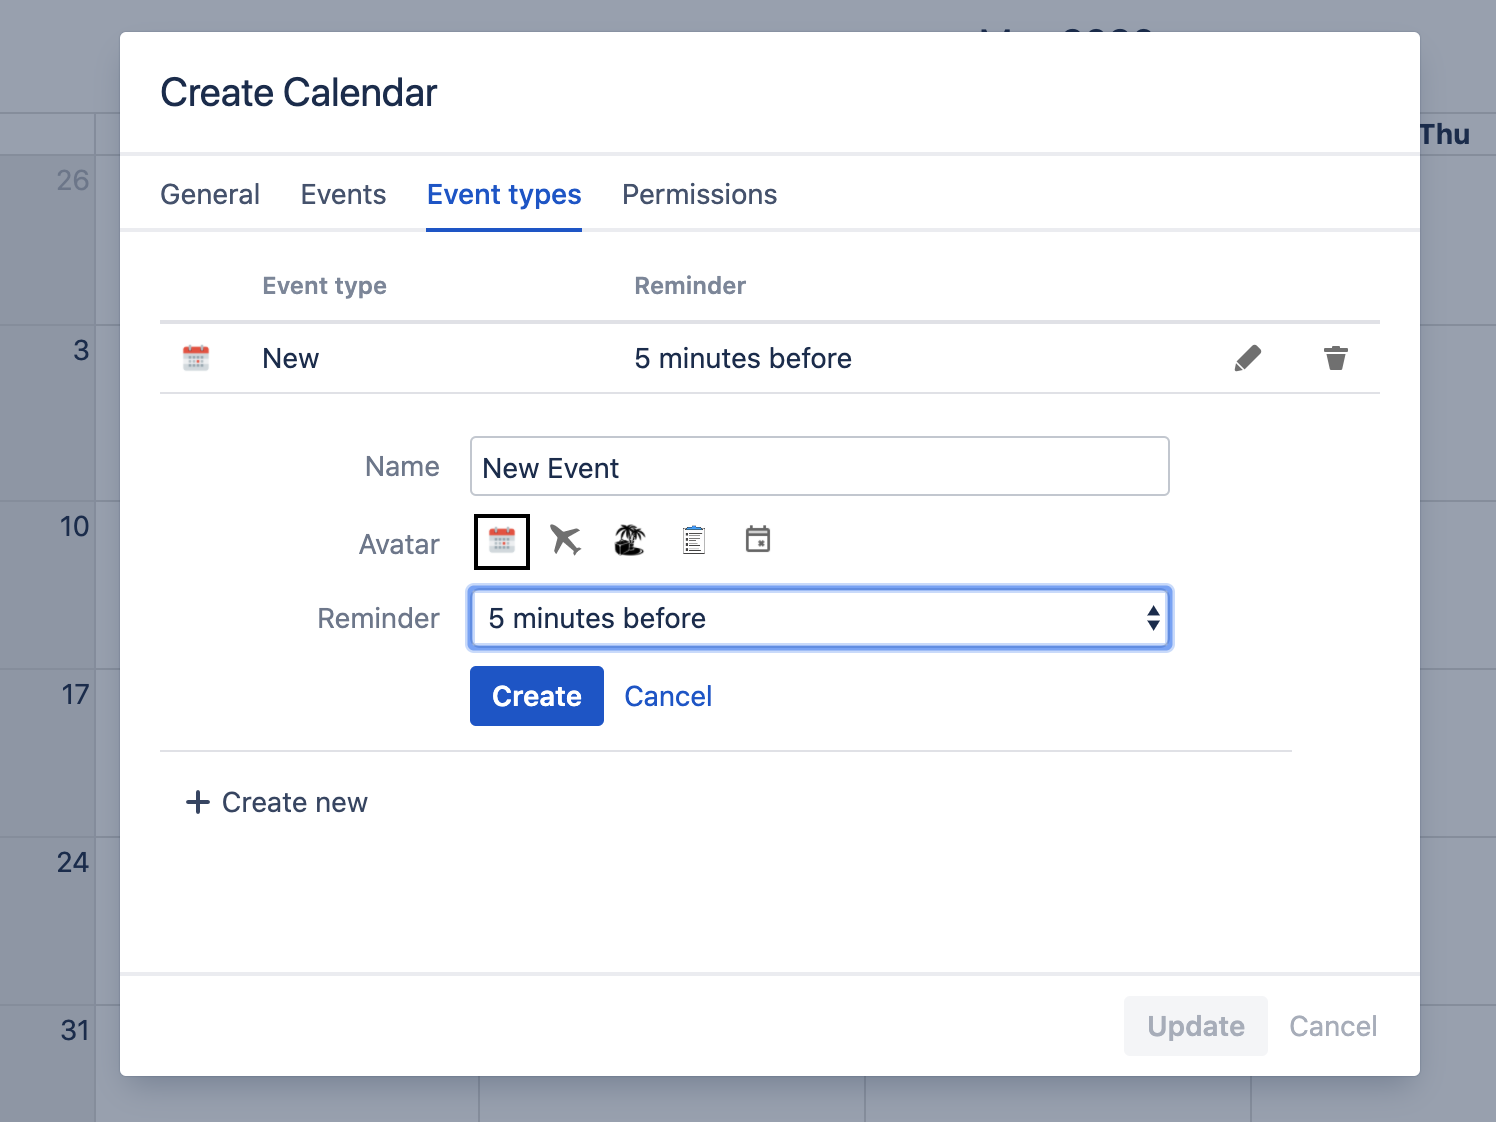
- Click the three dots to the right of the calendar name for which you want to create a new event type.
- Open "Event Types" tab in the calendar settings.
- Click "Add new Event" button to create a new event type.
-
Enter required fields:
- Name: The name of the Event Type
- Icon: Icon to represent this Event Type
- Reminder: Select a time before which event participants should be notified about event start
- Click Create to save the new event type.
Create New Event Back to top
Double-click on the calendar day block where you want to create an event. The Create event dialog will open with the following fields:

- Calendar (required) — Select the calendar on which the event will be created.
- Type (required) — Choose the event type from the dropdown. You can add new event types in the calendar settings.
- Name (required) — The event title that will be displayed on the calendar.
- Link (optional) — A hyperlink to more information, such as an external page or document.
- Linked Issues (optional) — Search and select one or more Jira issues to associate with this event. Linked issues create a two-way connection — the event will also appear in the issue's Calendar Events panel.
- All day — Check this to create an all-day event, or leave unchecked to specify exact start and end times.
- Start / End (required) — Set the date and time for the event.
- Participants (optional) — Select Jira users who will participate in the event.
- Reminder (optional) — Set a reminder notification before the event starts.
- Description (optional) — Add a rich-text description with formatting, images, and links.
- Click Create to save the event.
Create Recurring Events Back to top
- Double-click on the calendar day block.
- Select the calendar on which the event will be created.
- Type the name of your event.
- Select the event type from the Type drop-down.
- Choose All Day option if applicable.
- Specify start and end dates for your event.
- Select participants for the event.
- Select recurrent mode from the "Repeat" dropdown.
- Specify recurrence rule (daily, weekly, monthly, etc.).
- Click Create to save the recurring event.
Calendar Events on Issue View Back to top
The Calendar Events panel on the Jira issue view displays all calendar events linked to that issue. You can view event details, unlink events, or link new events directly from the issue.
Viewing Linked Events
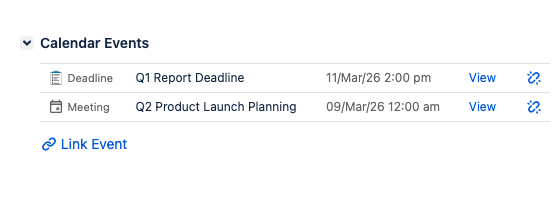
The "Calendar Events" section on the issue view shows all linked events with their type, name, date/time, and quick actions to view or unlink each event.
Link an Event from the Issue View
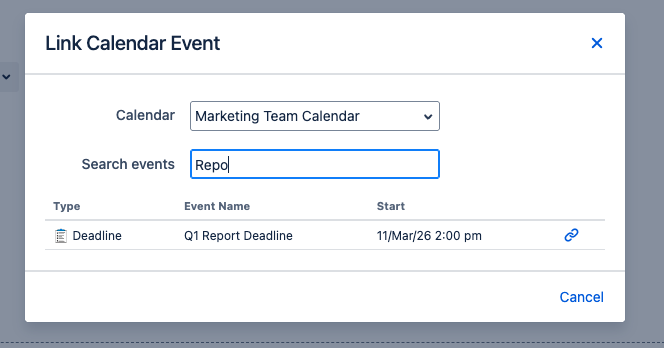
- Open the Jira issue you want to link a calendar event to.
- Find the "Calendar Events" section in the issue panel.
- Click "Link Event" to open the link dialog.
- Select a calendar from the Calendar dropdown.
- Search for the event by typing in the "Search events" field. Matching events will appear below.
- Click the link icon next to the event you want to link.
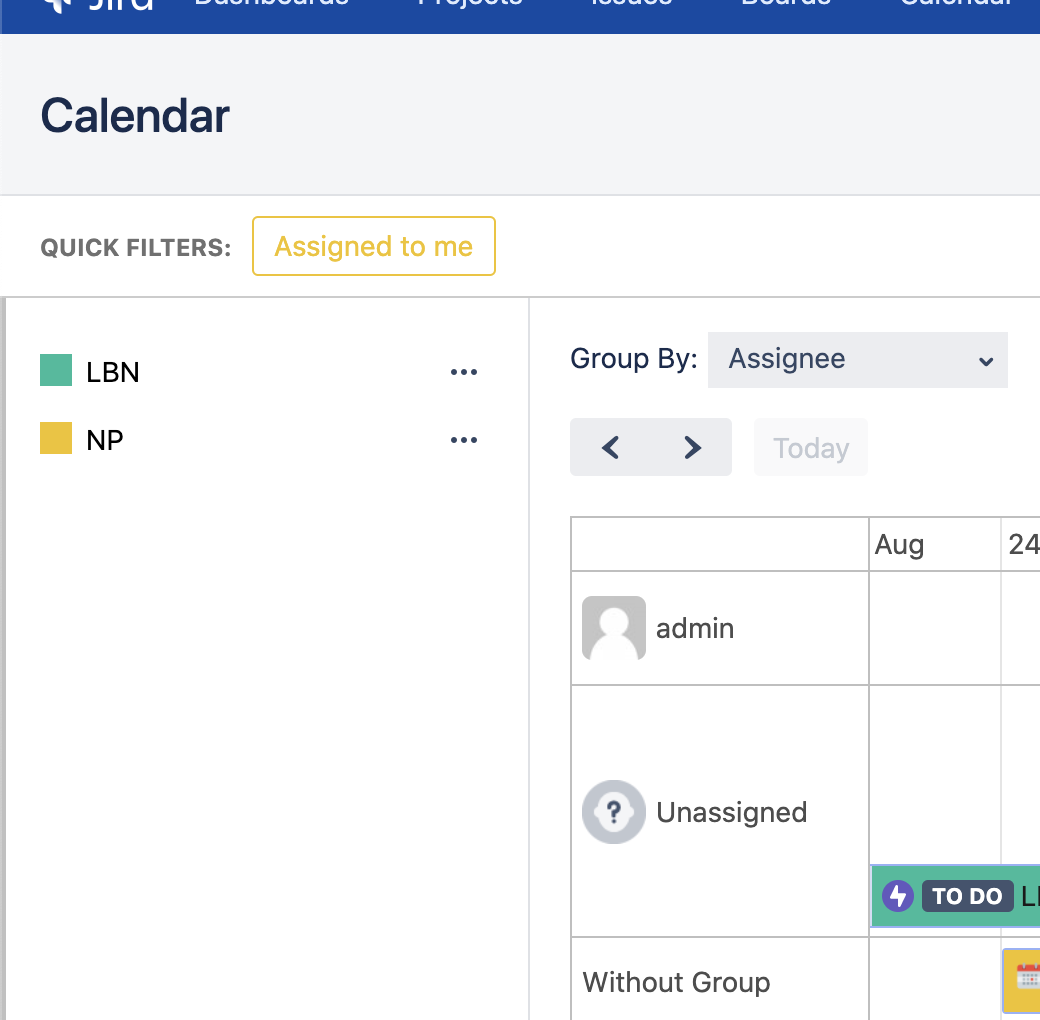
Timeline View Back to top
Timeline view allows you to visualize tasks in a horizontal timeline format with powerful grouping options.
Group Tasks by Project

Group Tasks by Issue Type
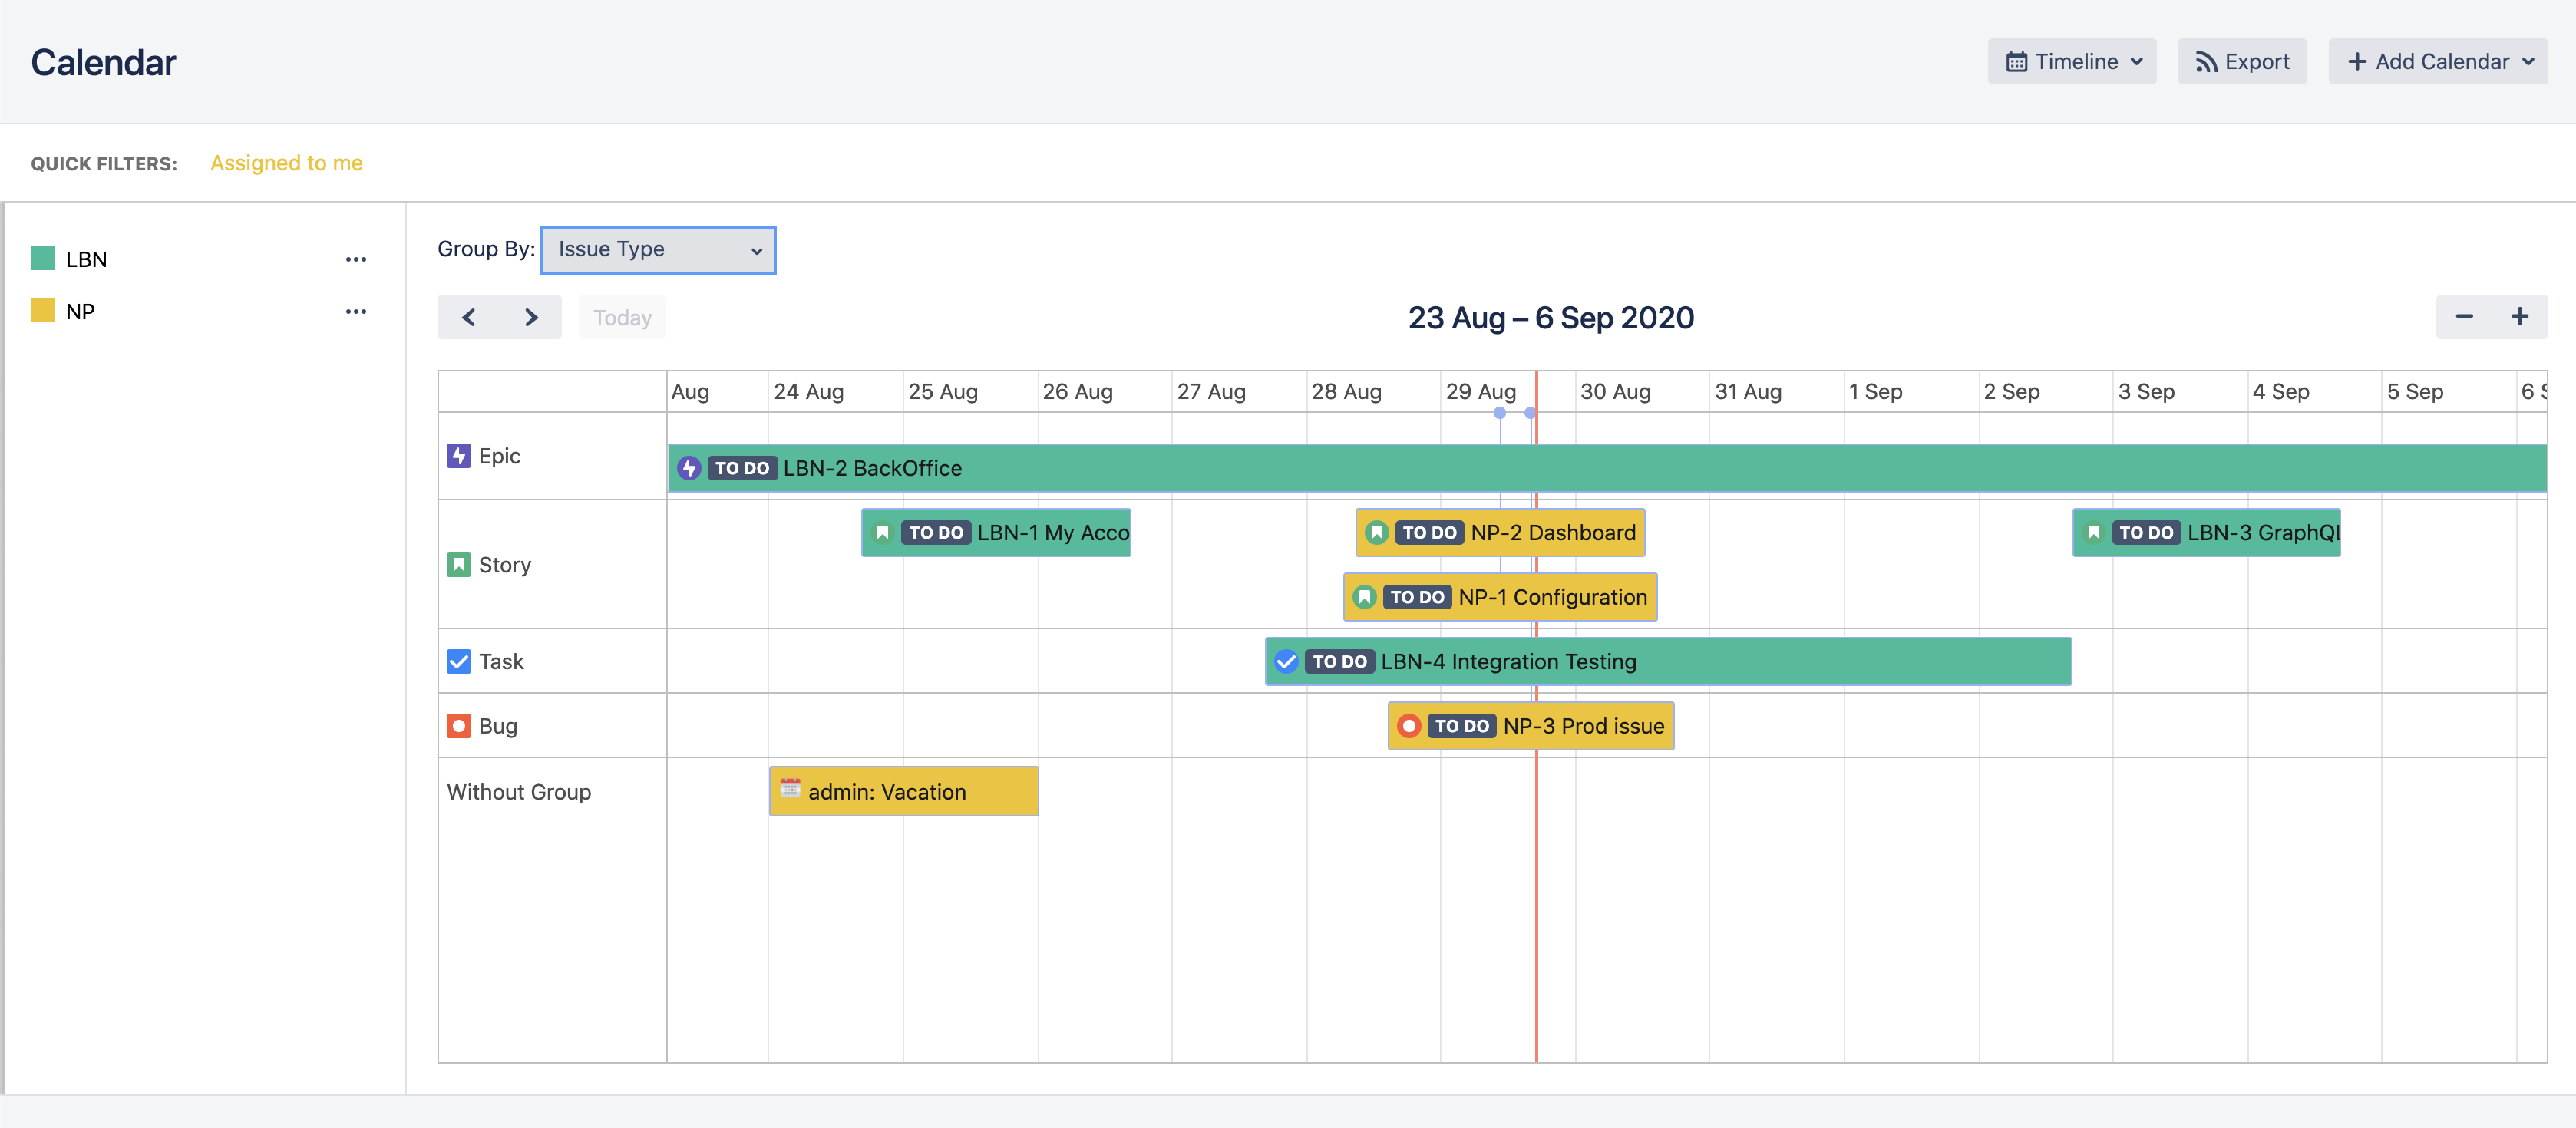
Group Tasks by Assignee

- Click on "Views" dropdown on the top right corner.
- Select Timeline from the available views.
- Select "Group By" field from the dropdown (custom events display in the "Without Group" section).
- To drag and drop events in timeline view, click on the event first
- Change timeline scope using + and - buttons at the right of the calendar header
- Create new events by clicking the three dots next to the calendar name and selecting "New Event"
Agenda View Back to top
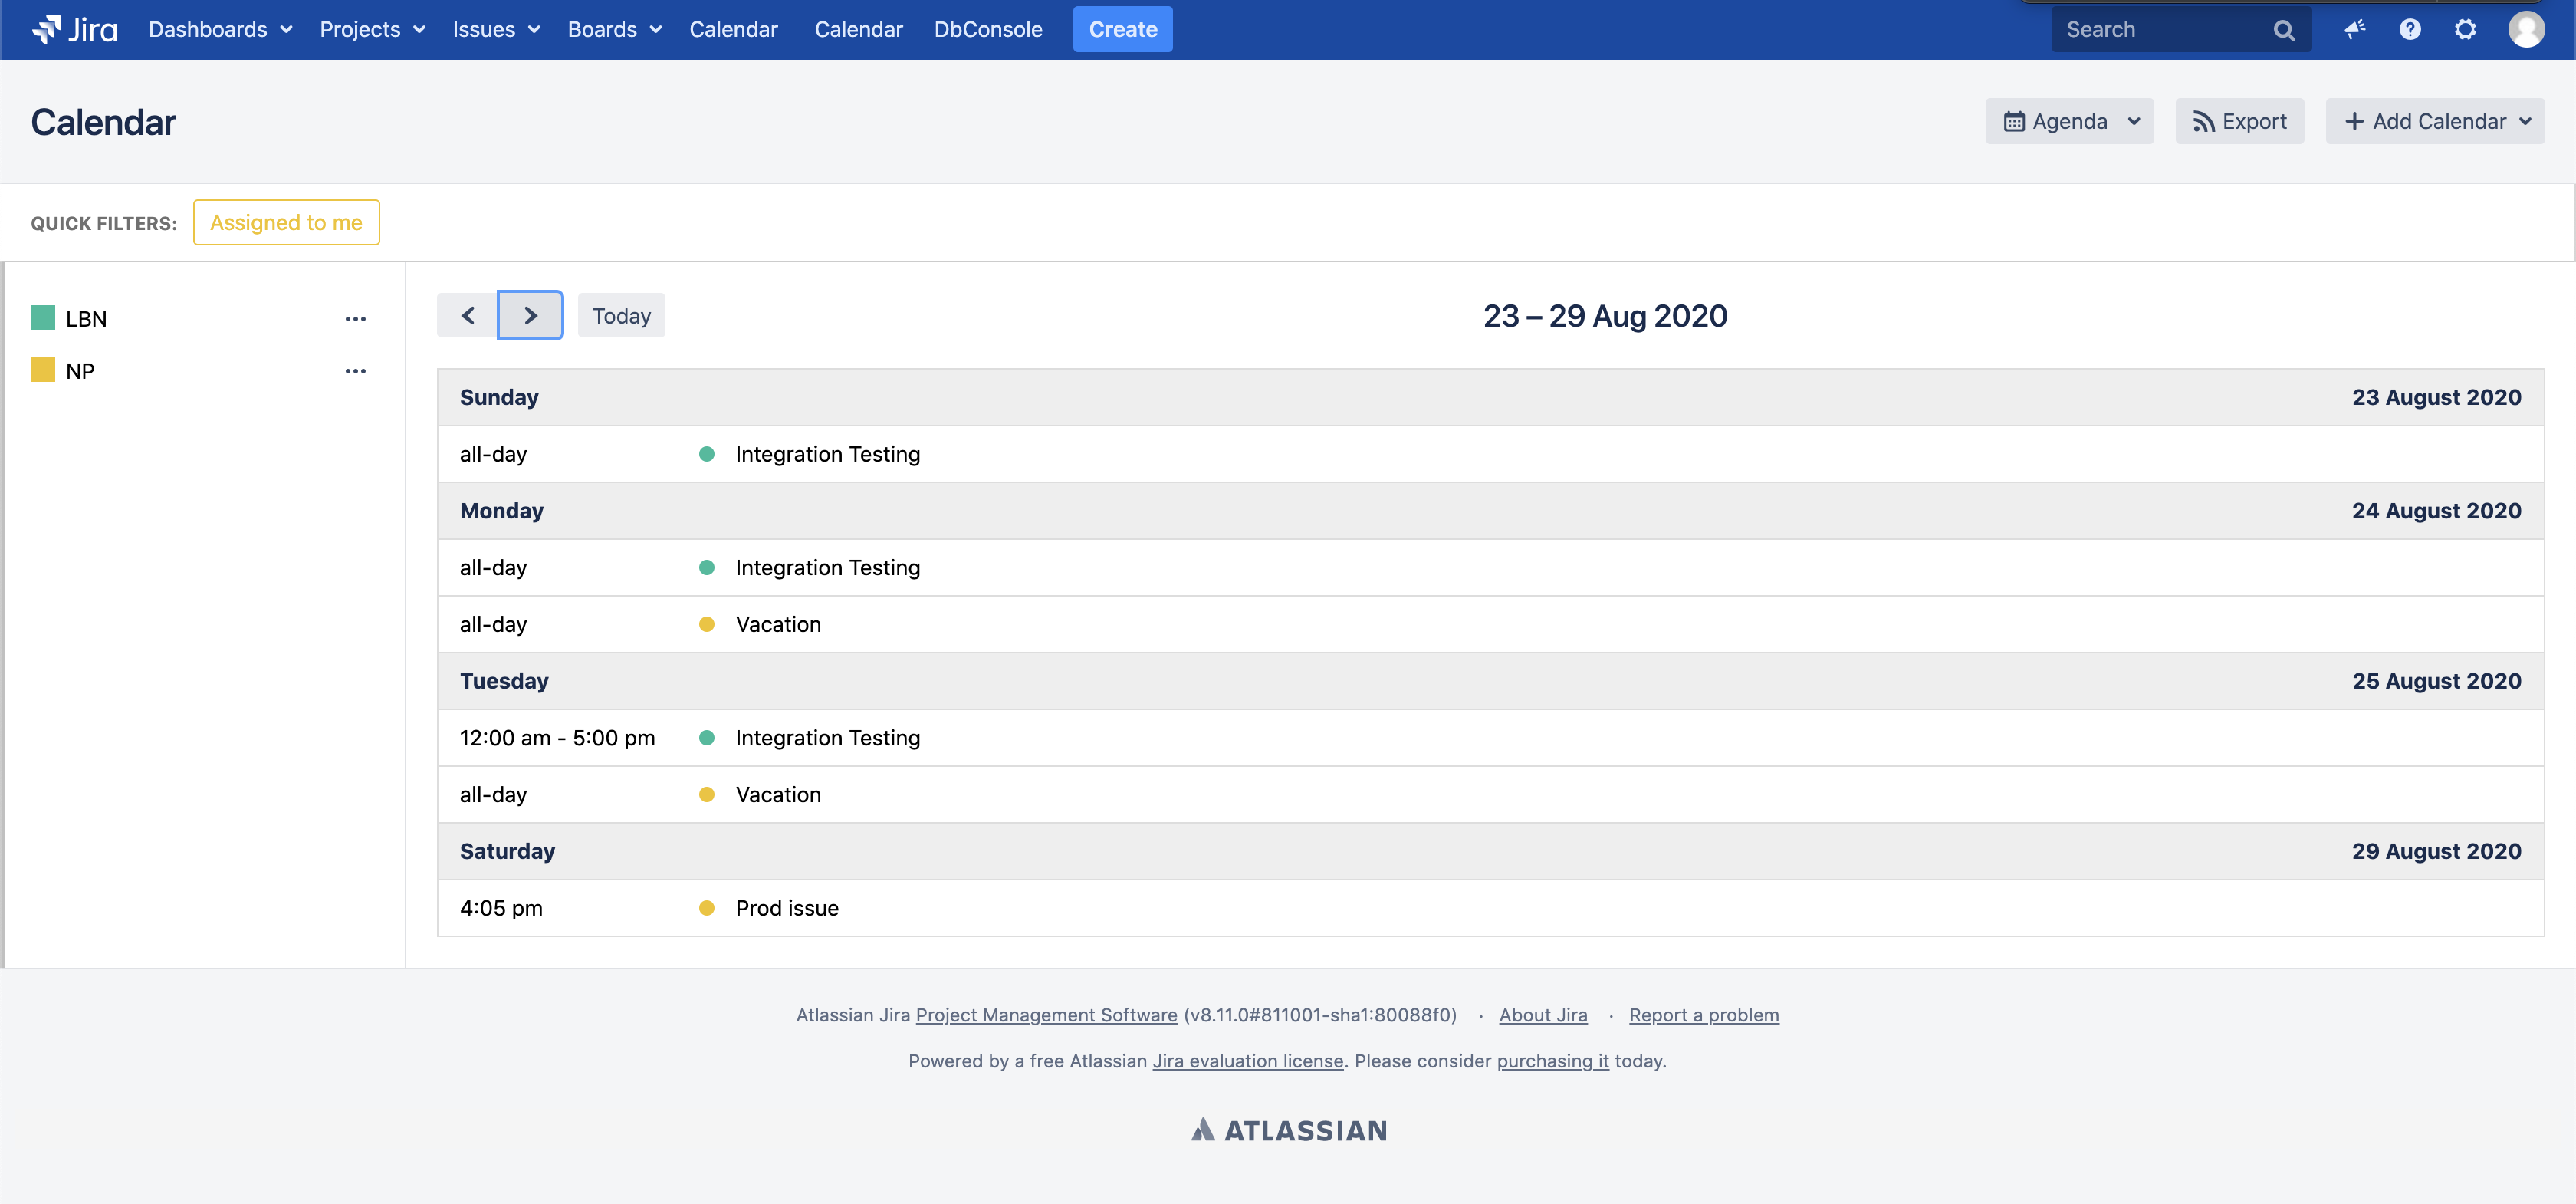
- Click on "Views" dropdown on the top right corner.
- Select Agenda to view your events in a chronological list grouped by day.
Calendar Permissions Back to top
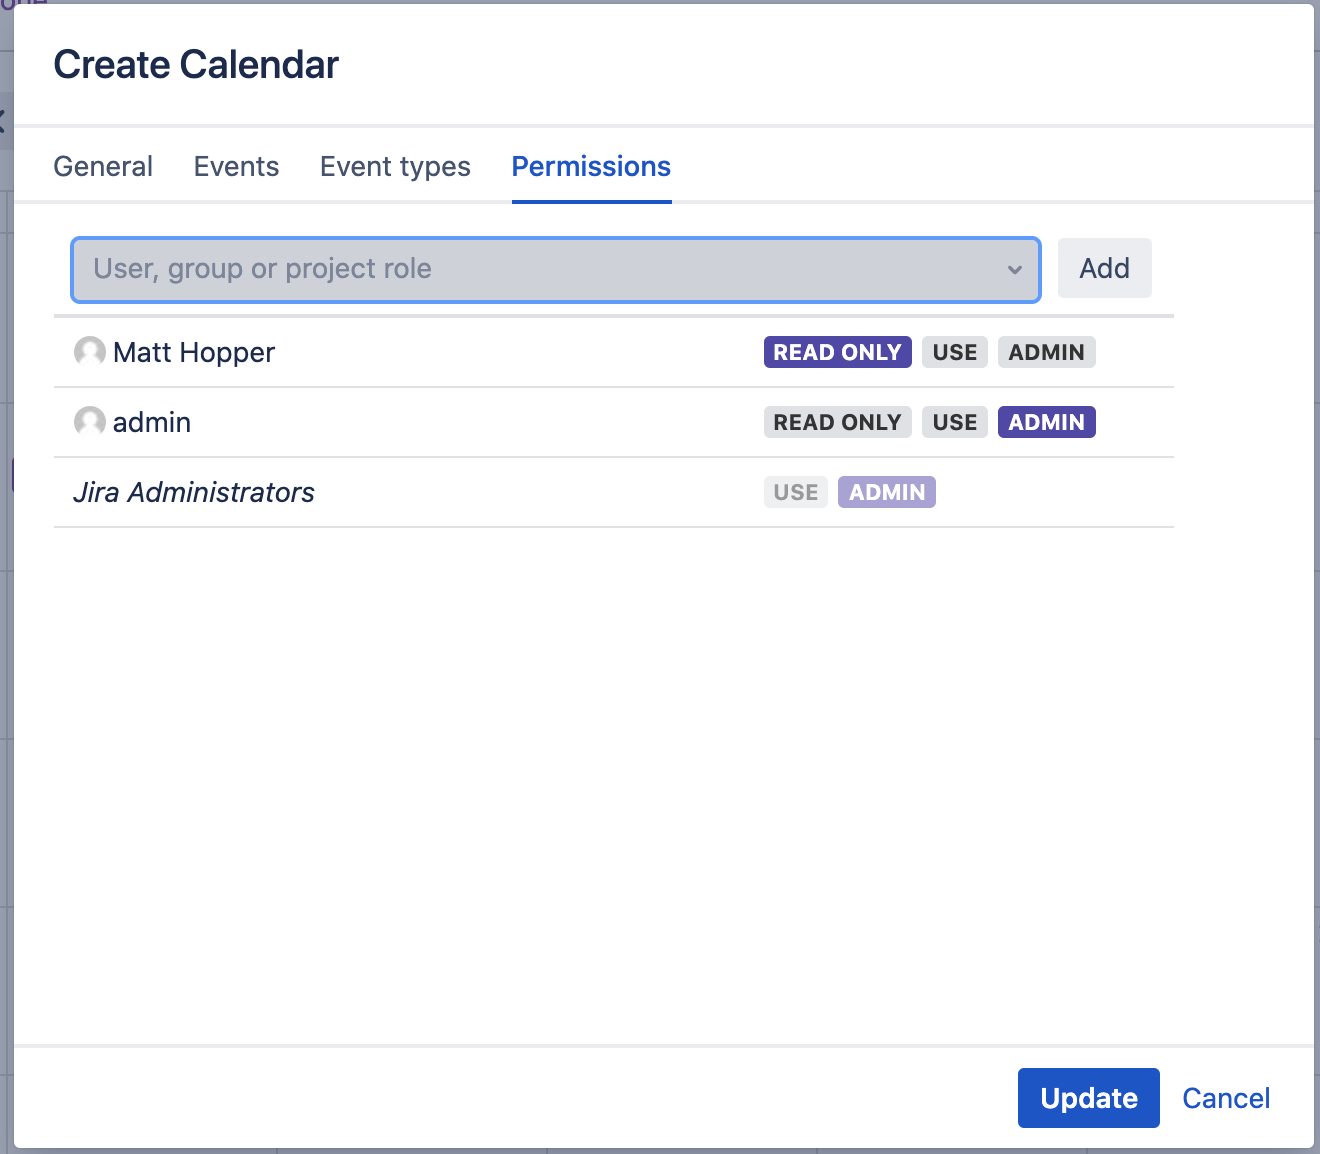
- Click the three dots to the right of the calendar name you want to configure.
- Click Edit button to open calendar settings.
- Open "Permission" tab in the settings dialog.
-
Choose users or groups and assign permission levels:
- ADMIN: All possible actions are allowed
- USE: All actions allowed except calendar edit and new event types creation
- Read Only: Users can only view existing events/issues. No edit, delete, or move actions allowed
- Click Save to apply the permissions.
Create Quick Filters Back to top
A Quick Filter is a saved JQL condition that narrows down which issues from a calendar are shown. Quick Filters belong to a specific calendar — you create them from that calendar's menu, and they only affect issues coming from it. Each Quick Filter appears as a button in its calendar's colour, so you can tell at a glance which calendar a filter belongs to.
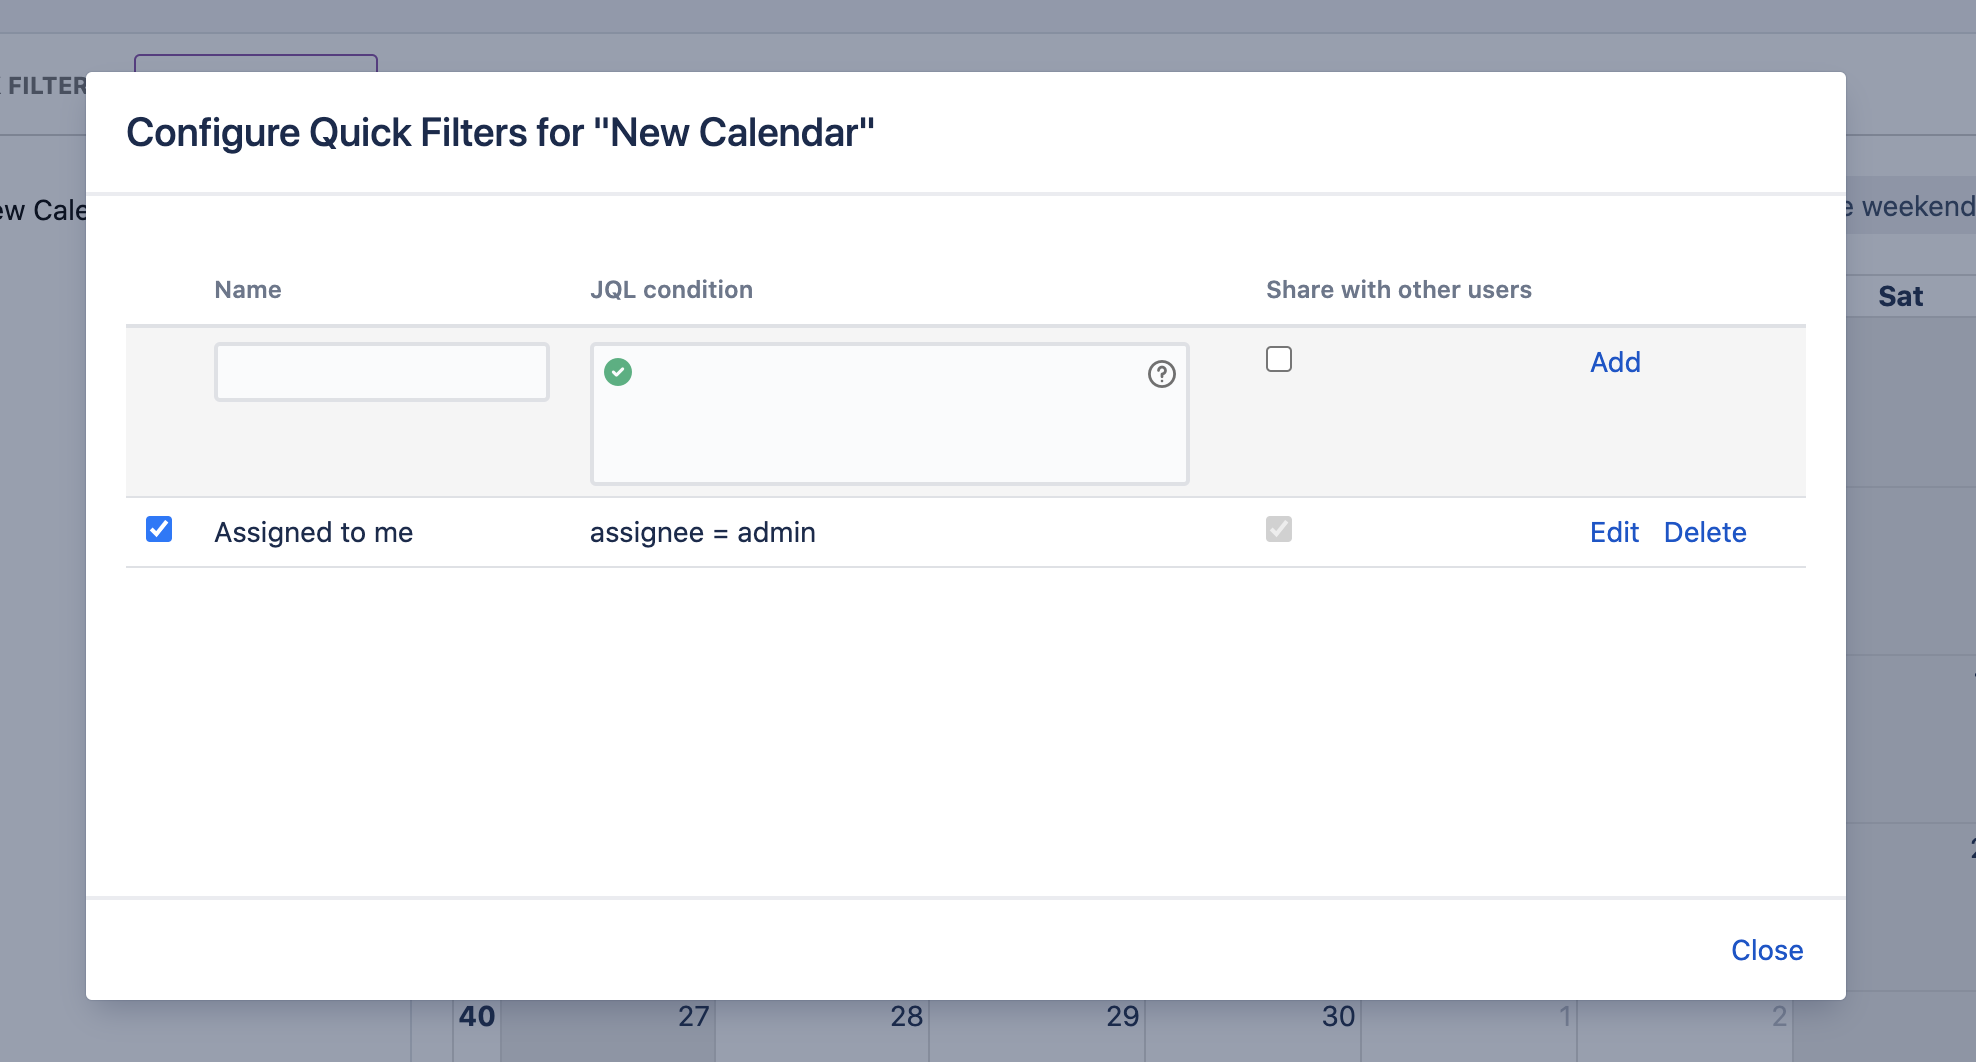
- Click the three dots to the right of the calendar name.
- Click "Configure quick filters" from the menu.
-
Enter required fields:
- Name: The name of the Quick Filter
- Condition: JQL condition to filter events
- Share with other users: Select if other users can use this quick filter
- Click Save to create the filter.
- Enable the filter by clicking the checkbox near the filter name.
- Click Close to exit the configuration.
- Apply quick filter by clicking on it in the calendar view.
How filters combine
You can turn on several filters at the same time, and they all narrow the calendar together (AND):
- Multiple Quick Filters — an issue is shown only if it matches every active Quick Filter, not just one of them.
- Quick Filters + Filter by user — Quick Filters also stack with the Filter by user picker, so you can drill down to exactly what you need.
status = Done
and turn it on, then pick Oliver in the Filter by user picker. The calendar now
shows only Done issues assigned to Oliver — the Quick Filter limits it to done work, and the
user filter limits it to Oliver.
Conditional Colors Back to top
Conditional Colors let you automatically colour calendar issues based on rules you define — so the issues that matter to you (overdue work, high priority, your own tasks) stand out at a glance. Each rule has a colour and a set of conditions; any issue that matches the conditions is drawn in that colour instead of its calendar's default colour.
How matching works
Rules are checked from top to bottom — the first rule an issue matches wins, and that colour is used. You can reorder your rules to control which one takes priority. Issues that match no rule keep their normal calendar colour.
Create a Rule
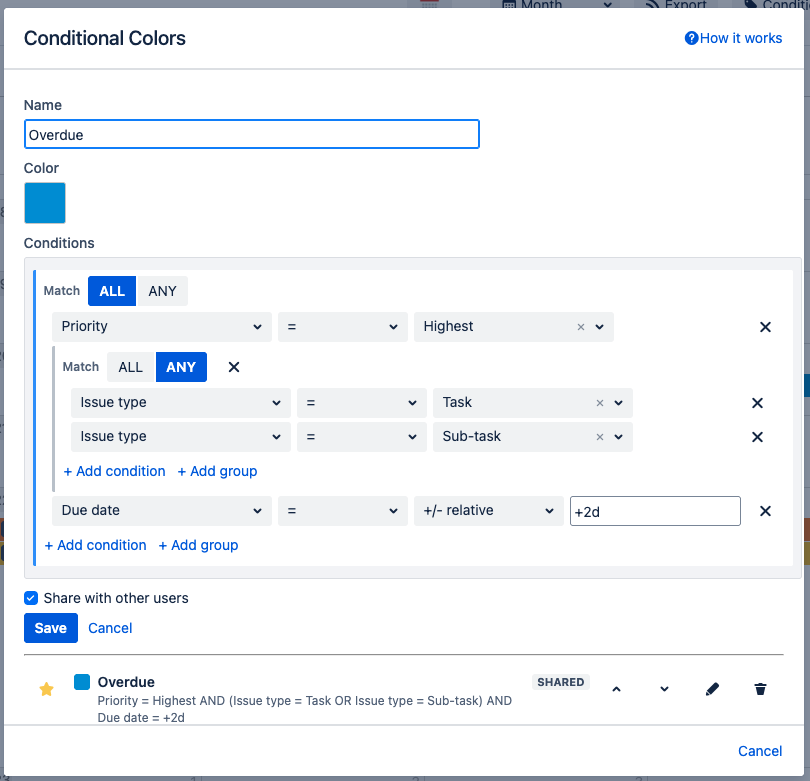
- Open the "Conditional Colors" button in the calendar toolbar, then click "Manage conditional colors" and create a new rule.
- Give it a Name and pick a Color.
-
Choose how conditions combine — Match ALL or ANY:
- ALL — every condition in the group must match (this is an "AND").
- ANY — matching just one condition is enough (this is an "OR").
-
Add conditions and groups:
- Add condition — pick a field, an operator, and a value.
- Add group — nest a sub-group with its own ALL/ANY setting to build more advanced logic, such as "Priority is Highest AND (Issue type is Task OR Sub-task)".
- Fields you can use: standard fields such as Assignee, Reporter, Status, Priority, Issue type, Labels, Due date (and other date fields), plus your project's custom fields.
- Operators depend on the field — for example is / is not, is one of, contains, is empty, or (for dates) before / after.
-
Smart values for dates: instead of a fixed date you can pick a dynamic value —
Today, Now, Start/End of month, Start/End of year —
or a relative value like
+2d(2 days from now) or-1M(1 month ago). - Smart value for people: for user fields (like Assignee) you can choose Current user — the rule then matches whoever is viewing the calendar, so a single shared rule like "My work" works for everyone.
-
Share with other users — tick this box to make the rule available to your team, or leave it
unticked to keep it private to you.

- Click Save. The new rule is automatically added to your favourites and turned on.
Common rule examples
- My work — Assignee is Current user
- Overdue — Due date is before Today
- Blocked — Status is Blocked
- Critical bug — Match ALL: Priority is Highest and Issue type is Bug
- Due this week — Due date is between Today and
+7d
Manage Rules

The management dialog lists every rule available to you — your own rules plus any rules other people have shared. Each rule shows its colour, name, a short summary of its conditions, and a SHARED or PRIVATE badge.
- Star (favourite) — pins the rule to the toolbar dropdown so you can switch it on or off quickly. Favourites are per-user, so your choice doesn't affect anyone else.
- Up / Down — reorder rules. Order matters: when an issue matches more than one rule, the rule higher in the list wins.
- Edit (pencil) — change a rule's name, colour, conditions, or sharing.
- Delete (trash) — remove a rule.
Apply Colors to the Calendar
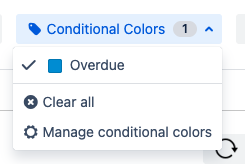
Click the "Conditional Colors" button in the toolbar to see your favourite rules. Tick the rules you want to apply — you can turn on several at once, and the calendar recolours immediately. The number badge on the button shows how many rules are currently active. Use "Clear all" to switch them all off, or "Manage conditional colors" to open the rules dialog.
Filter by User Back to top
Quickly narrow the calendar down to specific people. The "Filter by user" picker sits on the right of the Quick Filters bar.

- Open the "Filter by user" picker and select one or more people.
- The calendar shows only their work — issues assigned to the selected users, plus custom events where they are participants. Everything else is hidden while the filter is on.
- Remove a person by clicking the × on their chip, or clear all of them to show everyone again.
Show or Hide Non-Working Hours Back to top
In the Week and Day views, you can hide the hours outside your working day to focus on work time. With fewer hours on screen the remaining time slots become taller and easier to read.
- Click "Hide non-working hours" in the calendar toolbar (available in the Week and Day views). The calendar now shows only your working hours.
- Click "Show non-working hours" to bring back the full 24-hour day.
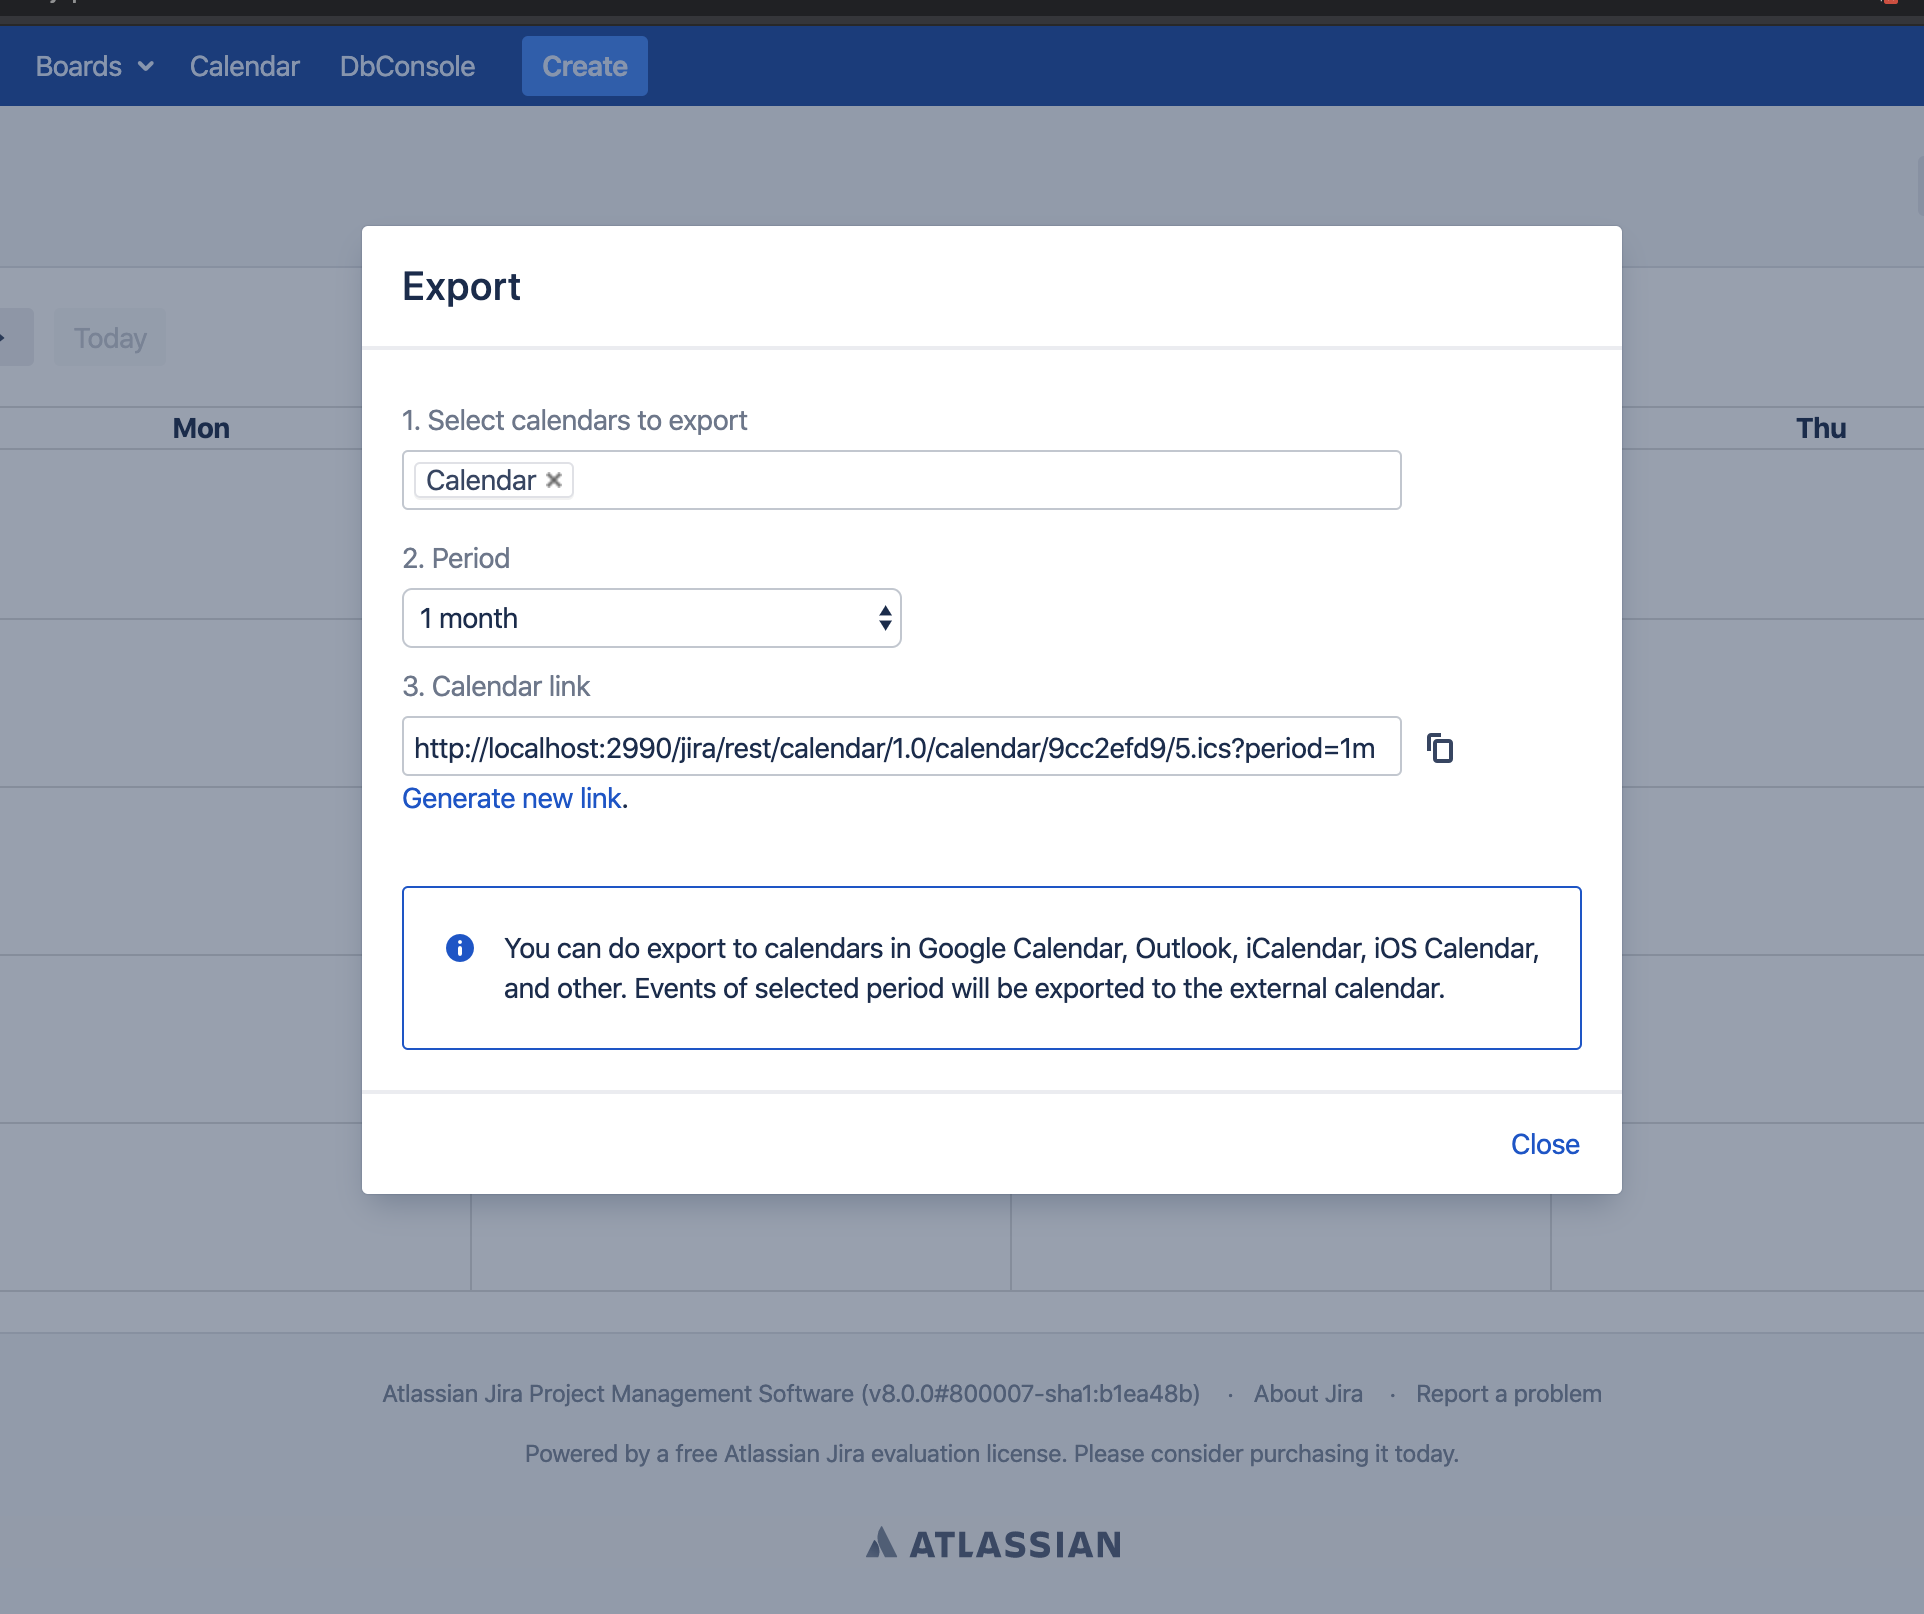
Export Calendar (ICS) Back to top
Export your Jira calendar to ICS format and import it into Google Calendar, Apple Calendar, Outlook, or any other calendar application that supports ICS feeds.
Click here for instructions on how to automatically sync/update your calendar to Google Calendar.
- Click Export button on the top right corner.
- Select calendars to export from the available list.
- Select period for the export (date range).
- Click "generate calendar" link to create the export URL.
- Copy the link and import it to Google Calendar, Apple Calendar, your phone, or other calendar applications.
Auto-Sync with External Calendars
When you subscribe to the ICS feed URL in an external calendar application, it will automatically fetch updates at regular intervals. This means your Jira calendar events will stay synchronized across all your devices and calendar applications without manual intervention.
Configure Calendar Gadget Back to top
- Go to the Jira Dashboard where you want to add the gadget.
-
Click "Add Gadget" button on the top right corner.

-
Click "Load all gadgets" if the "More gadgets available" popup appears.

-
Find "Calendar for Jira" gadget and click "Add Gadget" button.

-
Configure the gadget:
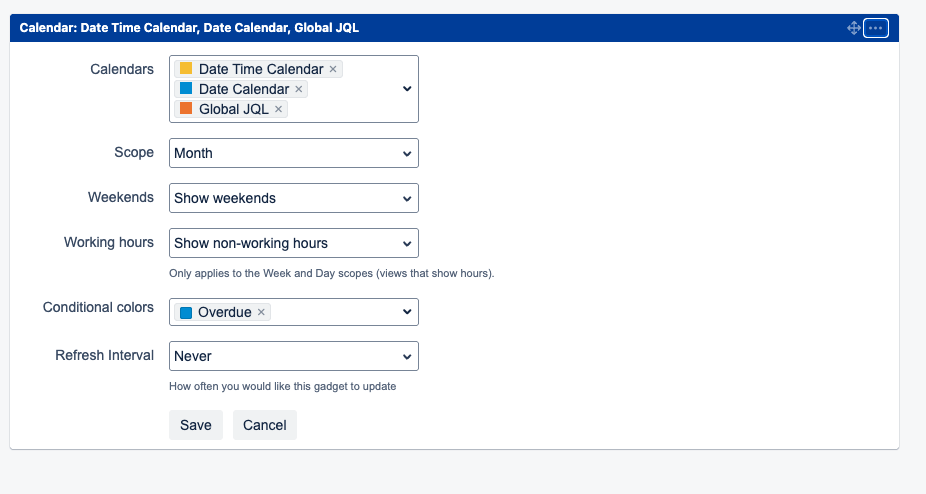
- Calendars: Select calendars that should be displayed
- Scope: Choose the calendar scope (Month, Week, Day, etc.)
- Weekends: Display weekends on the calendar or not
- Working hours: Show or hide non-working hours. Only applies to the Week and Day scopes (views that show hours)
- Conditional colors: Choose which conditional color rules should be applied to the issues shown in this gadget
- Refresh Interval: How often you would like this gadget to update
- Click Save to add the gadget to your dashboard.
Gadget Legend

A legend at the bottom of the gadget shows the calendars currently displayed and, if you applied any conditional colors, the colour rules in effect — so anyone viewing the dashboard can tell at a glance what each colour means.
Upcoming Calendar Events Gadget Back to top
The Upcoming Calendar Events gadget displays a list of upcoming events from your calendars directly on the Jira dashboard, giving you a quick overview of what's coming up without navigating to the full calendar view.
Gadget View
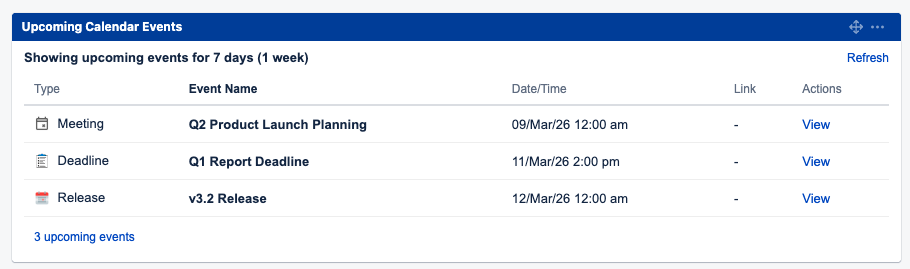
The gadget shows upcoming events in a table format with event type, name, date/time, and actions. Click "View" on any event to open a detail dialog with full event information including description, participants, and linked issues. The total count of upcoming events is displayed at the bottom.
Gadget Configuration
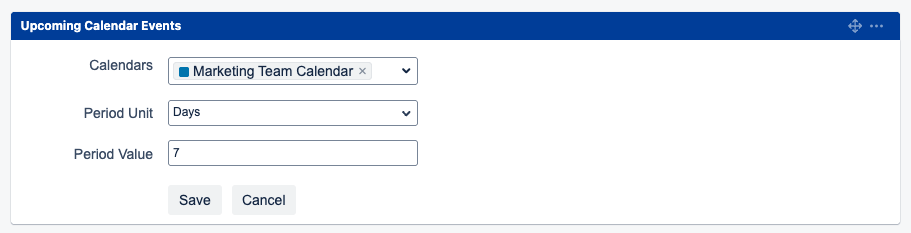
- Add the gadget to your Jira Dashboard using the "Add Gadget" button and search for "Upcoming Calendar Events".
-
Configure the gadget:
- Calendars: Select one or more calendars to display events from
- Period Unit: Choose the time unit for the upcoming period (Days, Weeks, or Months)
- Period Value: Enter the number of units to look ahead (e.g., 7 days, 2 weeks)
- Click Save to apply the configuration.
Admin Configuration Back to top
Define which days are working days, set business hours, and toggle general app behavior for your organization. These settings affect how the calendar displays, calculates working time, and which features are available to your users.
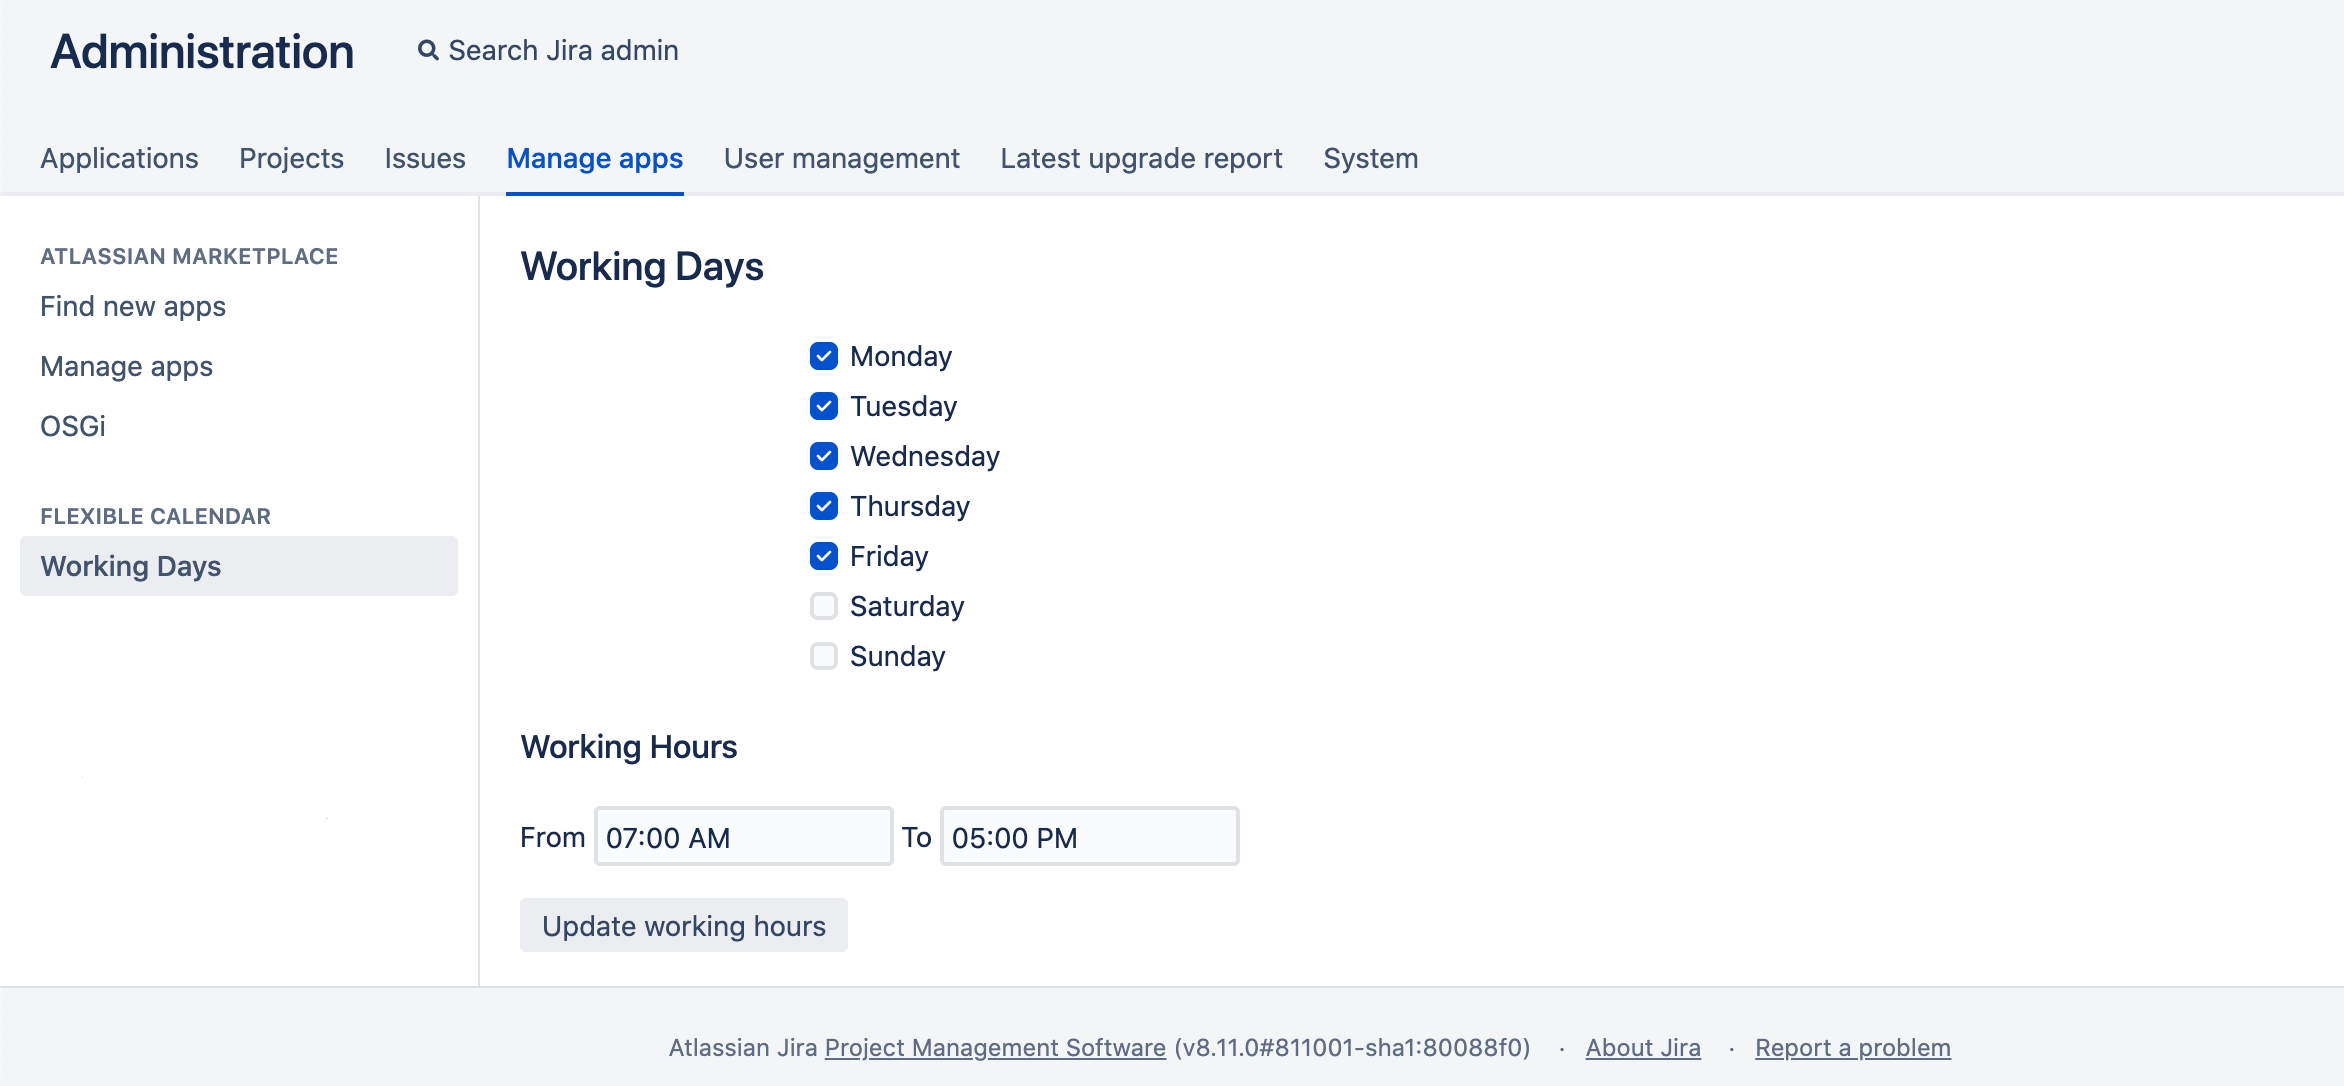
-
Navigate to the configuration page: Go to
{jiraUrl}/secure/CalendarWorkingDaysConfiguration.jspa(or open Manage apps → Flexible Calendar → Configuration). - Select working days by clicking on the days (saves automatically on click).
- Specify work day hours: Set the start and end hours for your work day, then click "Update working hours" to save changes.
-
General Configuration: Use the checkboxes to control optional features, then click "Update configuration" to apply your changes.
- Calendar import disabled: Hides the option to subscribe to external calendars (ICS feeds).
- Calendar export disabled: Hides the option to generate a calendar export URL.
- Calendar events panel on issue view disabled: Hides the "Calendar Events" panel from the Jira issue view.
Note: The "Calendar events panel on issue view disabled" option is enabled by default, meaning the Calendar Events panel is hidden on issue views out of the box. If your team uses custom calendar events and you want users to link them to issues, untick this checkbox and click "Update configuration" to make the panel visible.
Migrating from Data Center to Cloud Back to top
You can move your Calendar for Jira data from Jira Data Center or Server to Jira Cloud using the Jira Cloud Migration Assistant (JCMA). Your calendars, custom events, permissions, event types, conditional colors, quick filters, and working-hours configuration transfer automatically — there is no need to re-create them by hand.
Migration Checklist
- Update the Data Center app to the latest version from the Atlassian Marketplace.
- Install Calendar for Jira on your Cloud site from the Atlassian Marketplace before you migrate.
- Update the Jira Cloud Migration Assistant (JCMA) on Data Center to the latest version.
- Migrate your Jira data first (or in the same plan) — projects, users, and the custom fields your calendars use must exist on the Cloud site so calendar field references resolve.
- Confirm administrator rights on both the Data Center and Cloud instances.
- Test on a non-production Cloud site before running the production migration (recommended).
How to migrate
- Open the migration assistant in Jira Data Center: Settings → System → Import and Export → Migrate to cloud.
- Connect to your Cloud site and sign in as an administrator.
- Create a migration plan. Include your projects, users, and issues, and under Apps mark Calendar for Jira as Needed in cloud so its data is included in the migration.
- Include the fields your calendars depend on — the date fields used for Start/End, the fields shown on the issue card, and any fields used in conditional-color rules.
- Run the migration and monitor progress in the assistant. Calendar for Jira reports its import progress (imported / skipped counts) in the migration details log.
- Open Calendar for Jira on Cloud and verify your calendars once the migration completes.

In Assess apps, Calendar for Jira shows Yes (a migration path is available) — set it to Needed in cloud to include its data.
What gets migrated
- Calendars — Project, Filter, JQL, and Basic sources, plus external (ICS subscription) calendars
- Calendar permissions — user and group
- Event types — including avatars and default reminders
- Custom events — including recurring events and participants
- Quick filters and your favourite quick filters
- Conditional color rules and your favourite rules
- Working hours and working days
- Favourite calendars (per-user visibility)
- Reminders — event-type default reminders are migrated and scheduled for upcoming events that have participants
What you set up again on Cloud
A few items have no automatic Cloud equivalent and are quick to re-create after migrating:
- Dashboard gadgets — Atlassian does not migrate third-party gadget placements. Re-add the Calendar gadget to your Cloud dashboards.
- Project-role permissions — re-add these as user or group permissions on Cloud.
After migration
- Verify your data — open the app on Cloud and confirm your calendars, events, event types, colors, and permissions are present.
- Re-add dashboard gadgets to your Cloud dashboards.
- Re-create project-role permissions as user or group permissions.
Troubleshooting
- Calendar for Jira does not appear in the migration assistant — make sure both the Data Center app and JCMA are updated to their latest versions, then refresh the app list.
- Checking results — the Calendar for Jira import writes its progress (imported / skipped counts) to the migration details log in the assistant.
Need Help?
If you have questions or need assistance with Calendar for Jira (Resource Timeline & JSM Calendar) Data Center, our support team is here to help.
Contact Support