Overview Back to top
The Linked Events issue panel allows you to connect custom events directly to Jira issues. This creates a two-way relationship between your planning and project work, giving teams full visibility into which events are associated with each issue. Events created in both Calendar and Resource Timeline appear in the same panel.
Use Cases
- Sprint Planning: Link sprint planning and review meetings to related stories and tasks
- Release Coordination: Connect release milestones and deployment events to related tickets
- Incident Management: Associate post-mortem meetings and follow-up reviews with bug tickets
- Project Milestones: Link milestone events (deadlines, demos, presentations) to epics and deliverables
- Client Meetings: Link client review sessions to the issues being discussed
Enable Linked Events Panel Back to top
The panel can be enabled for an individual issue or for all work items in a project.
Enabling the Panel on an Issue
- Open any Jira issue — Navigate to an issue in your project.
- Click the "View app actions" button — Located above the issue title (gear icon), this button provides access to app panels.
- Select "Linked Events" — From the dropdown menu, click on Linked Events to display the panel.
- Panel appears below issue description — The Linked Events panel will now be visible in the main issue view.
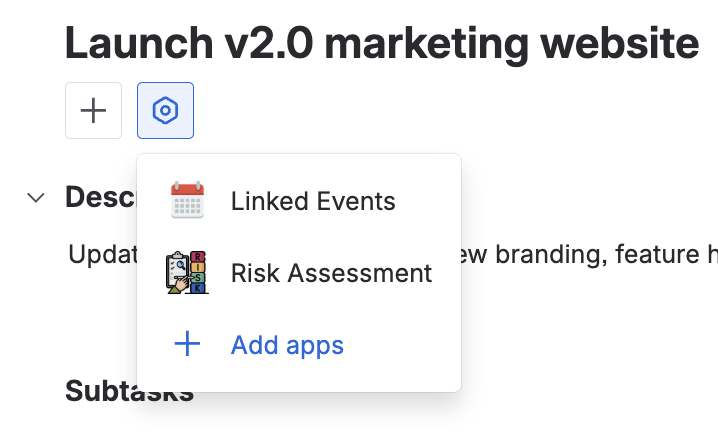
Click the 'View app actions' button above the issue title and select Linked Events to enable the panel
Show for All Work Items
To enable the Linked Events panel on every issue in your project at once, use the 'Show for all work items' option.
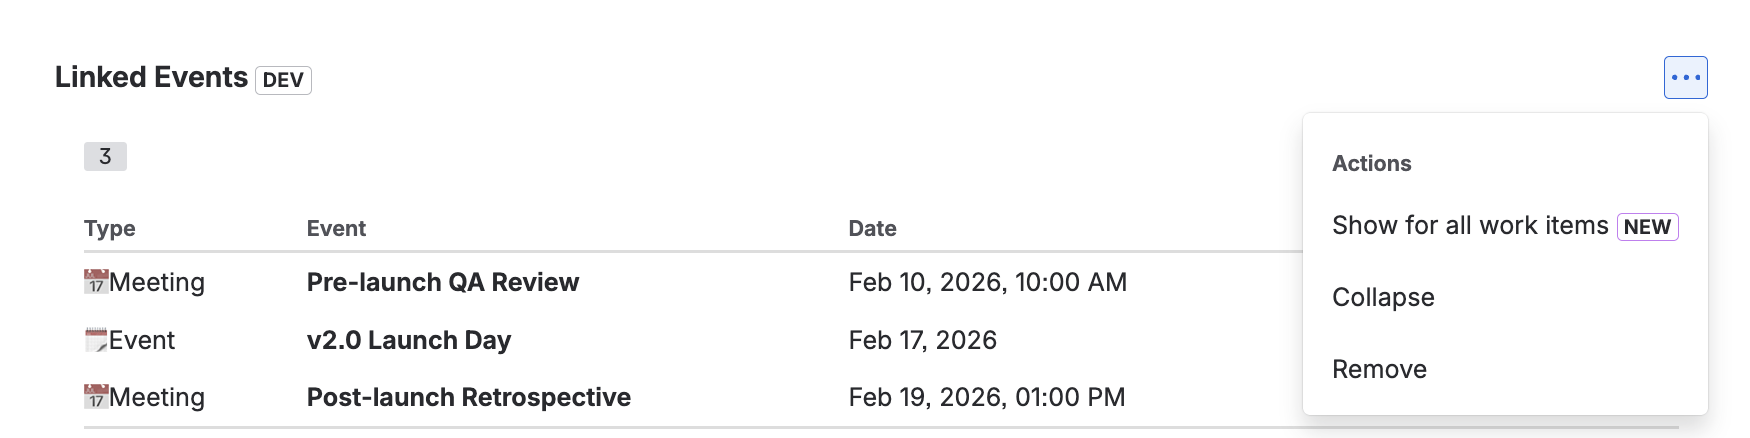
- Click the three dots menu (...) on the top right corner of the Linked Events panel.
- Select "Show for all work items" — This will enable the Linked Events panel on every issue in the project.
How It Works
- Link event: Search for and connect an existing event to this issue
- Create event: Create a new custom event and automatically link it to this issue
- Remove event: Unlink an event from this issue (the event is not deleted)
- Open event: Navigate to the event in Calendar or Resource Timeline
Using the Linked Events Panel Back to top

- Link an existing event — Click the "Link" button, search by event name, and select the event.
- Create a new linked event — Click "Create" to open the event creation dialog. The new event will be automatically linked to this issue.
- View linked events — All linked events are displayed with their name, date, and calendar/timeline. Click any event to open it.
- Remove a link — Click the remove icon next to an event to unlink it. This does not delete the event itself.
Need Help?
If you have questions or need assistance, our support team is here to help.
Contact Support