Introduction
Risk Assessment for Jira provides a powerful and flexible way to assess, calculate, and visualize risk levels directly on your Jira issues. Define custom risk fields like Impact and Probability, create mathematical formulas to calculate risk scores, and configure thresholds to categorize risks as Low, Medium, or High. Perfect for project managers, risk analysts, and teams who need to track and manage risk across their projects.
Overview Back to top
Risk Assessment for Jira provides comprehensive risk management capabilities including:
Key Features
- Visual risk assessment panel on every issue
- Customizable risk fields (Impact, Probability, and more)
- Flexible mathematical formulas for risk calculation
- Configurable risk thresholds with visual color coding
- Global, project-level, and issue type-specific configurations
- Real-time risk score calculation and visualization
- Formula validation and testing tools
Low Risk
Score within acceptable range
Medium Risk
Requires attention and monitoring
High Risk
Critical - immediate action needed
Enable Risk Assessment Panel Back to top
Before you can start assessing risk on your issues, you need to enable the Risk Assessment panel to display on your Jira issues. The panel can be enabled for individual issues or for all work items throughout a project.
Enabling the Panel on an Issue
- Open any Jira issue - Navigate to an issue in your project.
- Click "View app actions" button - Located above the issue title, this button provides access to app panels.
- Select "Risk Assessment" - From the dropdown menu, click on Risk Assessment to display the panel.
- Panel appears below issue description - The Risk Assessment panel will now be visible in the main issue view, below the description section.
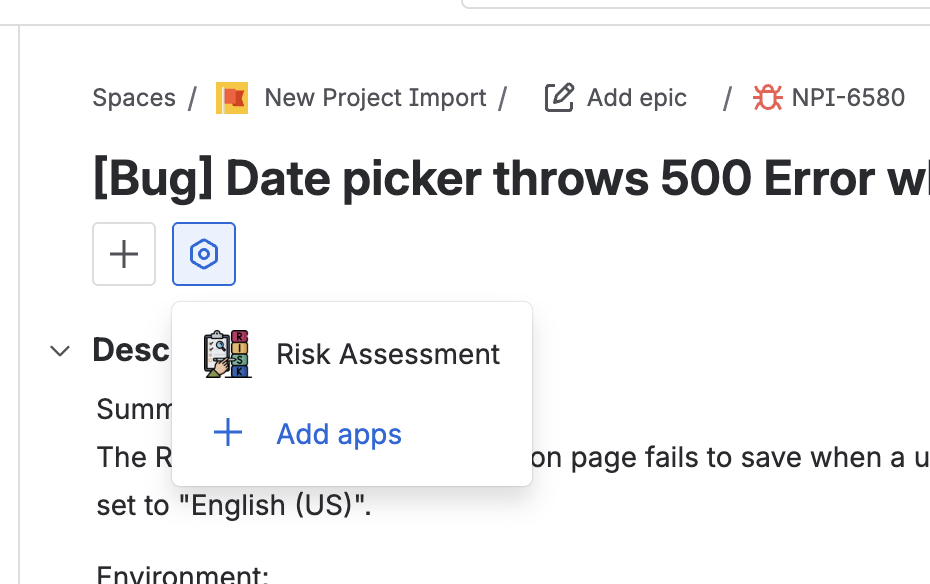
Click "View app actions" button above the issue title and select Risk Assessment to enable the panel
Show for All Work Items
The "Show for all work items" option is a powerful feature that ensures the Risk Assessment panel is visible on every issue in your project. This is particularly useful when you want to standardize risk assessment across all work items.
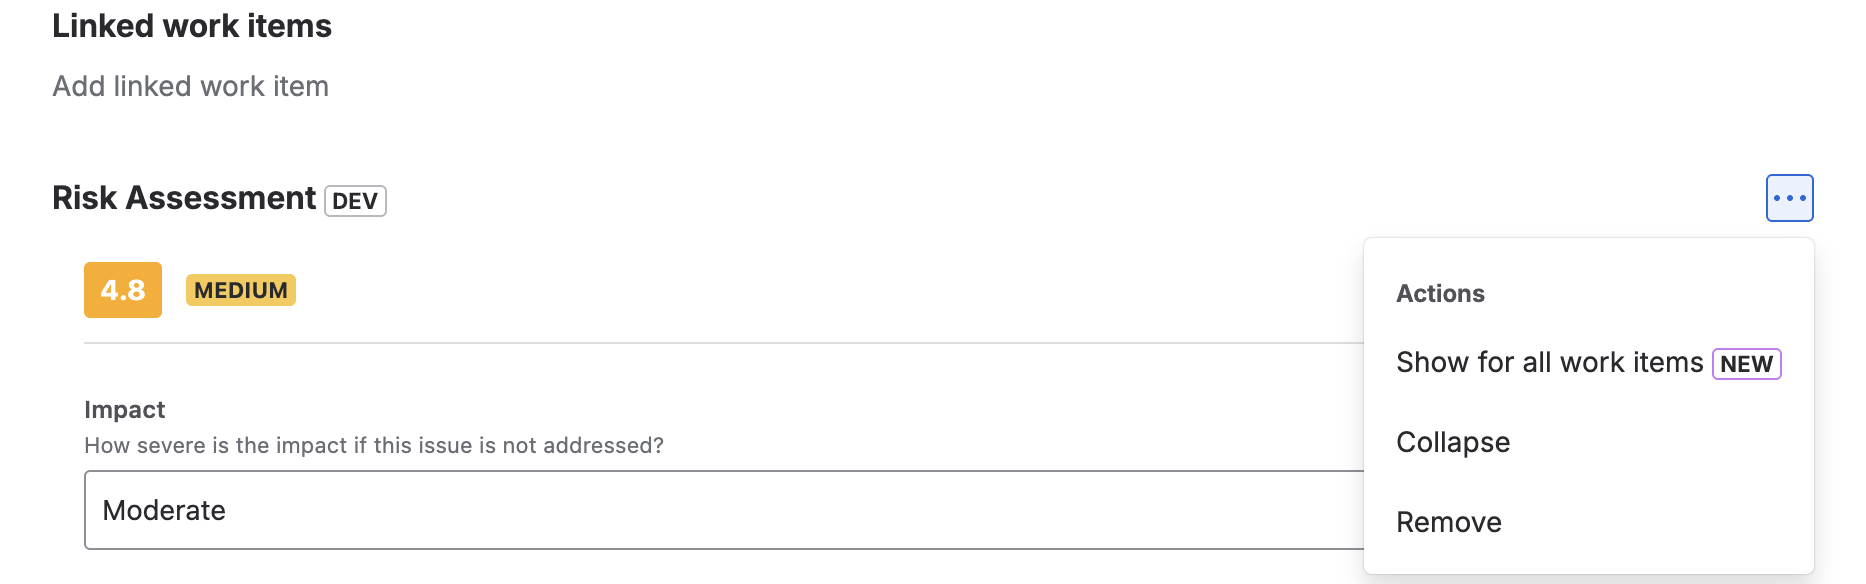
Action menu showing "Show for all work items" option to enable the panel project-wide
How It Works
The panel's action menu dynamically shows different options based on the current state:
- Show for all work items: Appears when the panel is hidden on all or some work items. Selecting this will display the panel on all work items throughout the project.
- Hide from all work items: Appears after enabling the panel for all work items. Selecting this will hide the panel from all work items in the project.
Issue Panel - Assessing Risk Back to top
The Risk Assessment panel appears on every Jira issue, allowing users to quickly assess and visualize risk levels. The panel displays the calculated risk score, risk level badge, and allows users to select values for each risk field.
Using the Issue Panel
- Open any Jira issue with Risk Assessment enabled - The Risk Assessment panel appears below the issue description in the main content area.
- View the current risk score - The panel displays the calculated score and risk level (Low, Medium, High, or Critical) with color-coded badges.
- Select values for configured risk fields - The panel displays dropdown fields based on your configuration (e.g., Impact, Probability, or any custom fields you've defined). Choose the appropriate value from each dropdown.
- View the calculated result - The risk score is automatically calculated in real-time based on your configured formula and displayed with a visual progress bar showing the risk level.
- Add a note (optional) - Click "+ Add note" at the bottom of the panel to document additional context, or any relevant information about the risk assessment.
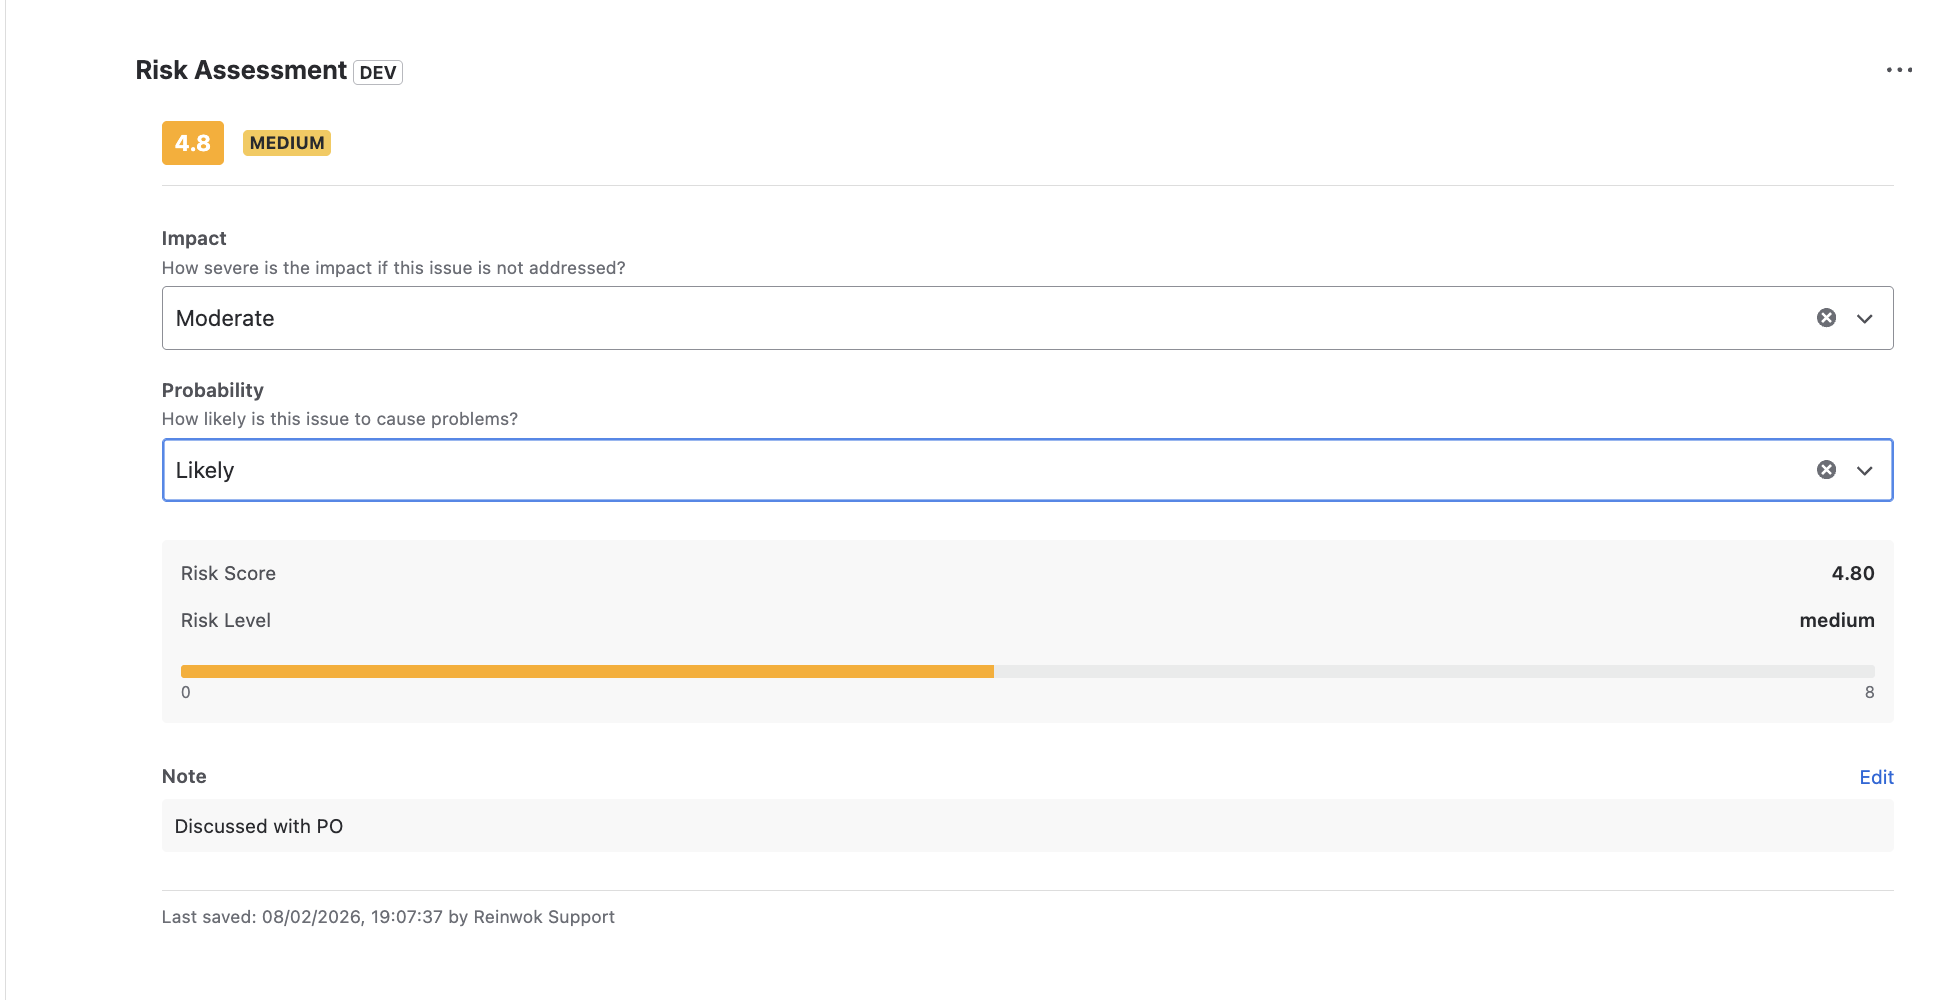
Risk Assessment panel showing configured risk fields, calculated score, risk level, and option to add notes
Global Configuration Back to top
The Global Configuration page allows Jira administrators to set up default risk assessment settings that apply across all projects. These settings serve as the baseline configuration that can be overridden at the project or issue type level.
Accessing Global Configuration
- Navigate to Jira Administration - Click the gear icon in the top navigation.
- Find Risk Assessment - Look for "Risk Assessment Global Configuration" in the apps section.
- Configure default settings - Set up fields, formulas, and thresholds that will apply globally.
Global Configuration page showing Risk Assessment Fields with customizable options
Project Configuration Back to top
Each project can have its own risk assessment configuration that overrides the global defaults. This allows different teams to customize risk assessment to match their specific needs and workflows.
Accessing Project Configuration
- Navigate to your project - Open the project where you want to configure risk assessment.
- Go to Project Settings - Click on "Project settings" in the left sidebar.
- Find Risk Assessment Configuration - Look for "Risk Assessment Project Configuration" in the apps section.
Configuration Options
The project configuration page includes two main tabs:
| Tab | Description |
|---|---|
| Project Default | Configure the default risk assessment settings for all issue types in this project |
| Issue Type Overrides | Create custom configurations for specific issue types (e.g., Epics, Bugs, Stories) |
Project Configuration page with Risk Formula settings
Project Configuration page with Risk Thresholds settings
Issue Type Overrides Back to top
Issue Type Overrides allow you to configure different risk assessment templates for specific issue types within a project. This is useful when different types of work require different risk evaluation criteria.
Configuration Hierarchy
The resolution hierarchy determines which configuration is used for an issue:
If an issue type has a custom configuration, it will be used. Otherwise, the project default is applied. If no project configuration exists, the global default is used.
Creating an Issue Type Override
- Go to Issue Type Overrides tab - In the project configuration page, click on "Issue Type Overrides".
- Select an Issue Type - Use the dropdown to choose which issue type to configure (e.g., Epic, Bug, Story).
- Configure custom settings - Define fields, formula, and thresholds specific to this issue type.
- Save Configuration - Click "Save Configuration" to apply the override.
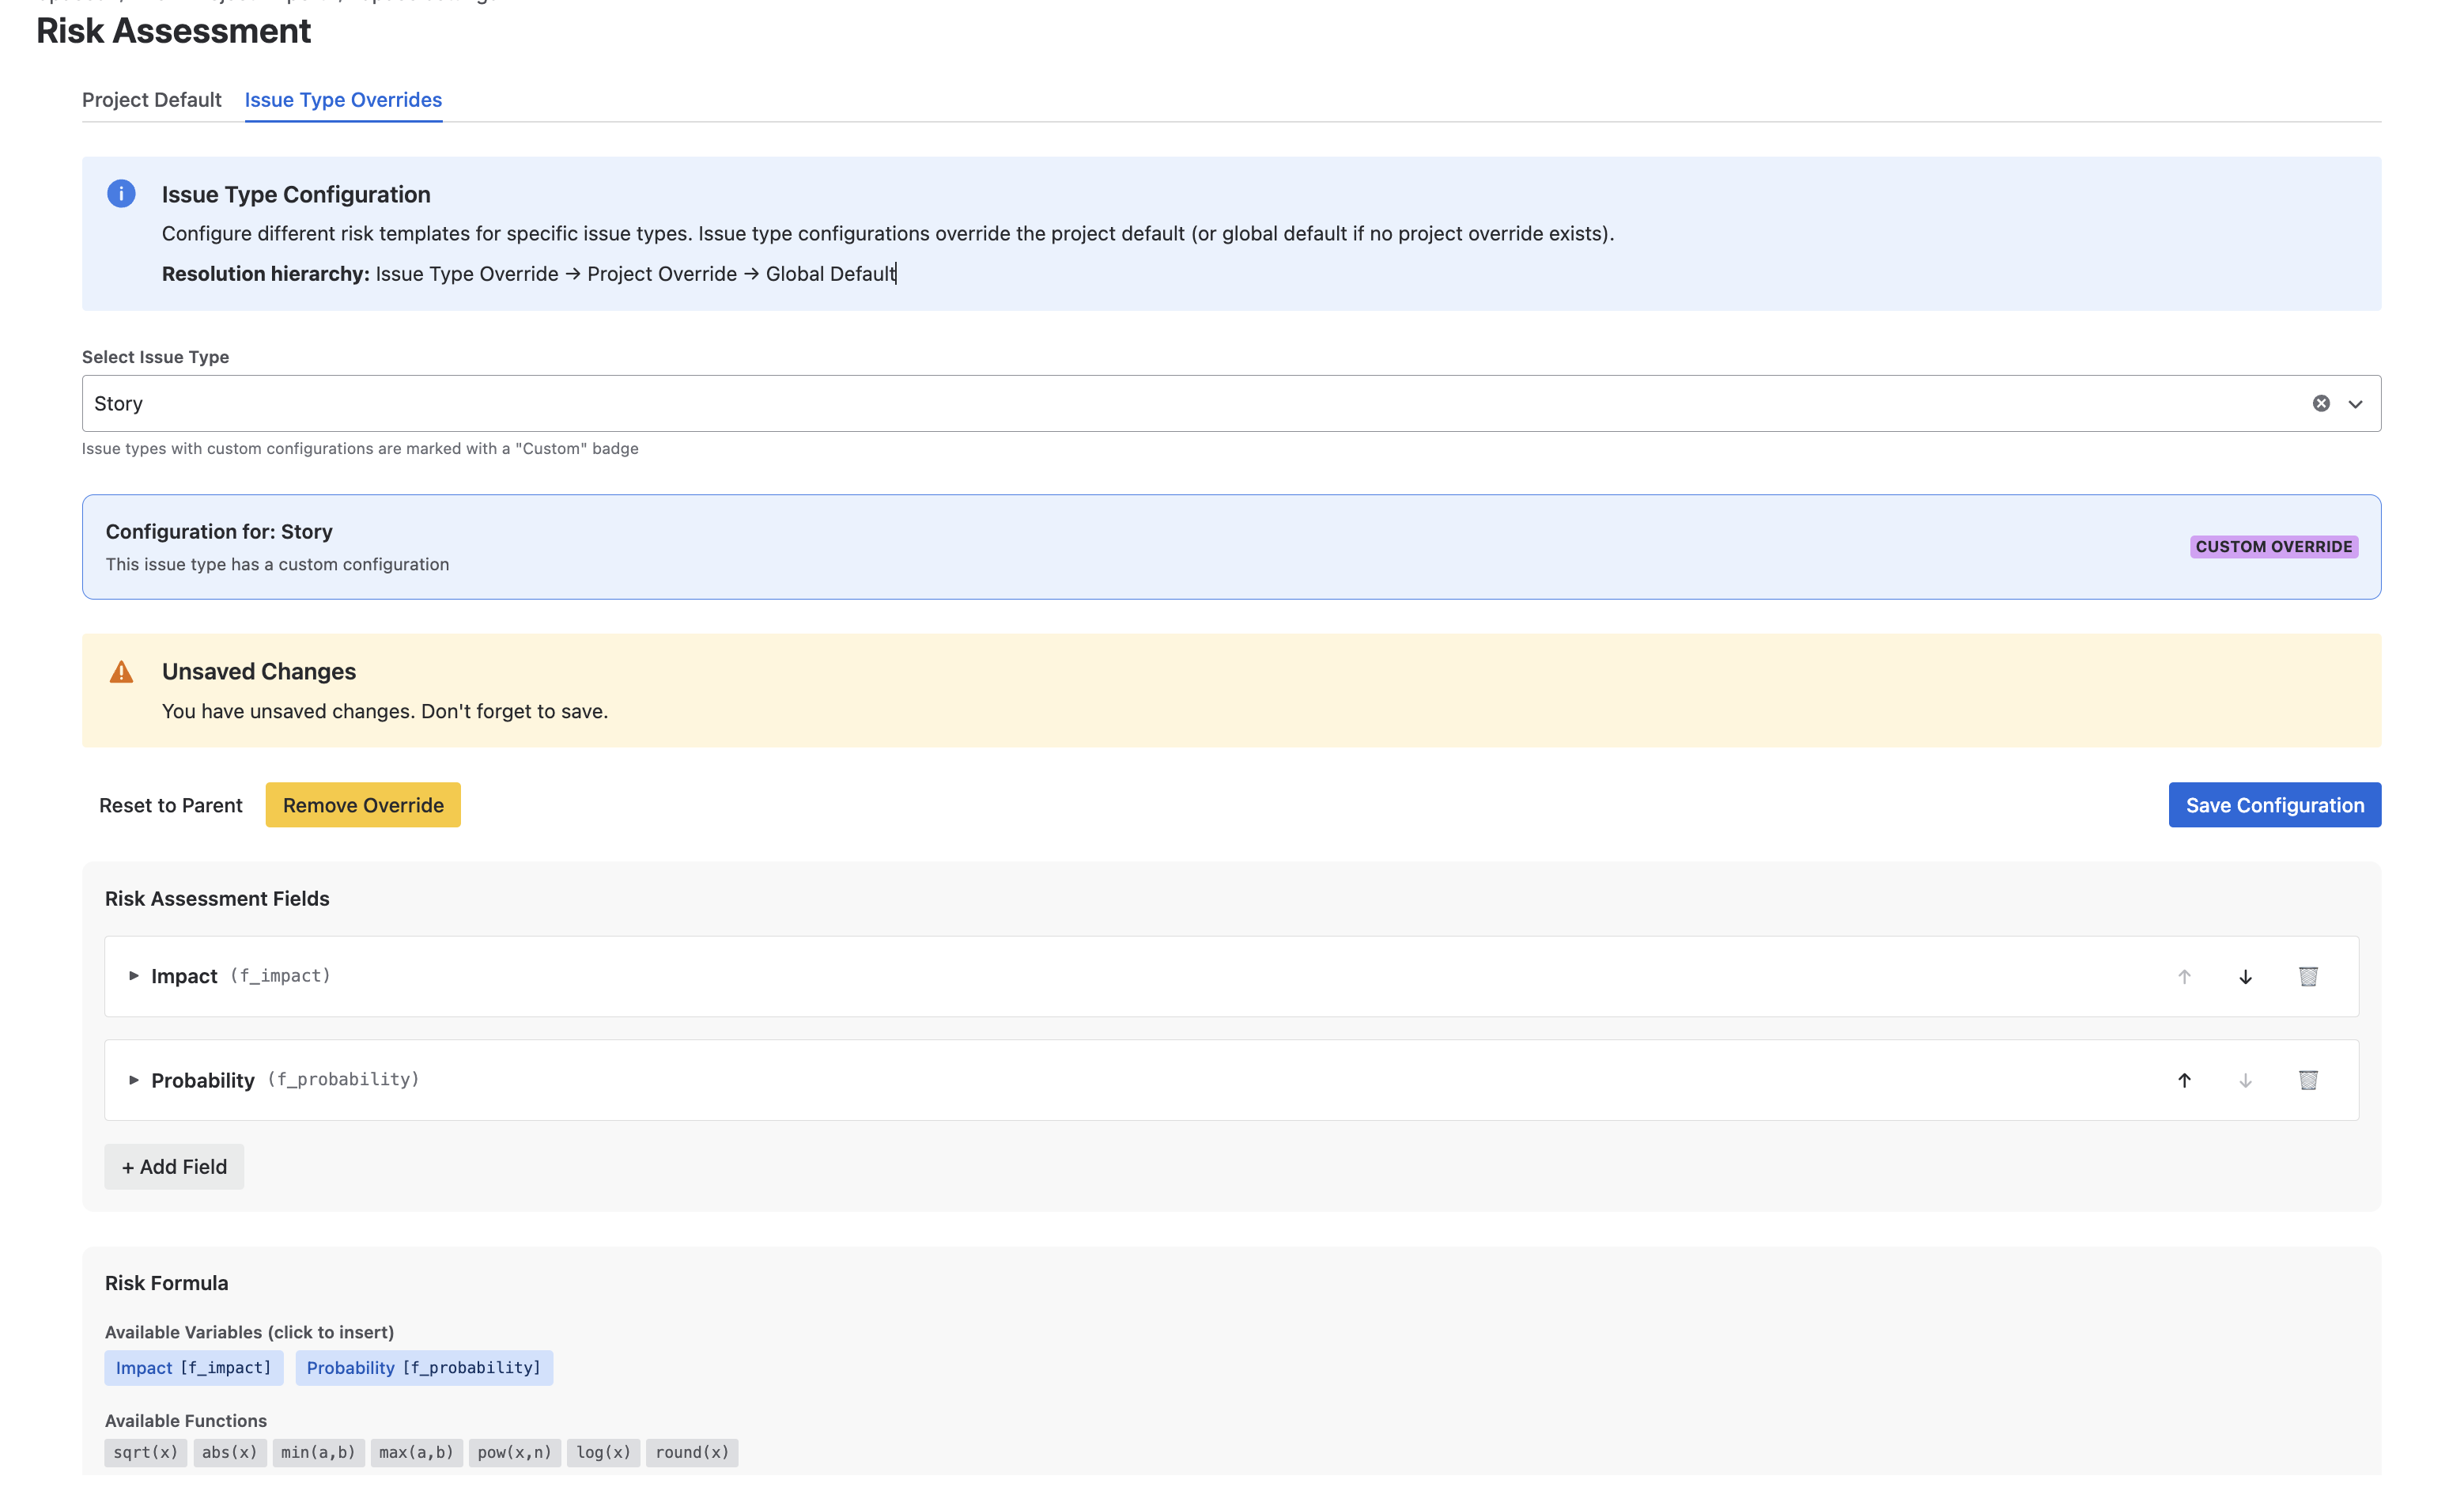
Issue Type Override configuration for Epic with custom fields and formula
Risk Assessment Fields Back to top
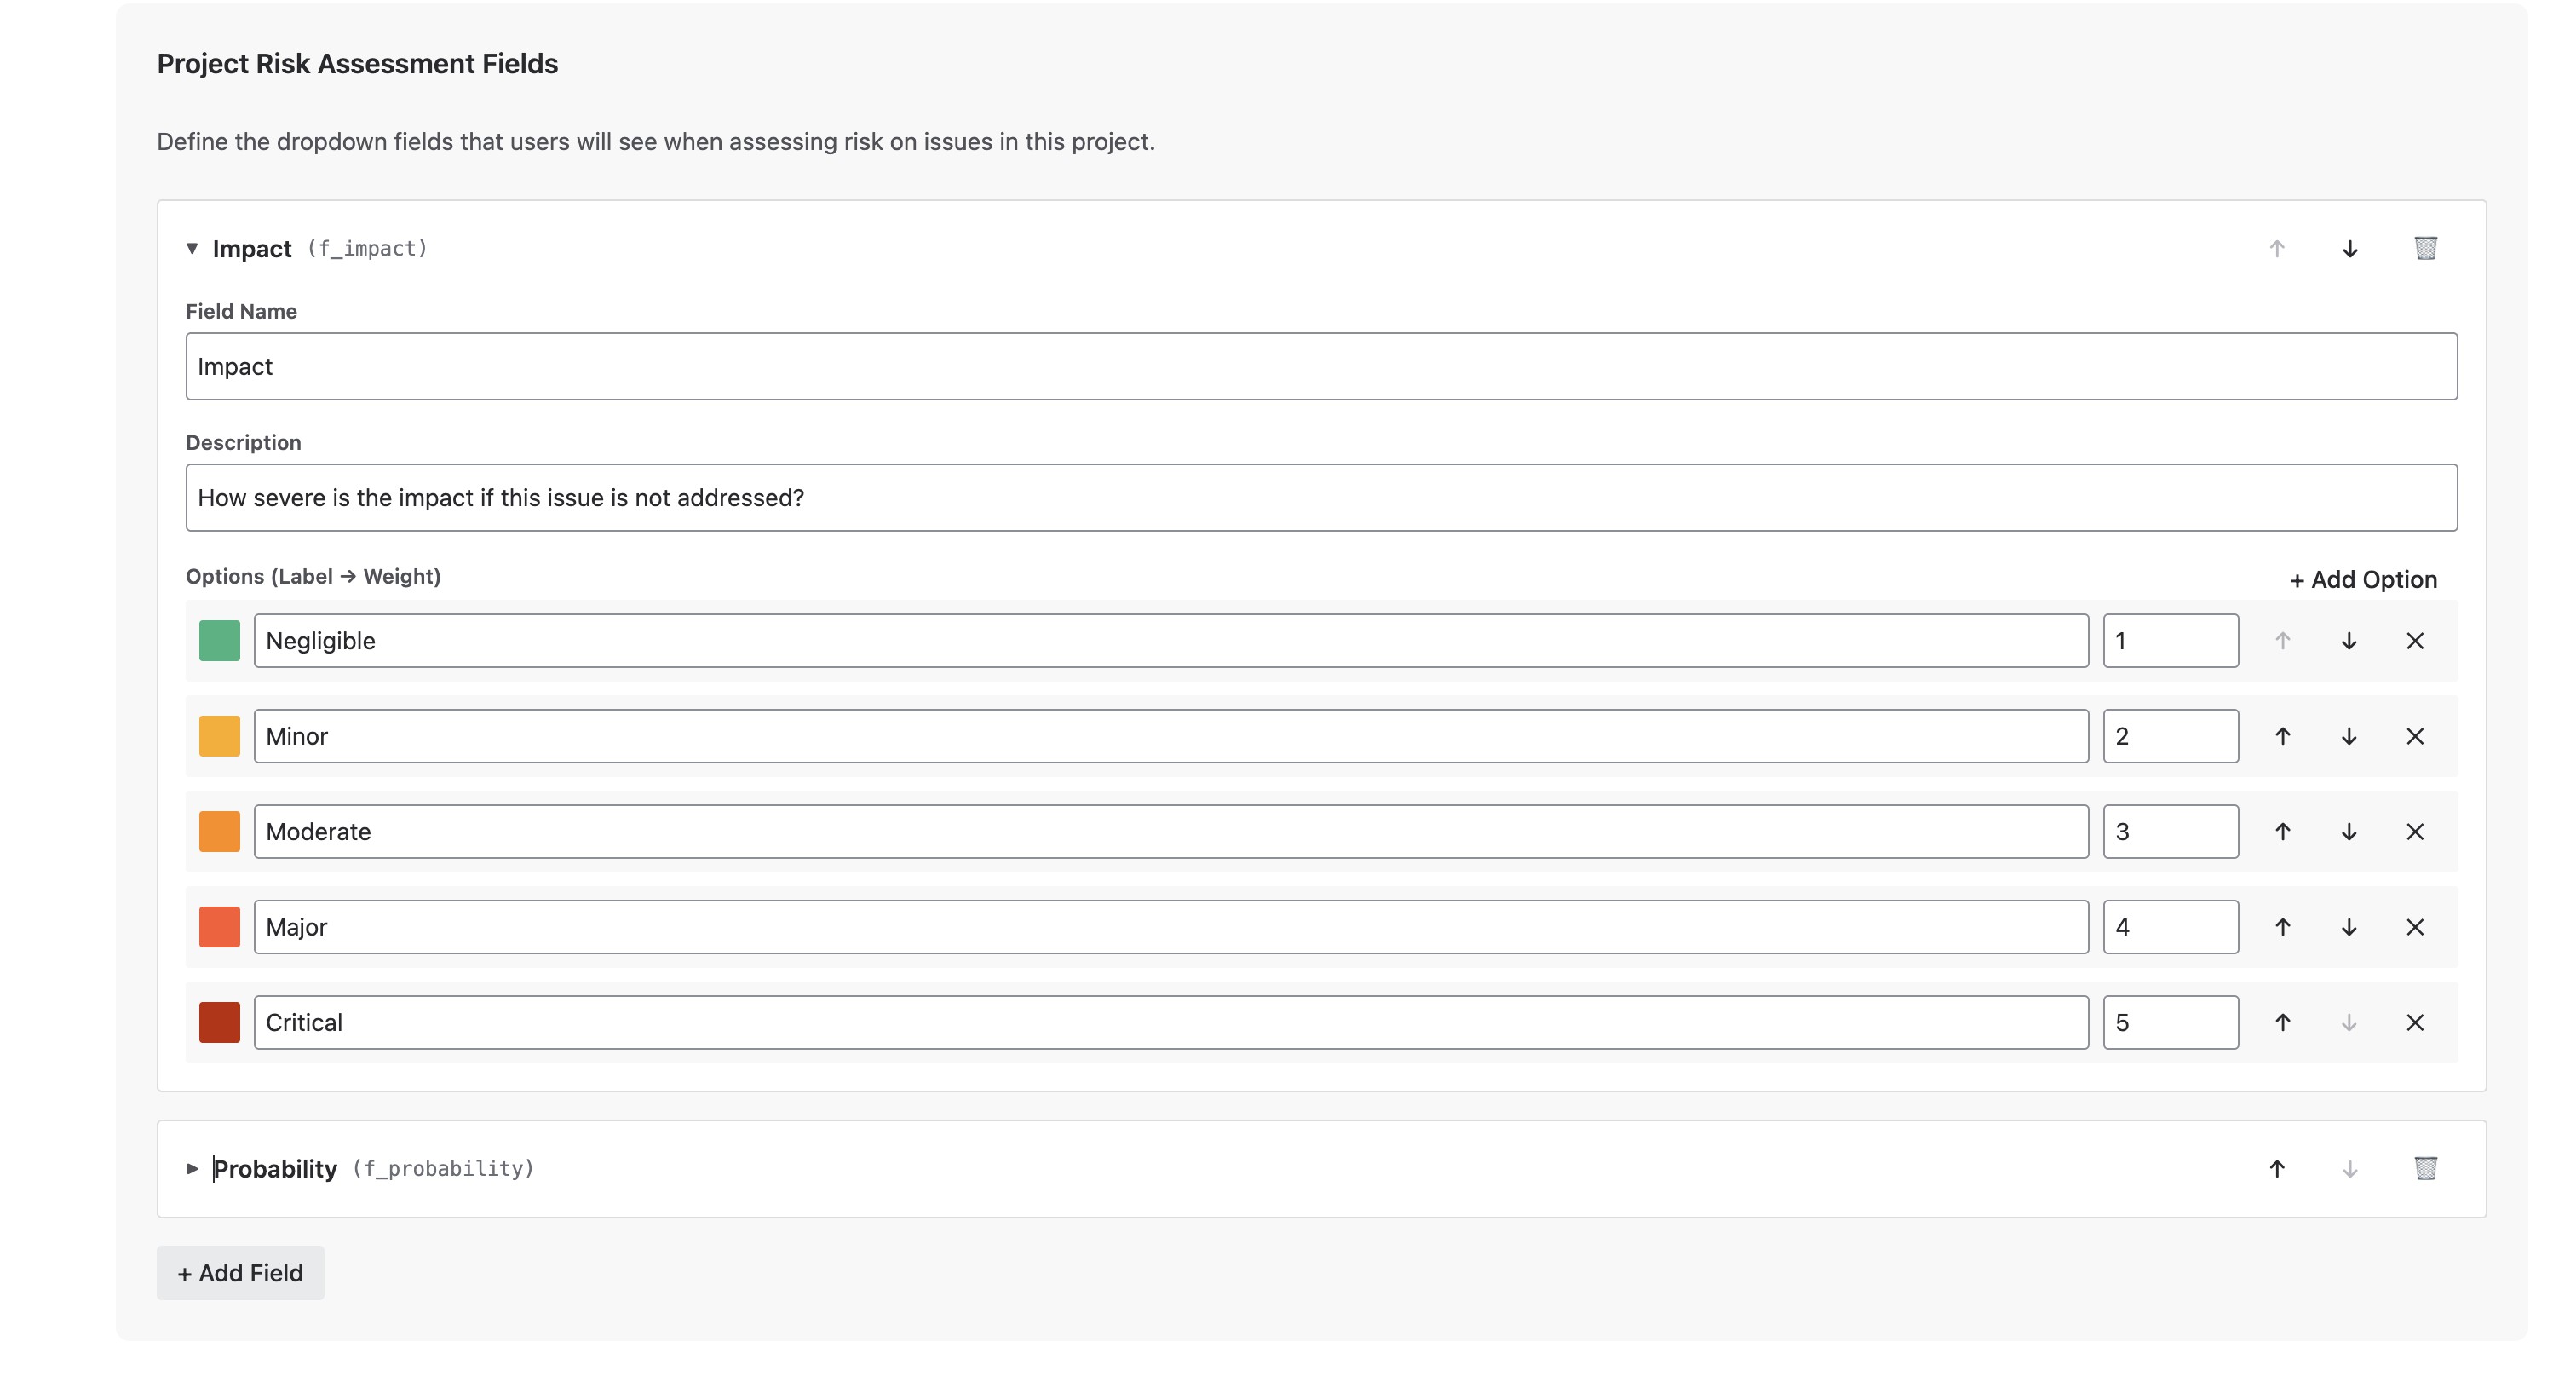
Risk Assessment Fields are the dropdown fields that users will see when assessing risk on issues. Each field has a name, description, and a set of options with associated numeric weights.
Default Fields
The app comes with two pre-configured fields:
| Field | Variable | Description |
|---|---|---|
| Impact | f_impact |
How severe is the impact if this issue is not addressed? |
| Probability | f_probability |
How likely is this issue to cause problems? |
Configuring Field Options
Each field can have multiple options with labels, colors, and numeric weights:
| Option | Color | Weight |
|---|---|---|
| Negligible | Green | 1 |
| Minor | Yellow | 2 |
| Moderate | Orange | 5 |
| Major | Red-Orange | 8 |
| Critical | Red | 10 |
Adding Custom Fields
- Click "+ Add Field" - In the Risk Assessment Fields section.
- Enter Field Name - Give your field a descriptive name.
- Add Description - Help users understand what this field measures.
- Configure Options - Add options with labels, colors, and numeric weights.
- Reorder fields - Use the arrow buttons to change the display order.
f_impact) is automatically generated
from the field name and is used in the risk formula. You can click on the variable tags to
insert them into your formula.
Risk Assessment Fields configuration with customizable options and weights
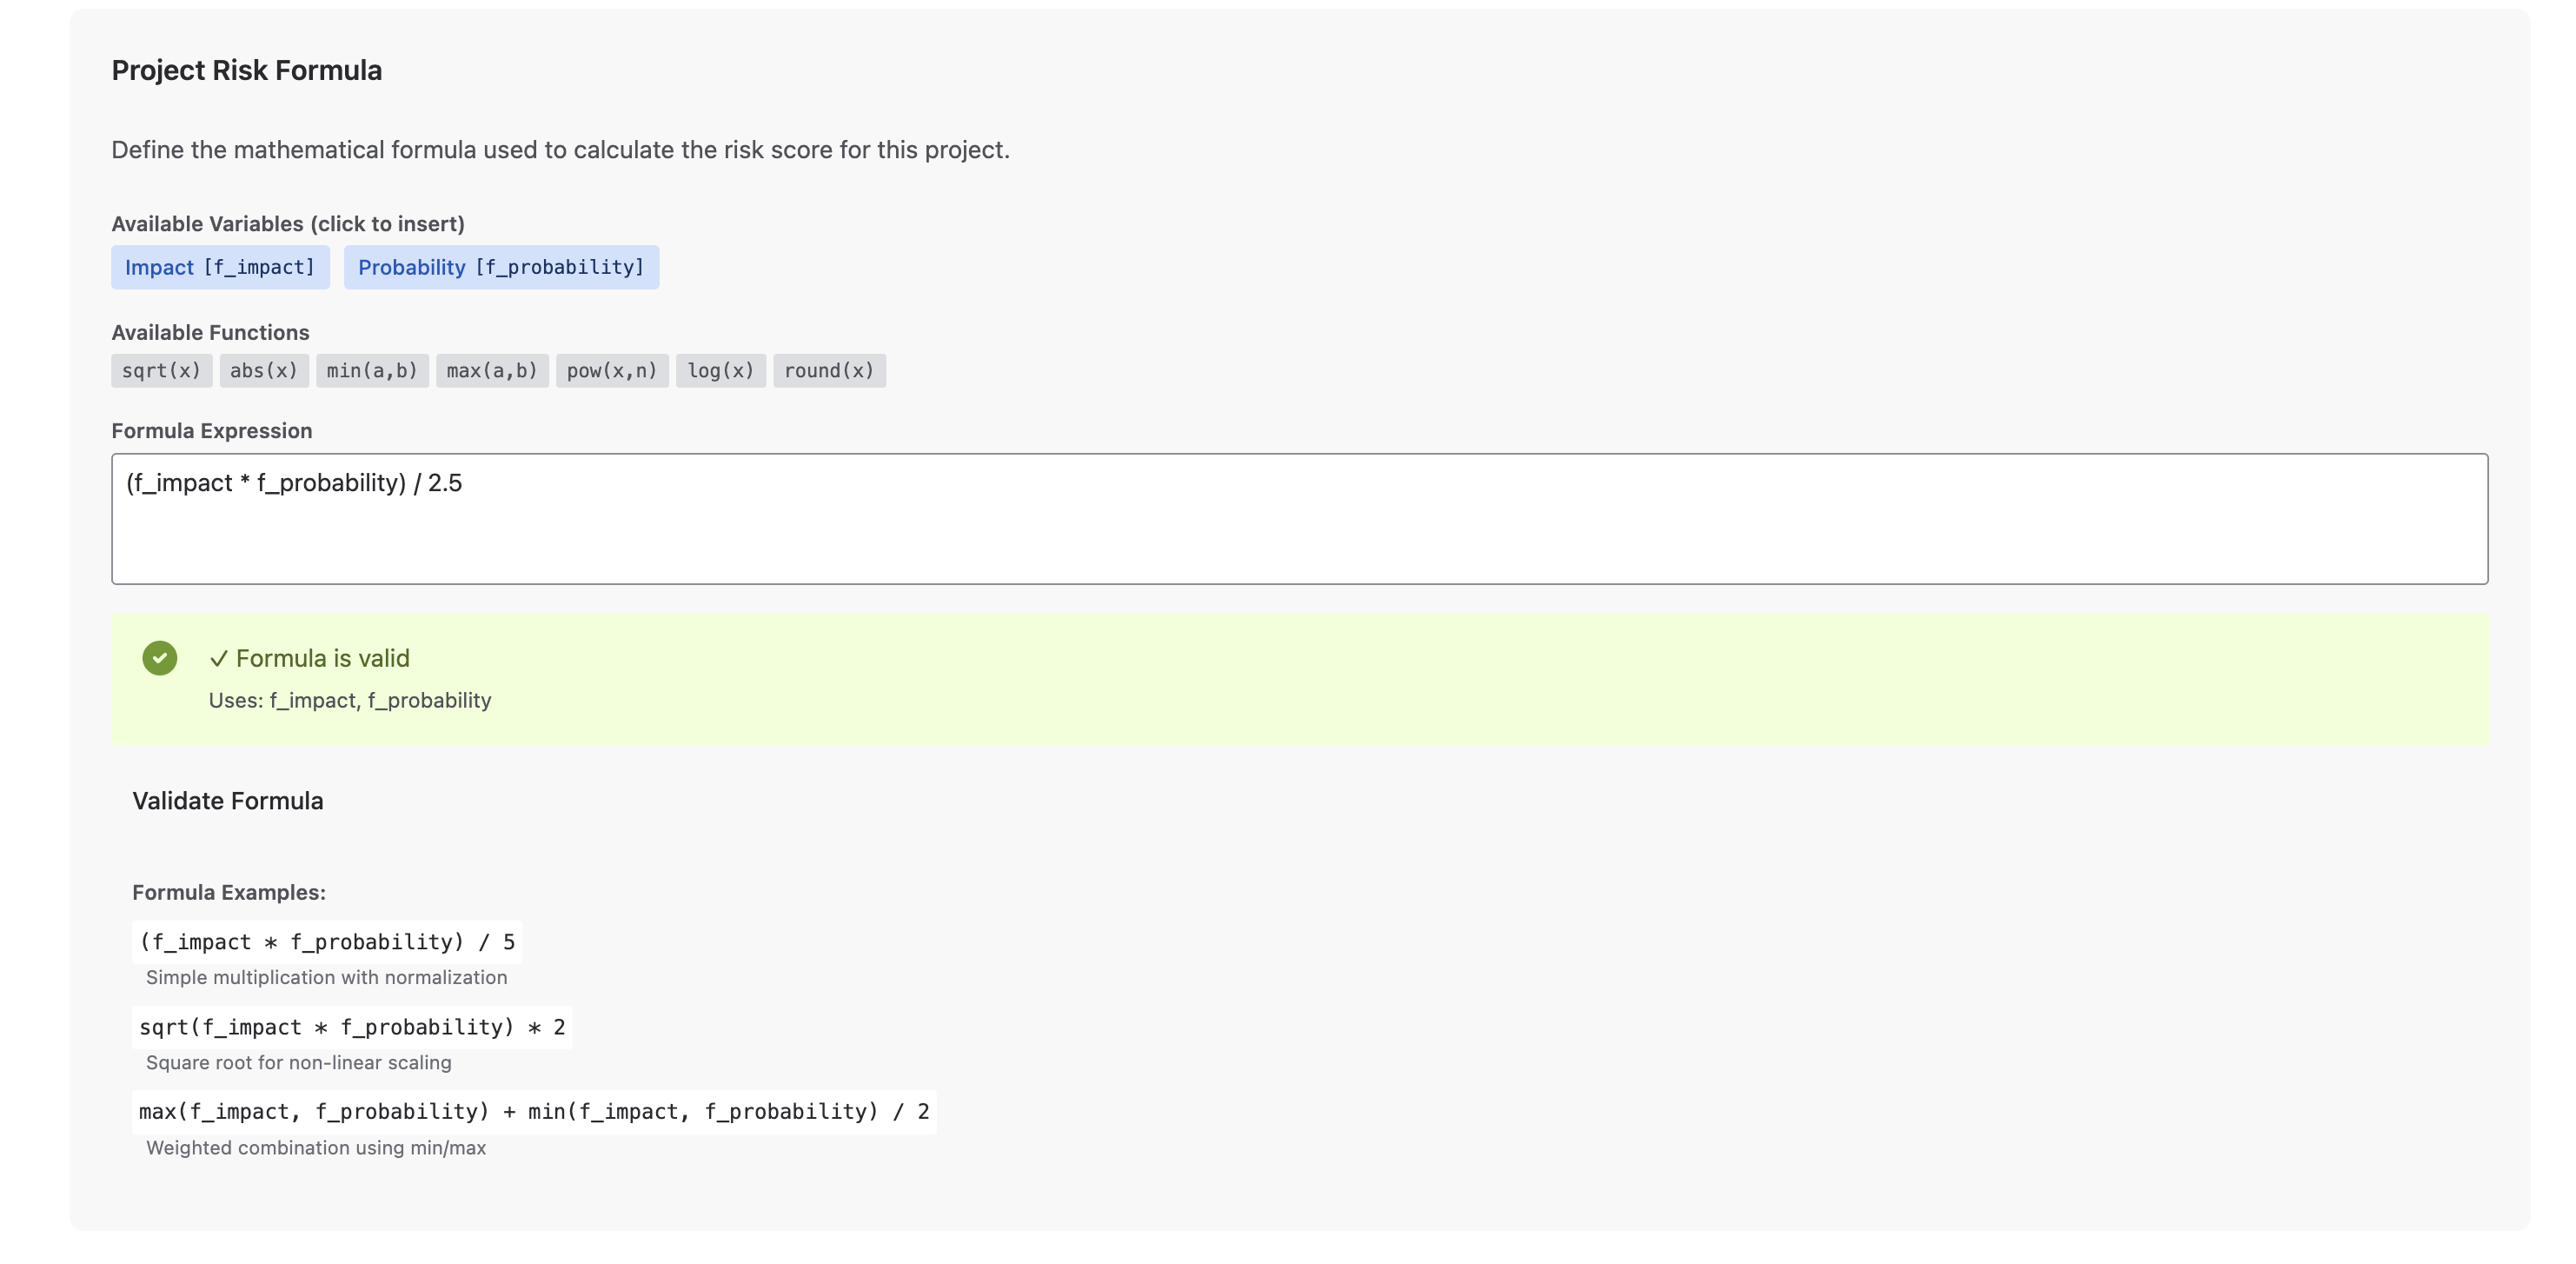
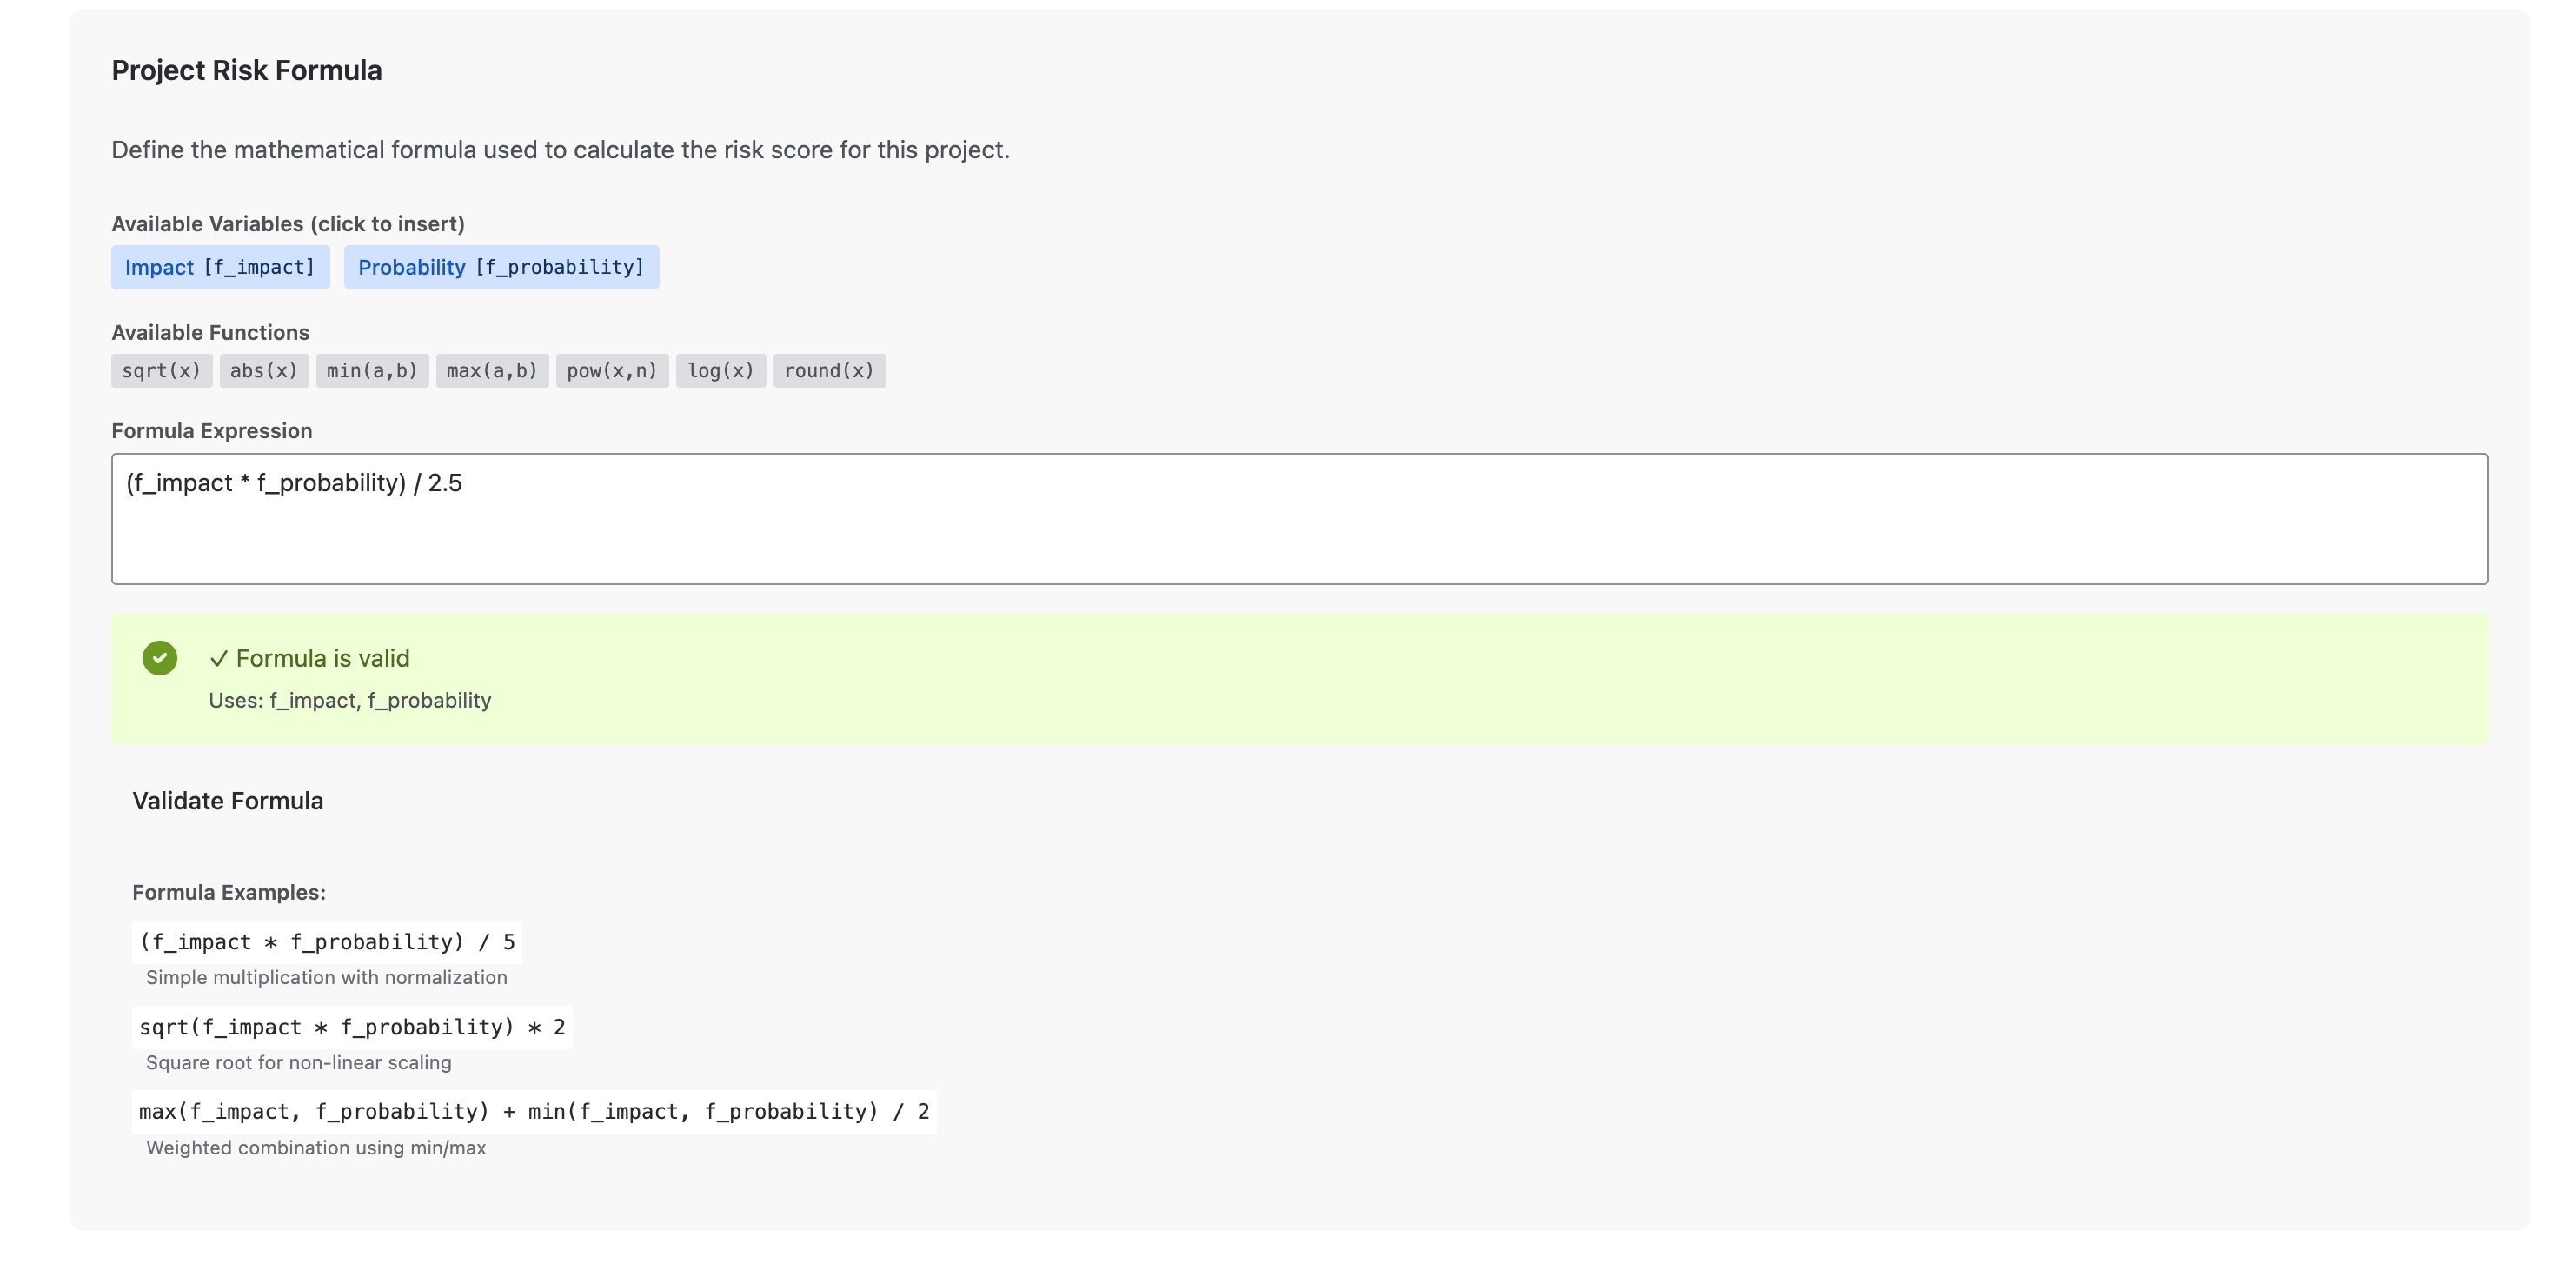
Risk Formula Back to top
The Risk Formula defines how the risk score is calculated from the field values. You can create simple or complex mathematical expressions using the field variables and built-in functions.
Available Variables
Click on the variable tags to insert them into your formula:
Available Functions
The following mathematical functions are available:
Formula Examples
// Standard risk matrix formula
(f_impact * f_probability) / 5
// Square root for non-linear scaling
sqrt(f_impact * f_probability) * 2
// Weighted combination using min/max
max(f_impact, f_probability) + min(f_impact, f_probability) / 2
Formula Validation
Click "Validate Formula" to check if your formula is valid. The system will show:
- ✓ Formula is valid - Green checkmark with list of used variables
- ✗ Formula is invalid - Error message explaining the issue
Risk Formula configuration with expression editor, variable tags, and validation
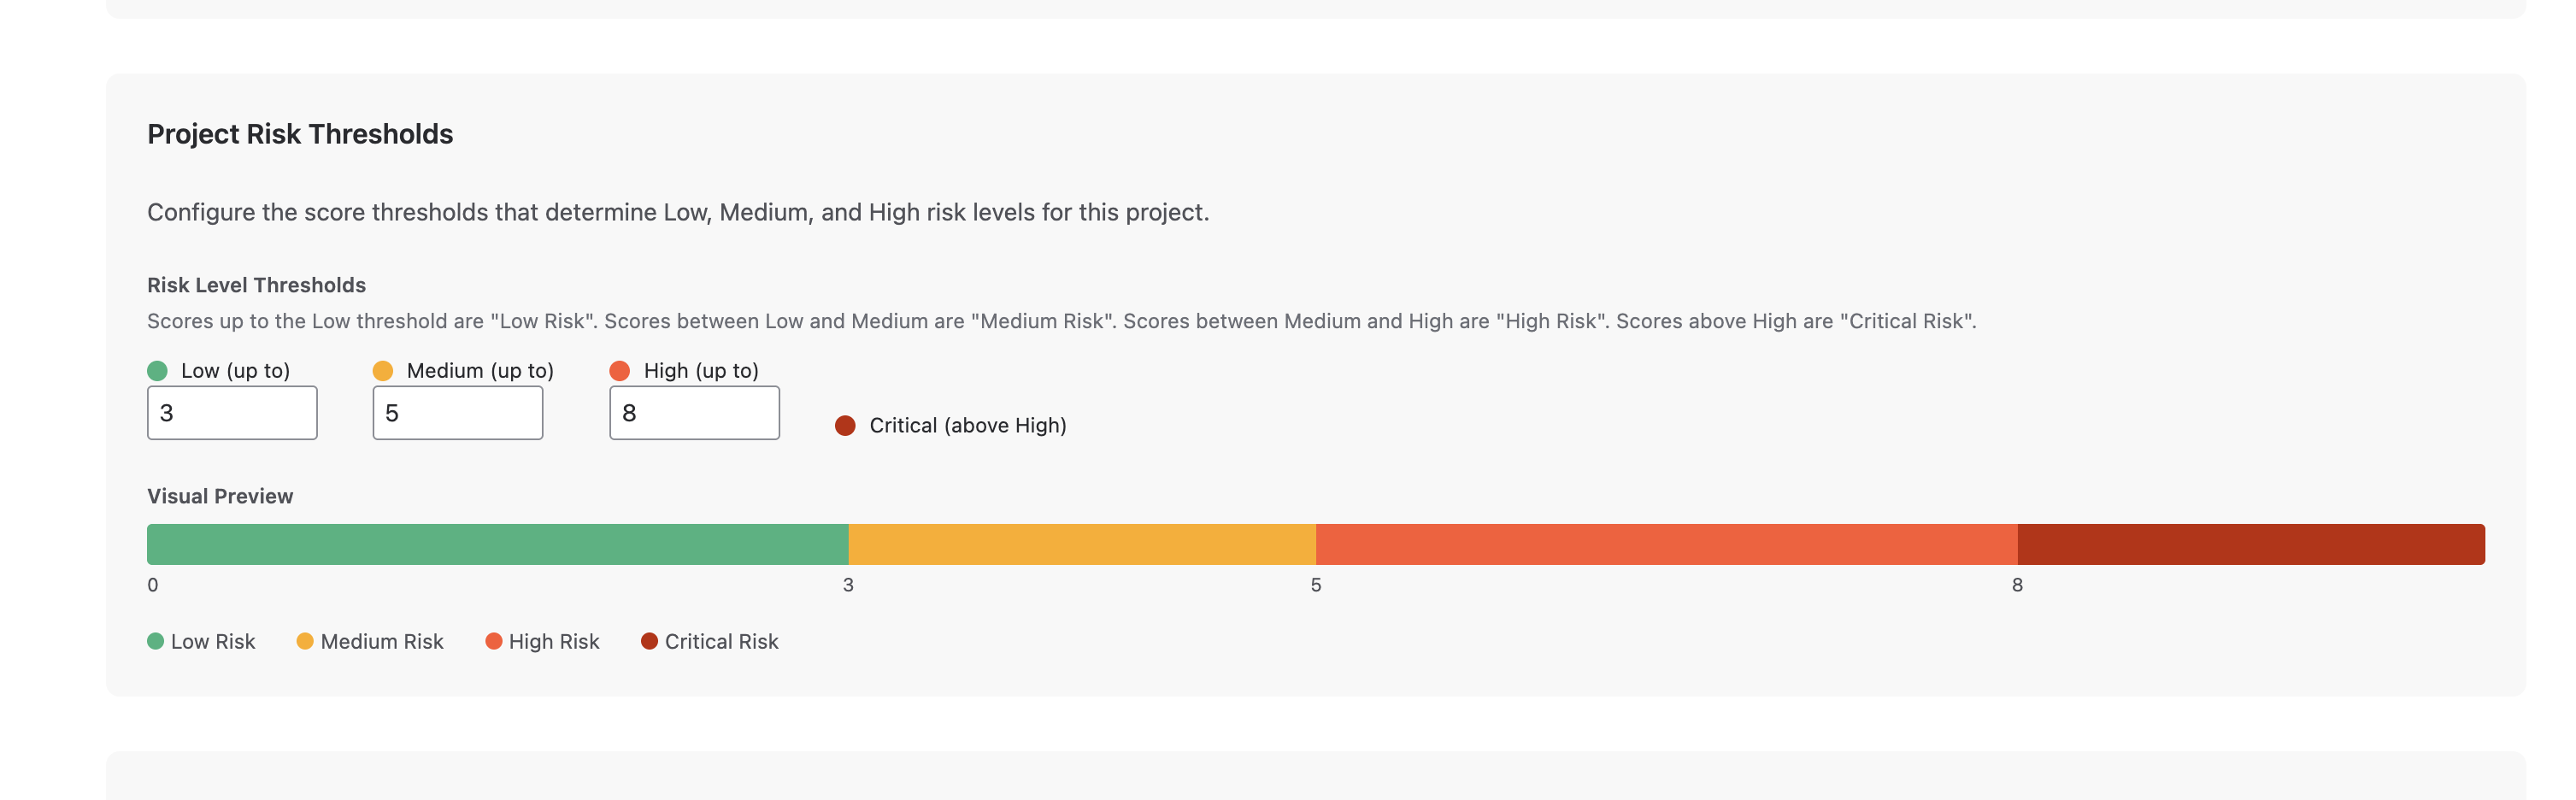
Risk Thresholds Back to top
Risk Thresholds define the score ranges that determine whether a risk is classified as Low, Medium, High, or Critical. Configure the threshold values to match your organization's risk tolerance.
Risk Level Thresholds
Configure where each risk level begins and ends:
| Level | Range | Color |
|---|---|---|
| ● Low | 0 to Low threshold (e.g., 0-3) | Green |
| ● Medium | Low threshold to Medium threshold (e.g., 3-6) | Yellow/Orange |
| ● High | Medium threshold to High threshold (e.g., 6-8) | Red |
| ● Critical | Above High threshold (e.g., 8 ->) | Dark Red |
Visual Preview
The configuration page shows a visual preview of your threshold settings as a color-coded bar:
Formula Testing Back to top
The Formula Testing tool allows you to verify that your formula calculates correctly before saving. Select test values for each field and see the calculated result in real-time.
Using the Formula Tester
- Enter your formula - In the Formula Expression field.
- Click "Test Formula" - Opens the formula testing panel.
- Select test values - Choose values for Impact, Probability, and any other fields.
- View the calculation - See the formula with substituted values and the final result.
- Check the risk level - Verify that the score falls into the expected risk category.
Formula Testing tool showing test values, formula calculation, and result with risk level
Test Result Display
The test result shows:
- Risk Score - The calculated numeric value
- Risk Level - Low, Medium, or High based on thresholds
- Color indicator - Visual color matching the risk level
- Thresholds reference - Shows the configured threshold ranges
Risk Distribution Report (Project Page) Back to top
The Risk Distribution Report is a powerful project-level feature that provides visual insights into the risk distribution across your project issues. Access it directly from the Jira project navigation to generate comprehensive risk reports using JQL filters.
Key Capabilities
- Generate risk distribution reports for entire projects or filtered issue sets
- Use custom JQL queries to analyze specific subsets of issues
- Visual breakdown showing count and percentage of Low, Medium, High, and Critical risks
- Color-coded horizontal bar chart for quick risk assessment
- Detailed issue list grouped by risk level with direct links to issues
- Real-time calculation based on current risk assessment data
Accessing Risk Distribution
- Navigate to your project - Open the Jira project where you want to view risk distribution.
- Click on "Risk Distribution" - Find it in the top navigation bar (Spaces → Risk Distribution).
- Enter JQL query (optional) - Leave empty to analyze all project issues, or enter a specific JQL filter.
- Click Search - Generate the risk distribution report.
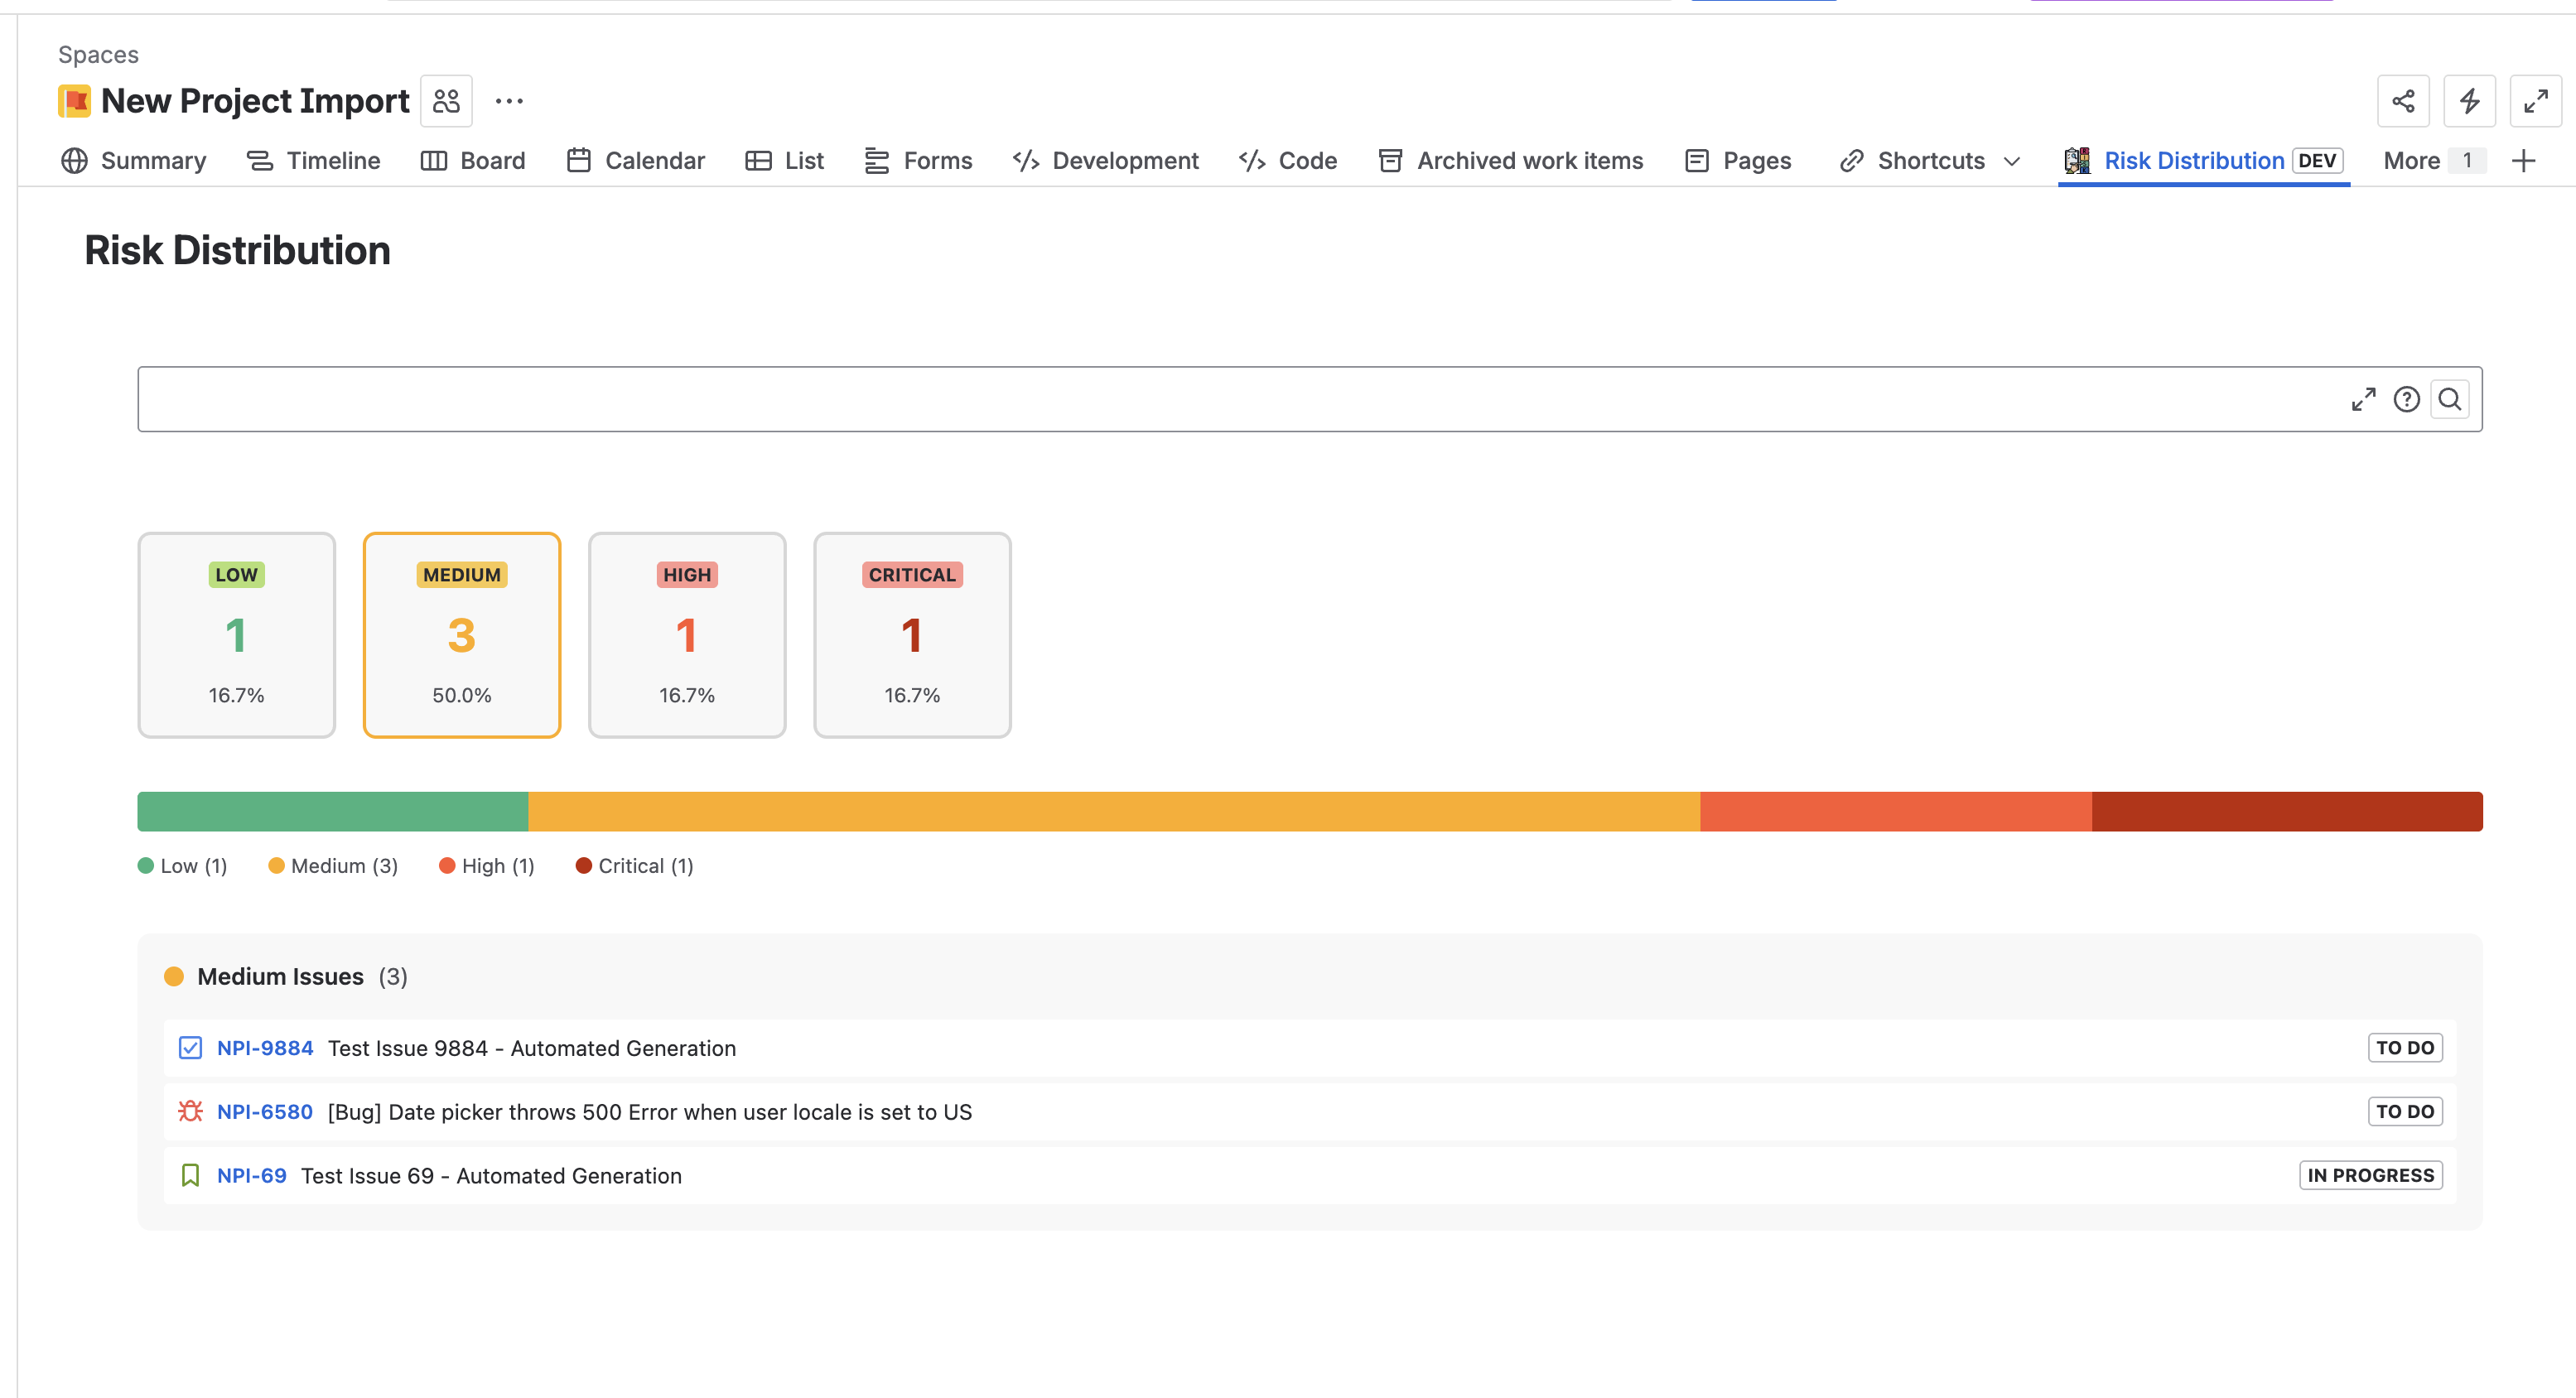
Risk Distribution Report showing visual breakdown of risk levels with counts, percentages, and issue details
Report Components
The Risk Distribution report displays:
| Component | Description |
|---|---|
| Risk Level Cards | Four cards showing count and percentage for Low, Medium, High, and Critical risk levels |
| Visual Bar Chart | Horizontal color-coded bar showing proportional distribution of risk levels |
| Issue List | Expandable sections for each risk level showing individual issues with keys, titles, and status |
Using JQL Filters
You can use JQL to generate targeted risk reports:
// All issues in the project (leave JQL empty or use)
project = MYPROJECT
// Only unresolved issues
resolution = Unresolved
// Specific issue types
issuetype in (Bug, Story) AND status != Done
// Issues assigned to specific team
assignee in membersOf("development-team")
Understanding the Report
- Low Risk (Green): Issues with risk scores in the low range - minimal attention needed
- Medium Risk (Yellow/Orange): Issues requiring monitoring and potential action
- High Risk (Red): Critical issues requiring immediate attention
- Critical Risk (Dark Red): Highest priority issues demanding urgent action
JQL Search - Find Issues by Risk Back to top
Risk Assessment stores the calculated risk data in two Jira custom fields: "Risk Score" (numeric) and "Risk Level" (text: Low, Medium, High). This enables you to search and filter issues using standard JQL (Jira Query Language) to create filters, boards, and reports based on risk criteria.
What You Can Do with JQL Risk Search
- Find all high-risk issues (score above threshold)
- Create saved filters for risk monitoring
- Build Kanban/Scrum boards filtered by risk score
- Generate reports on risk distribution
- Set up notifications for high-risk issues
- Track risk trends over time
JQL Examples - By Risk Level
Use the "Risk Level" field for simple category-based searches:
// Find all high-risk issues
"Risk Level" = "High"
// Find medium and high risk issues
"Risk Level" in ("Medium", "High")
// Find unresolved high-risk bugs
issuetype = Bug AND resolution = Unresolved AND "Risk Level" = "High"
JQL Examples - By Risk Score
Use the "Risk Score" field for precise numeric comparisons:
// Find issues with score above 7
"Risk Score" > 7
// Find issues with score between 3 and 7
"Risk Score" >= 3 AND "Risk Score" <= 7
// Find high-risk issues in a specific project
project = "MYPROJECT" AND "Risk Score" > 7
// Find issues with any risk assessment
"Risk Score" is not EMPTY
Creating Saved Filters
- Go to Filters → Advanced issue search in Jira.
- Enter your JQL query using the "Risk Score" field.
- Click "Save as" to create a saved filter.
- Share the filter with your team or use it in dashboards and boards.
Available Custom Fields
| Field Name | Type | Values | Best For |
|---|---|---|---|
| Risk Score | Number | 0 to max scale (e.g., 0-10) | Precise comparisons, sorting, ranges |
| Risk Level | Text | "Low", "Medium", "High" | Simple category filters, dashboards |