Documentation for Flexible Calendar for Jira
Introduction
Flexible Calendar for JIRA is calendar planner for project managers, event planners, HR managers, and whoever needs a more visual calendar planner. Our straightforward interface and easy-to-use platform are by far what sets us apart from other calendar planners.
Create New Calendar #back to top
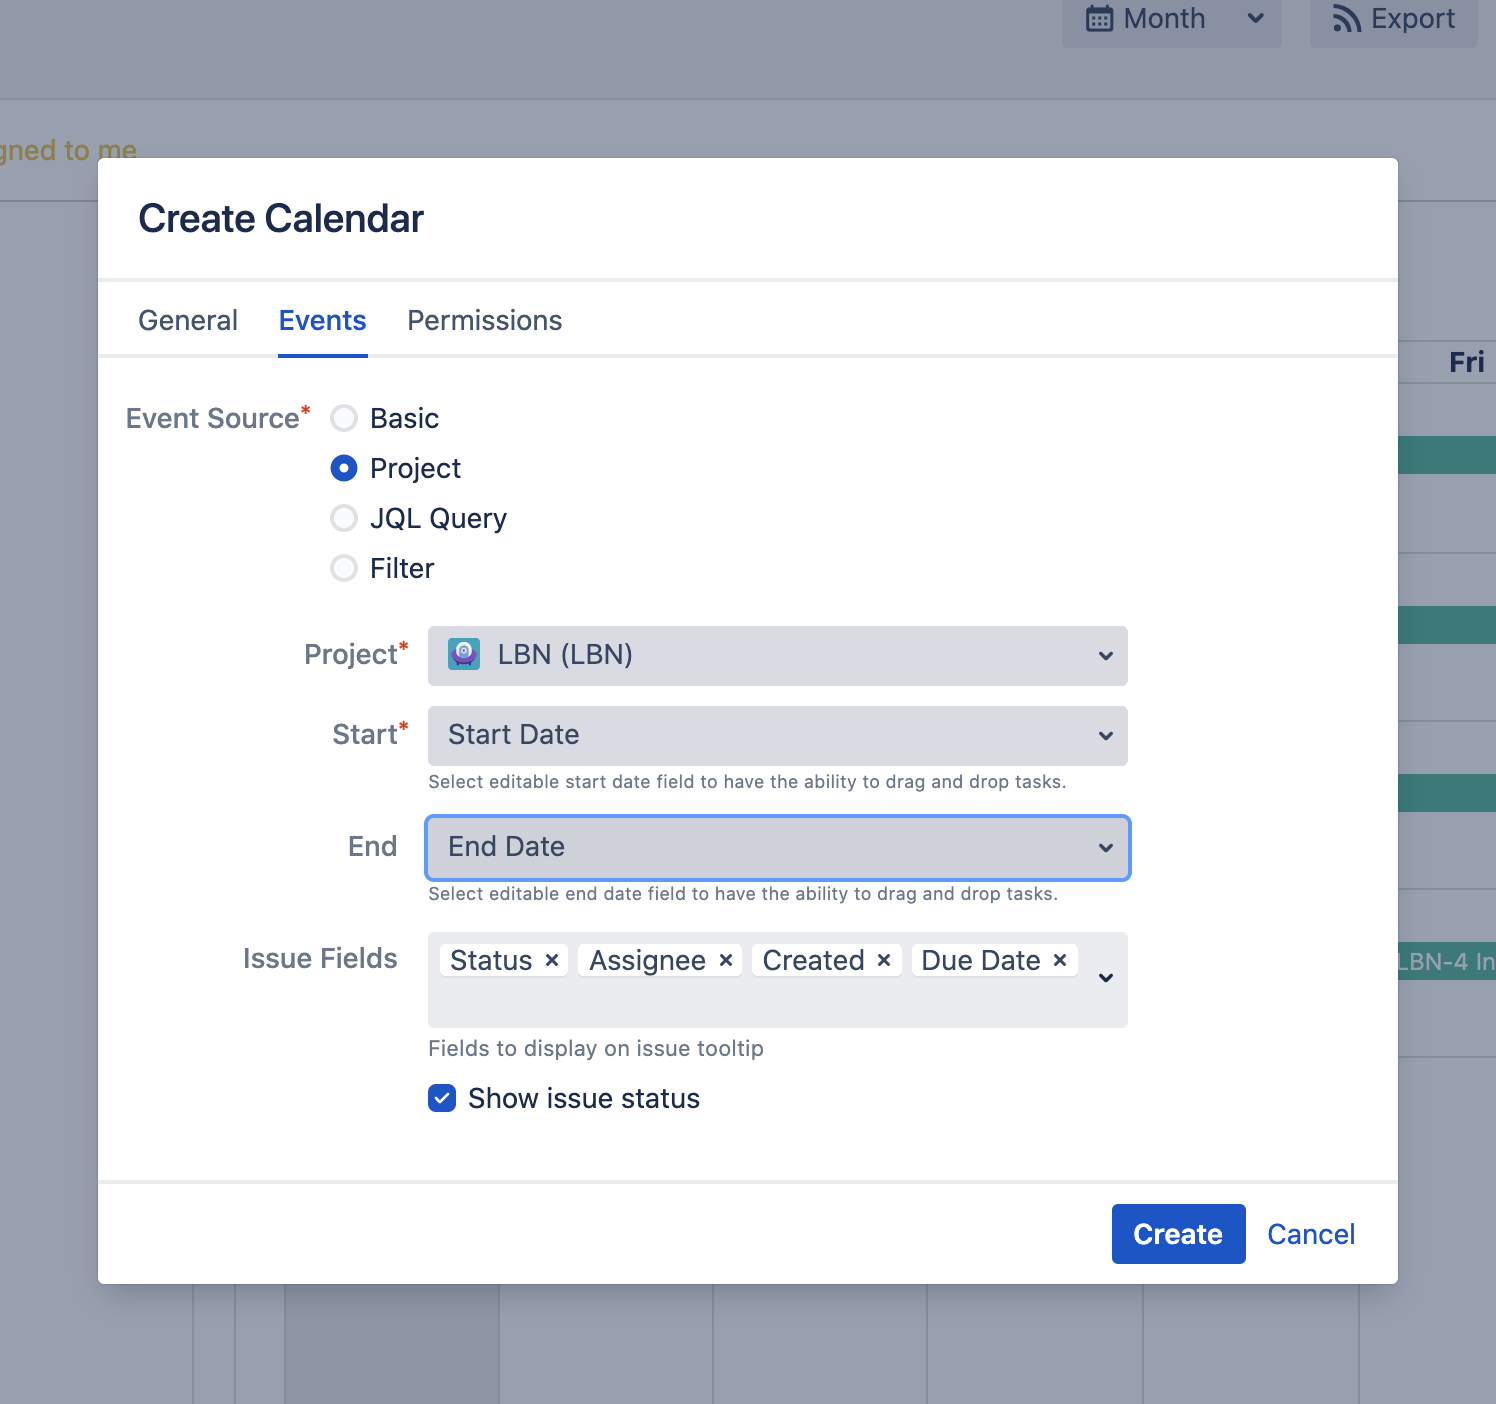
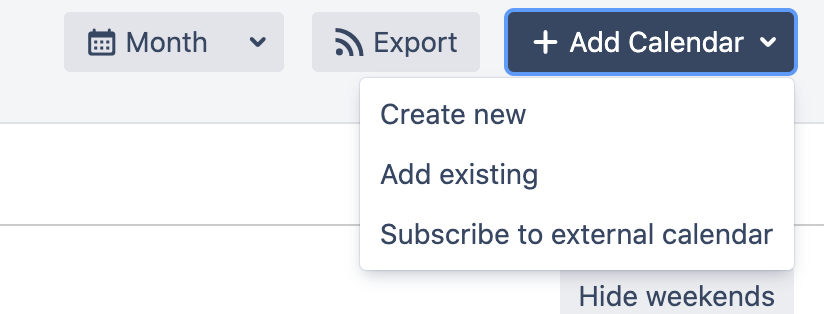
- Step 1 - Click "Add Calendar" in the upper right corner of the screen, then choose create.
- Step 2 - Enter required information about
your Calendar:
- Name - The name of your calendar will be used when displayed in the list of calendars, when searching, and so on
- Color - Events or Issues on the calendar will be painted in this color
- Basic - in this mode, it is possible to display and create only custom events
- Project - in this mode, you can select a specific project to display tasks
- Filter - creating a calendar via the Jira filter
- JQL query - creating a calendar via the JQL query
- Issue Fields - JIRA fields that should be displayed on issue card
- Start - (Start day field of Jira task - can be Jira system or custom field)
- End -(End day field of Jira task - can be Jira system or custom field) if it is empty then any task will be displayed for a duration of one day.
- Depending on start and end date fields type (date only or date time) events will be scheduled as All Day or not
Select an editable start date field to have the ability to drag and drop tasksSelect an editable end date field to have the ability to drag and drop tasks - Step 3 - Click Create.
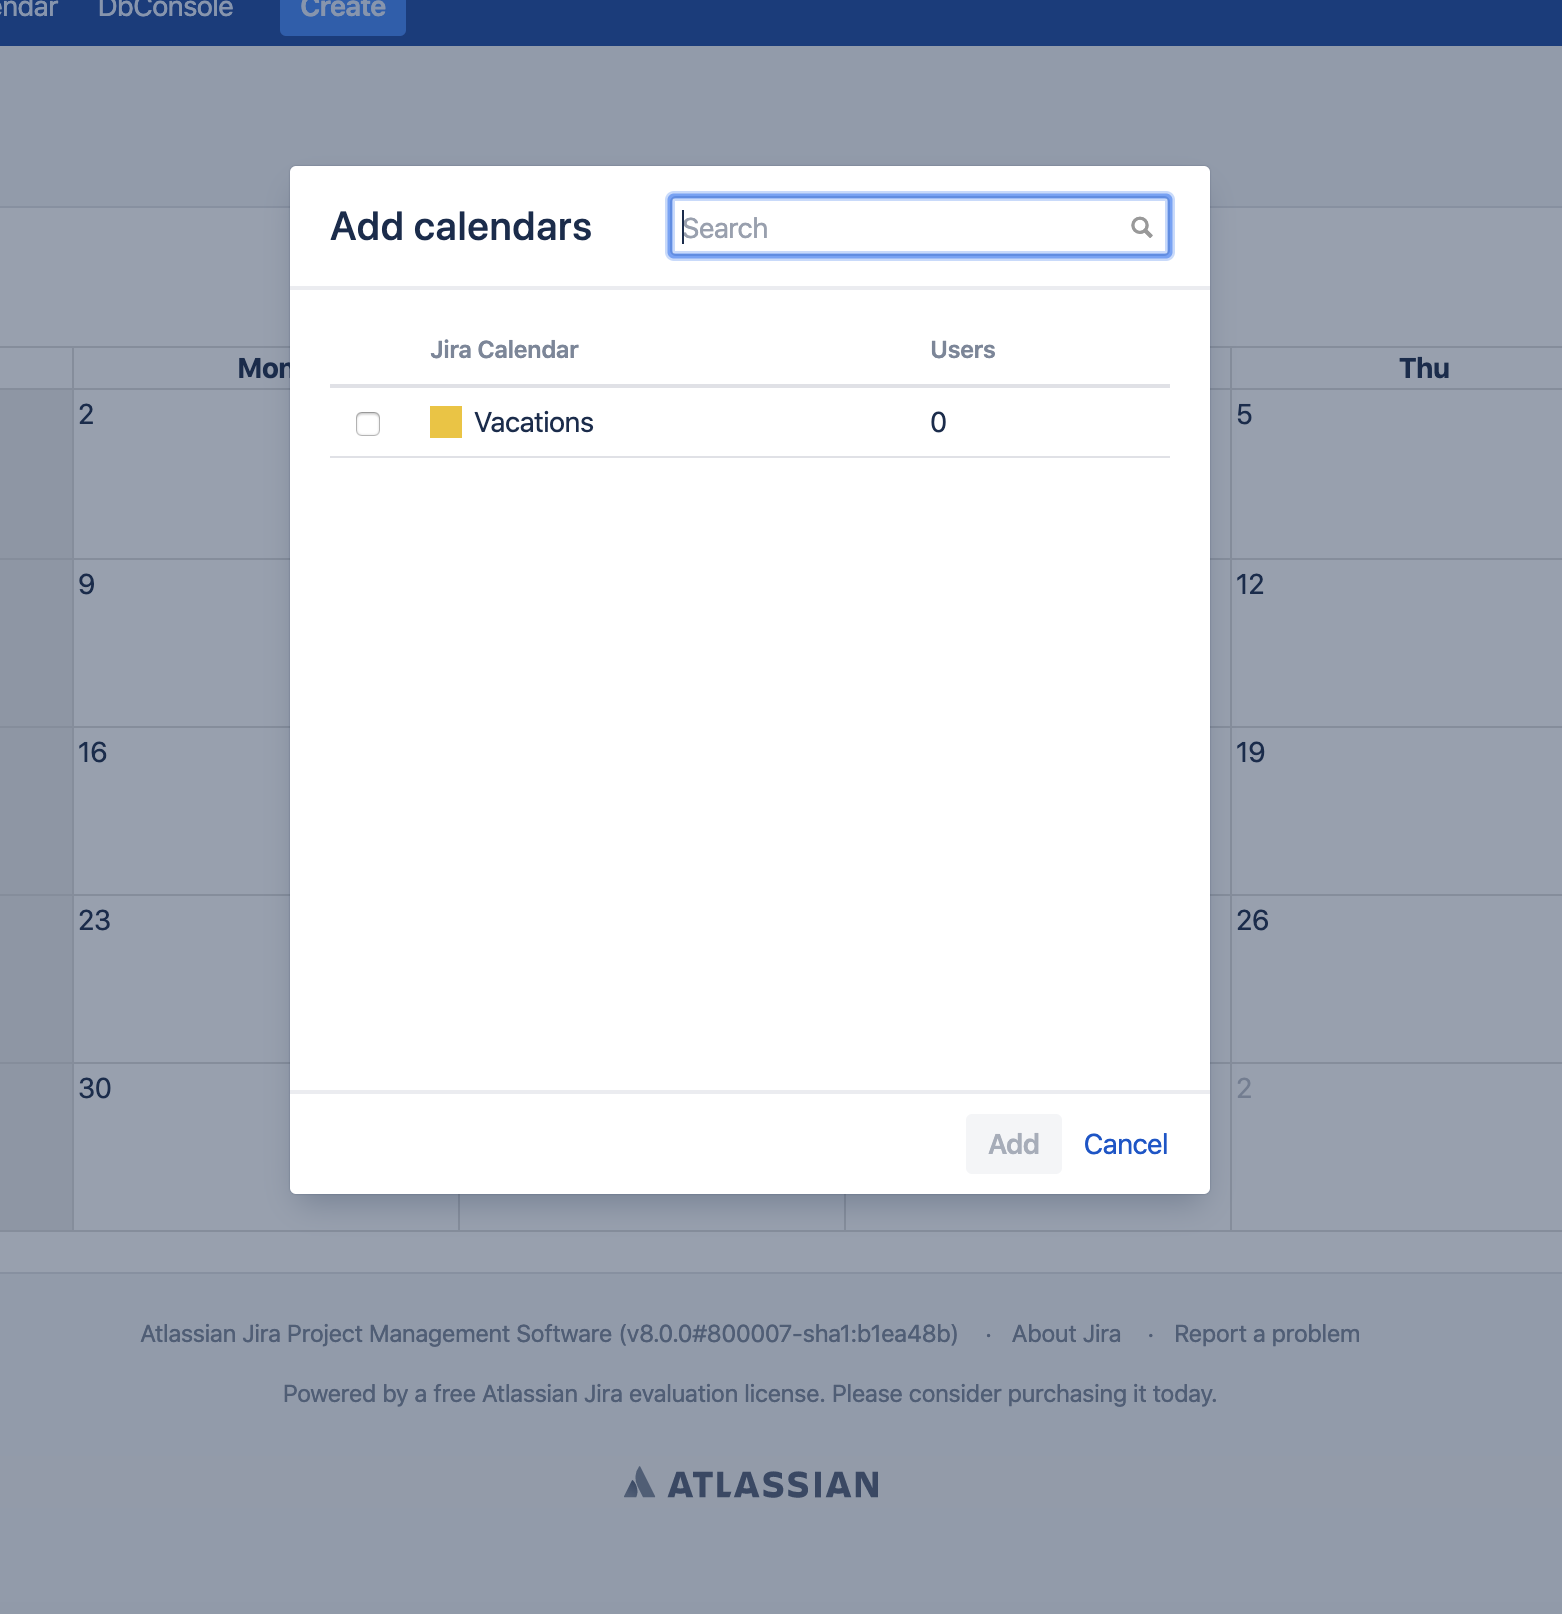
Add Existing Calendar #back to top
- Step 1 - Click "Add Calendar" in the upper right corner of the screen, then choose add existing.
- Step 2 - Select existing calendar from the list (all the calendars to which you have permission are displaying)
- Step 3 - Click Add.
-
Subscribe to External Calendar #back to
top
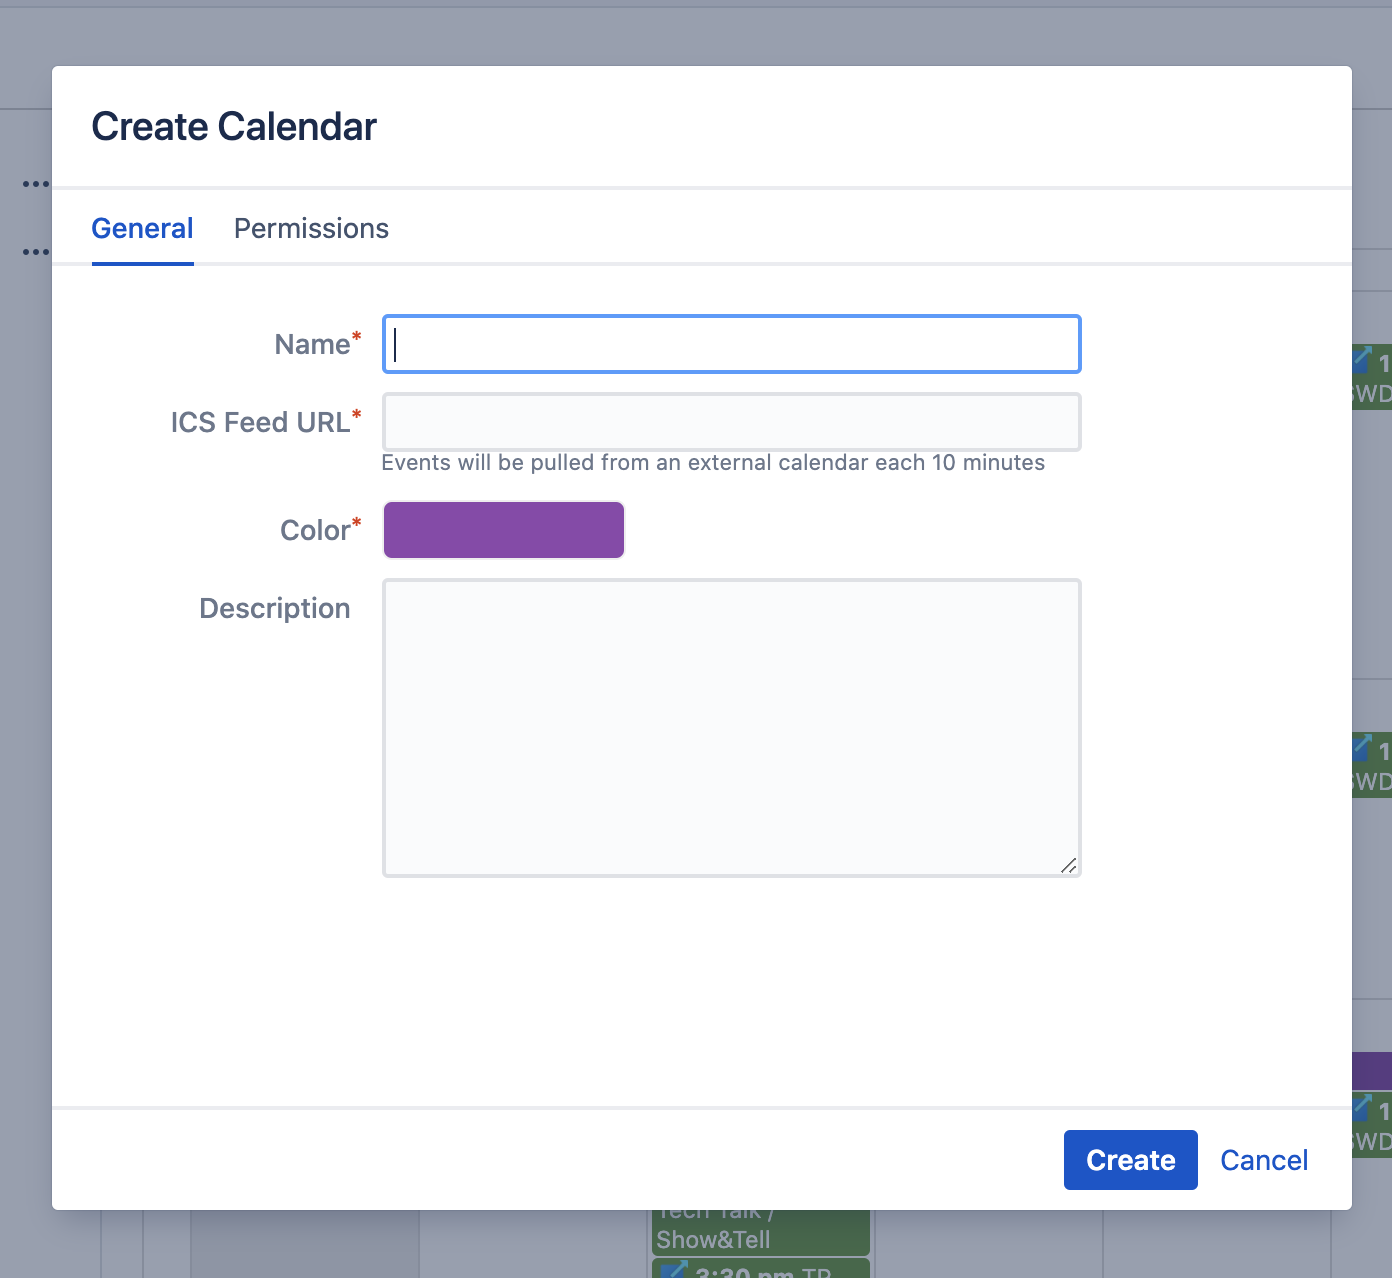
- Step 1 - Click "Add Calendar" in the upper right corner of the screen, then choose "Subscribe to external calendar.
-
- Step 2 - Enter required information about your Calendar:
- Name - The name of your calendar will be used when displayed in the list of calendars, when searching, and so on
- ICS Feed Url - The Url to external calendar
- Color - Events or Issues on the calendar will be painted in this color
Events will be pulled from an external calendar each 10 minutes - Step 3 - Click Create.
Create New Event Types for Calendar #back to
top
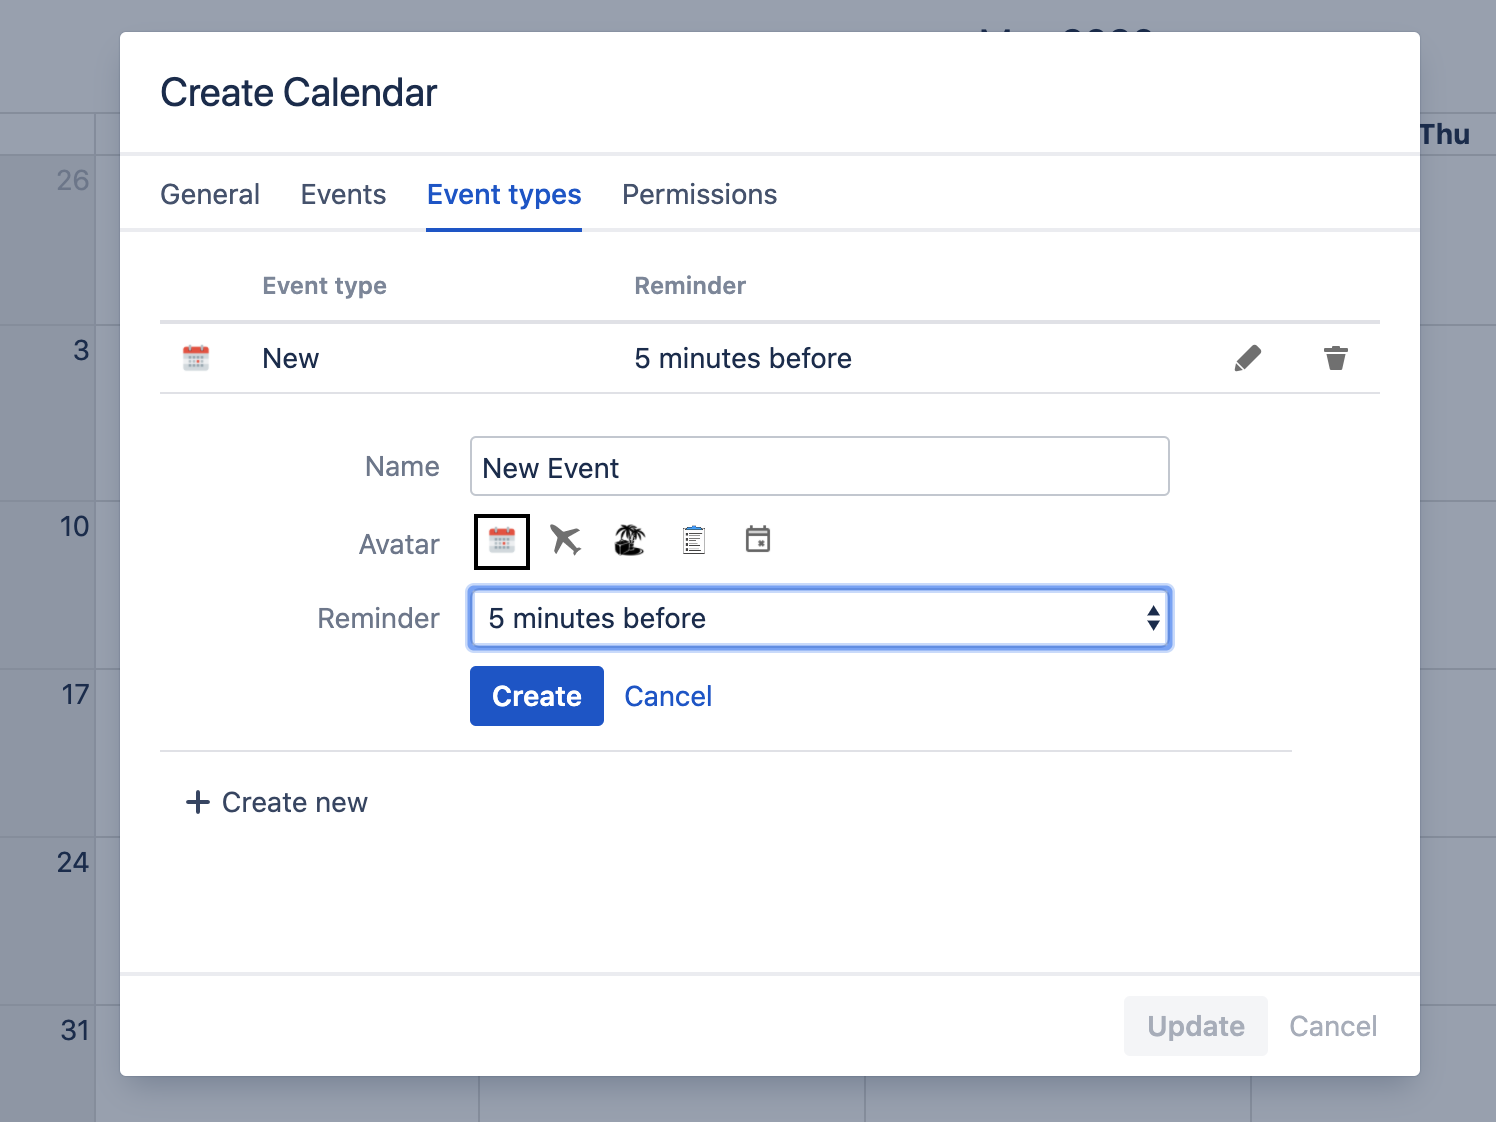
- Step 1 - Click the three dots to the right of the calendar name to which you want to create new event type
- Step 2 - Open "Event Types" tab.
- Step 3 - Click "Add new Event" button.
- Step 4 - Enter required fields:
- Name - The name of Event Type
- Icon - Icon of Event Type
- Reminder - Select a time before which event participants should be notified about event start
- Step 5 - Click Create.
Create New Event#back to
top
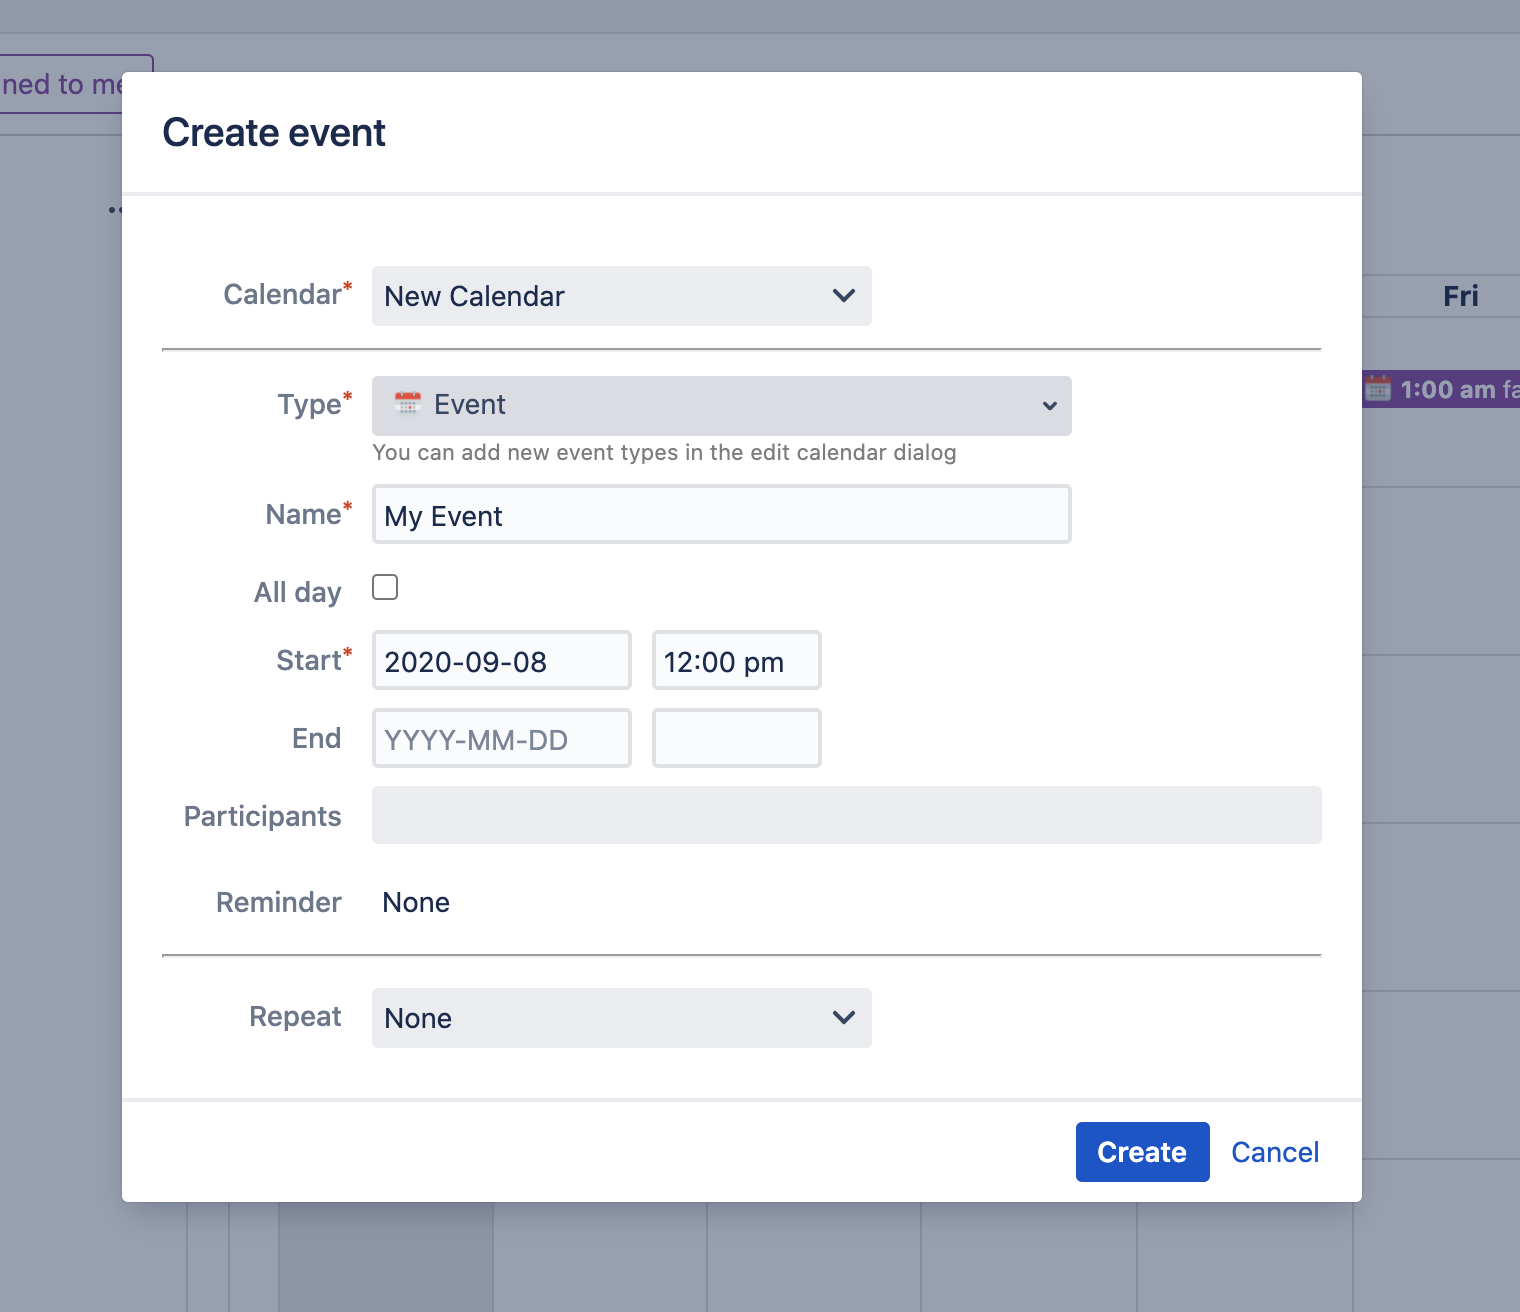
- Step 1 - Double-click on the calendar day block
- Step 2 - Select the calendar on which the event will be created.
- Step 3 - Type the name of your Event will be used when displayed in calendar.
- Step 4 - Select the type of event you'd like to add from the Type drop-down.
- Step 5 - Choose if it should be All Day event or not.
- Step 6 - Specify the start and end dates for your event.
- Step 7 - Select users who participate in the event.
- Step 8 - Click Create.
Create Recurrent Events #back to
top
- Step 1 - Double-click on the calendar day block
- Step 2 - Select the calendar on which the event will be created.
- Step 3 - Type the name of your Event will be used when displayed in calendar.
- Step 4 - Select the type of event you'd like to add from the Type drop-down.
- Step 5 - Choose if it should be All Day event or not.
- Step 6 - Specify the start and end dates for your event.
- Step 7 - Select users who participate in the event.
- Step 8 - Select recurrent mode from "Repeat" dropdown.
- Step 9 - Specify recurrence rule.
- Step 10 - Click Create.
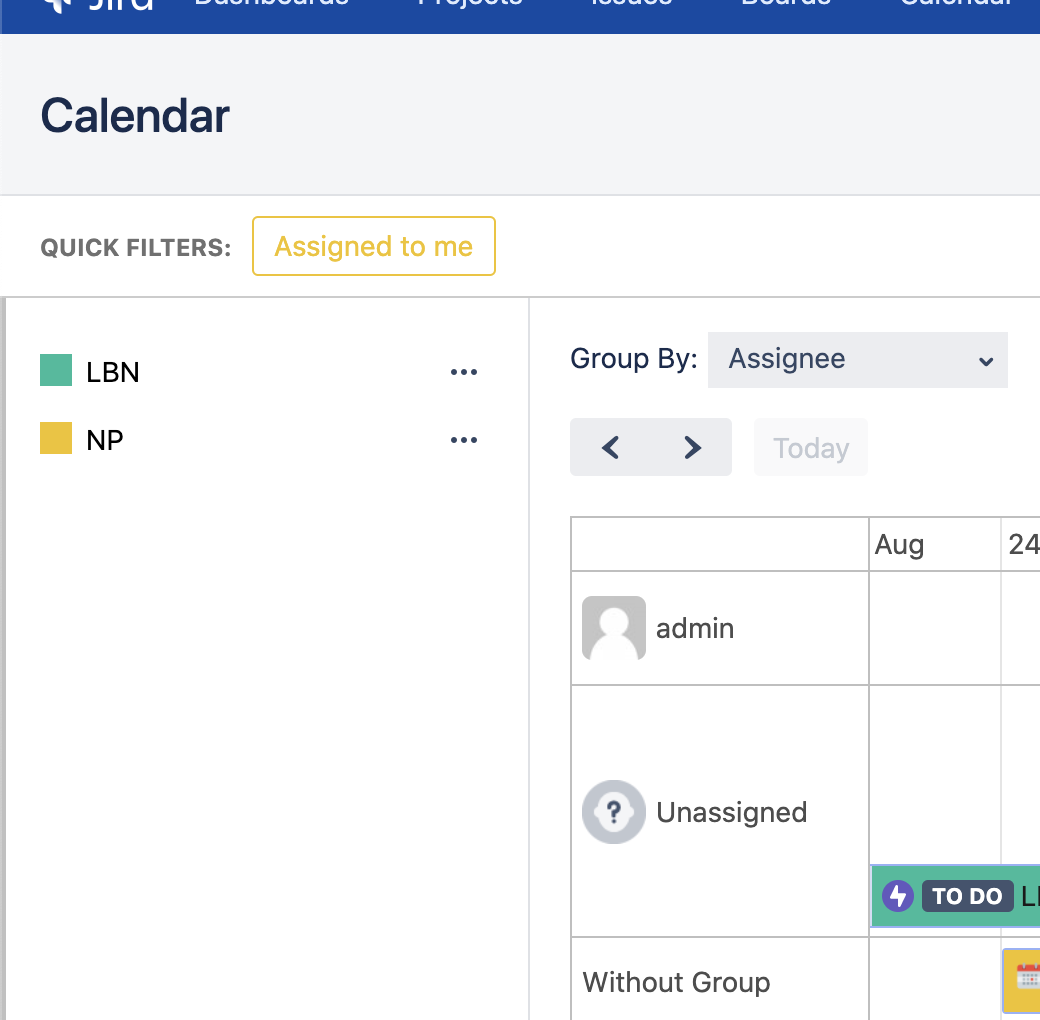
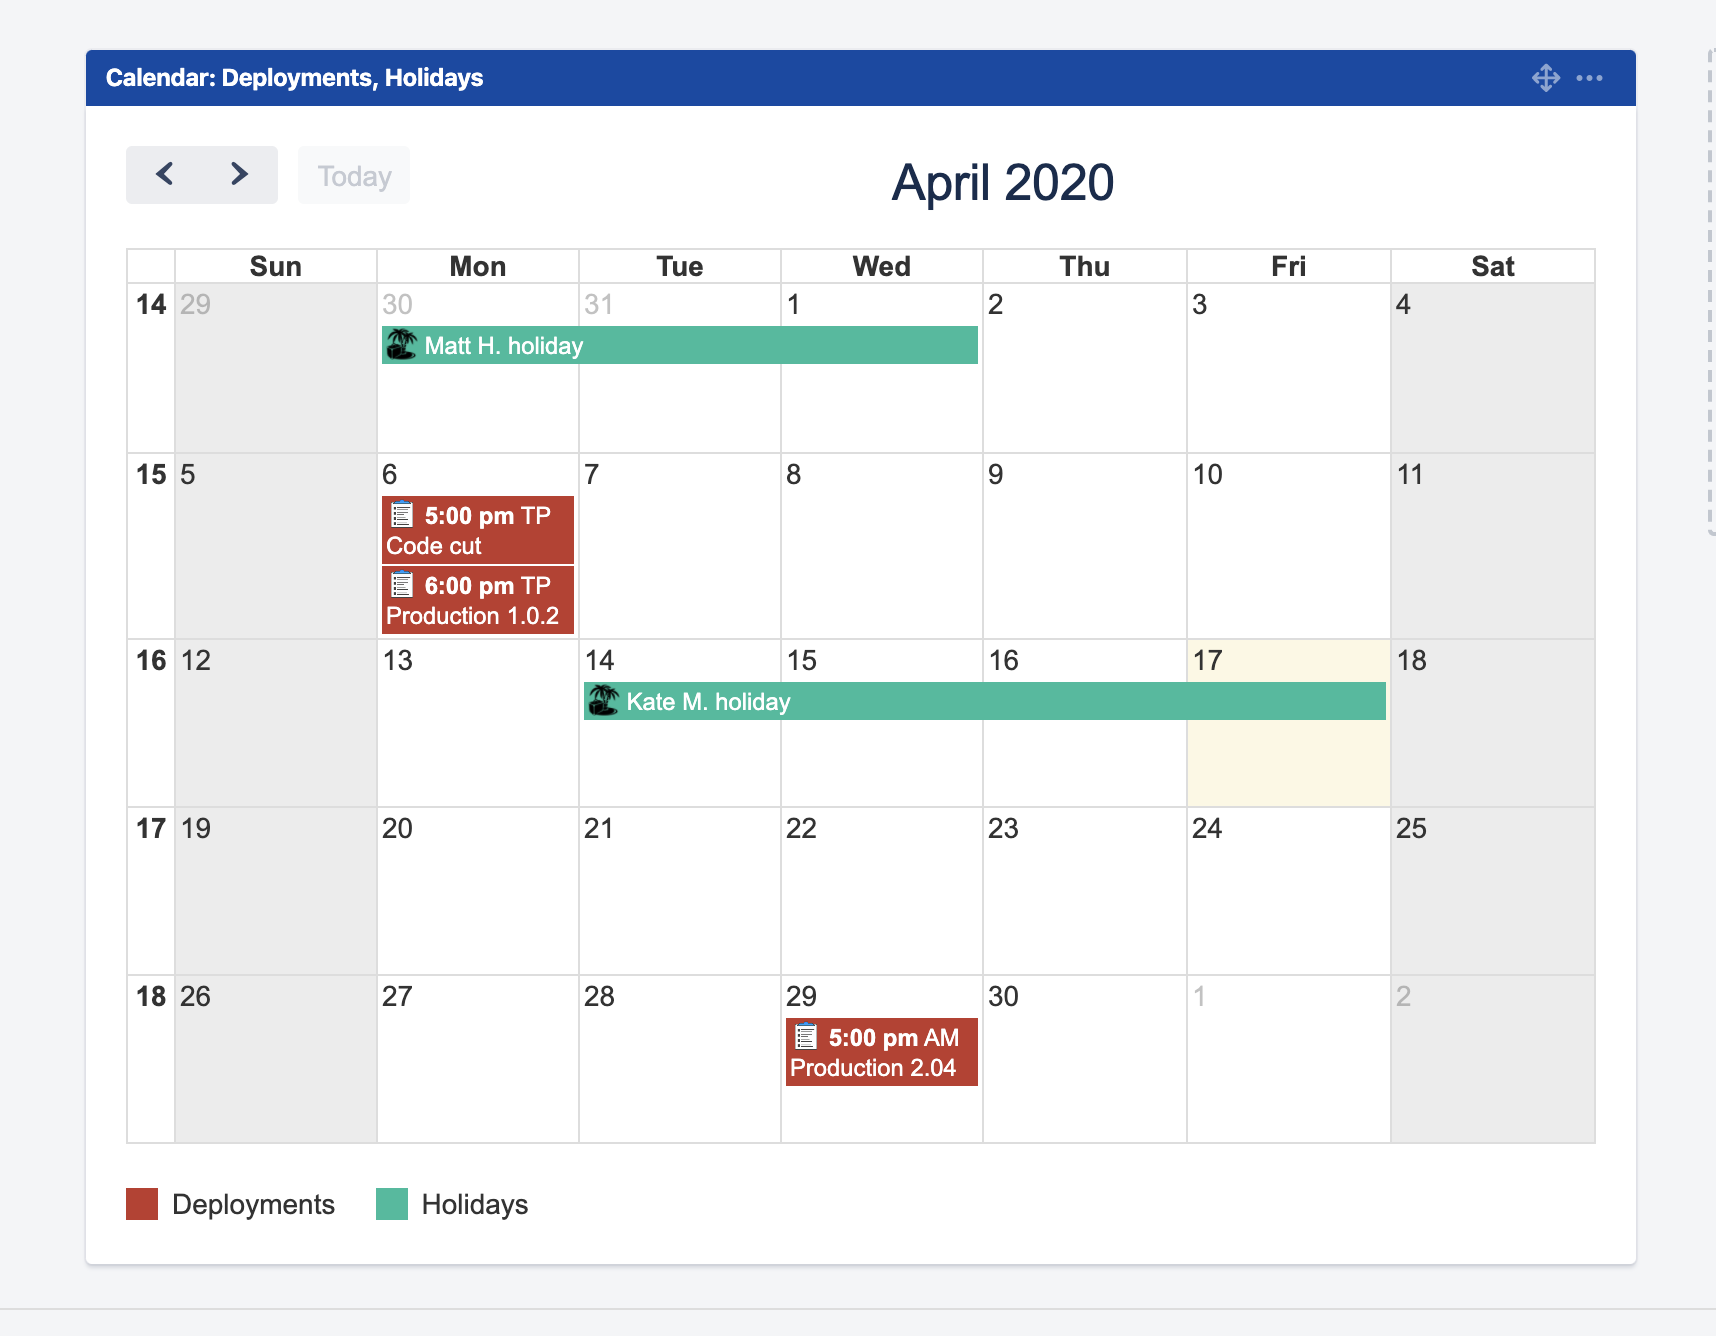
Timeline View #back to
top
Group Tasks by Project

Group Tasks by Issue Type
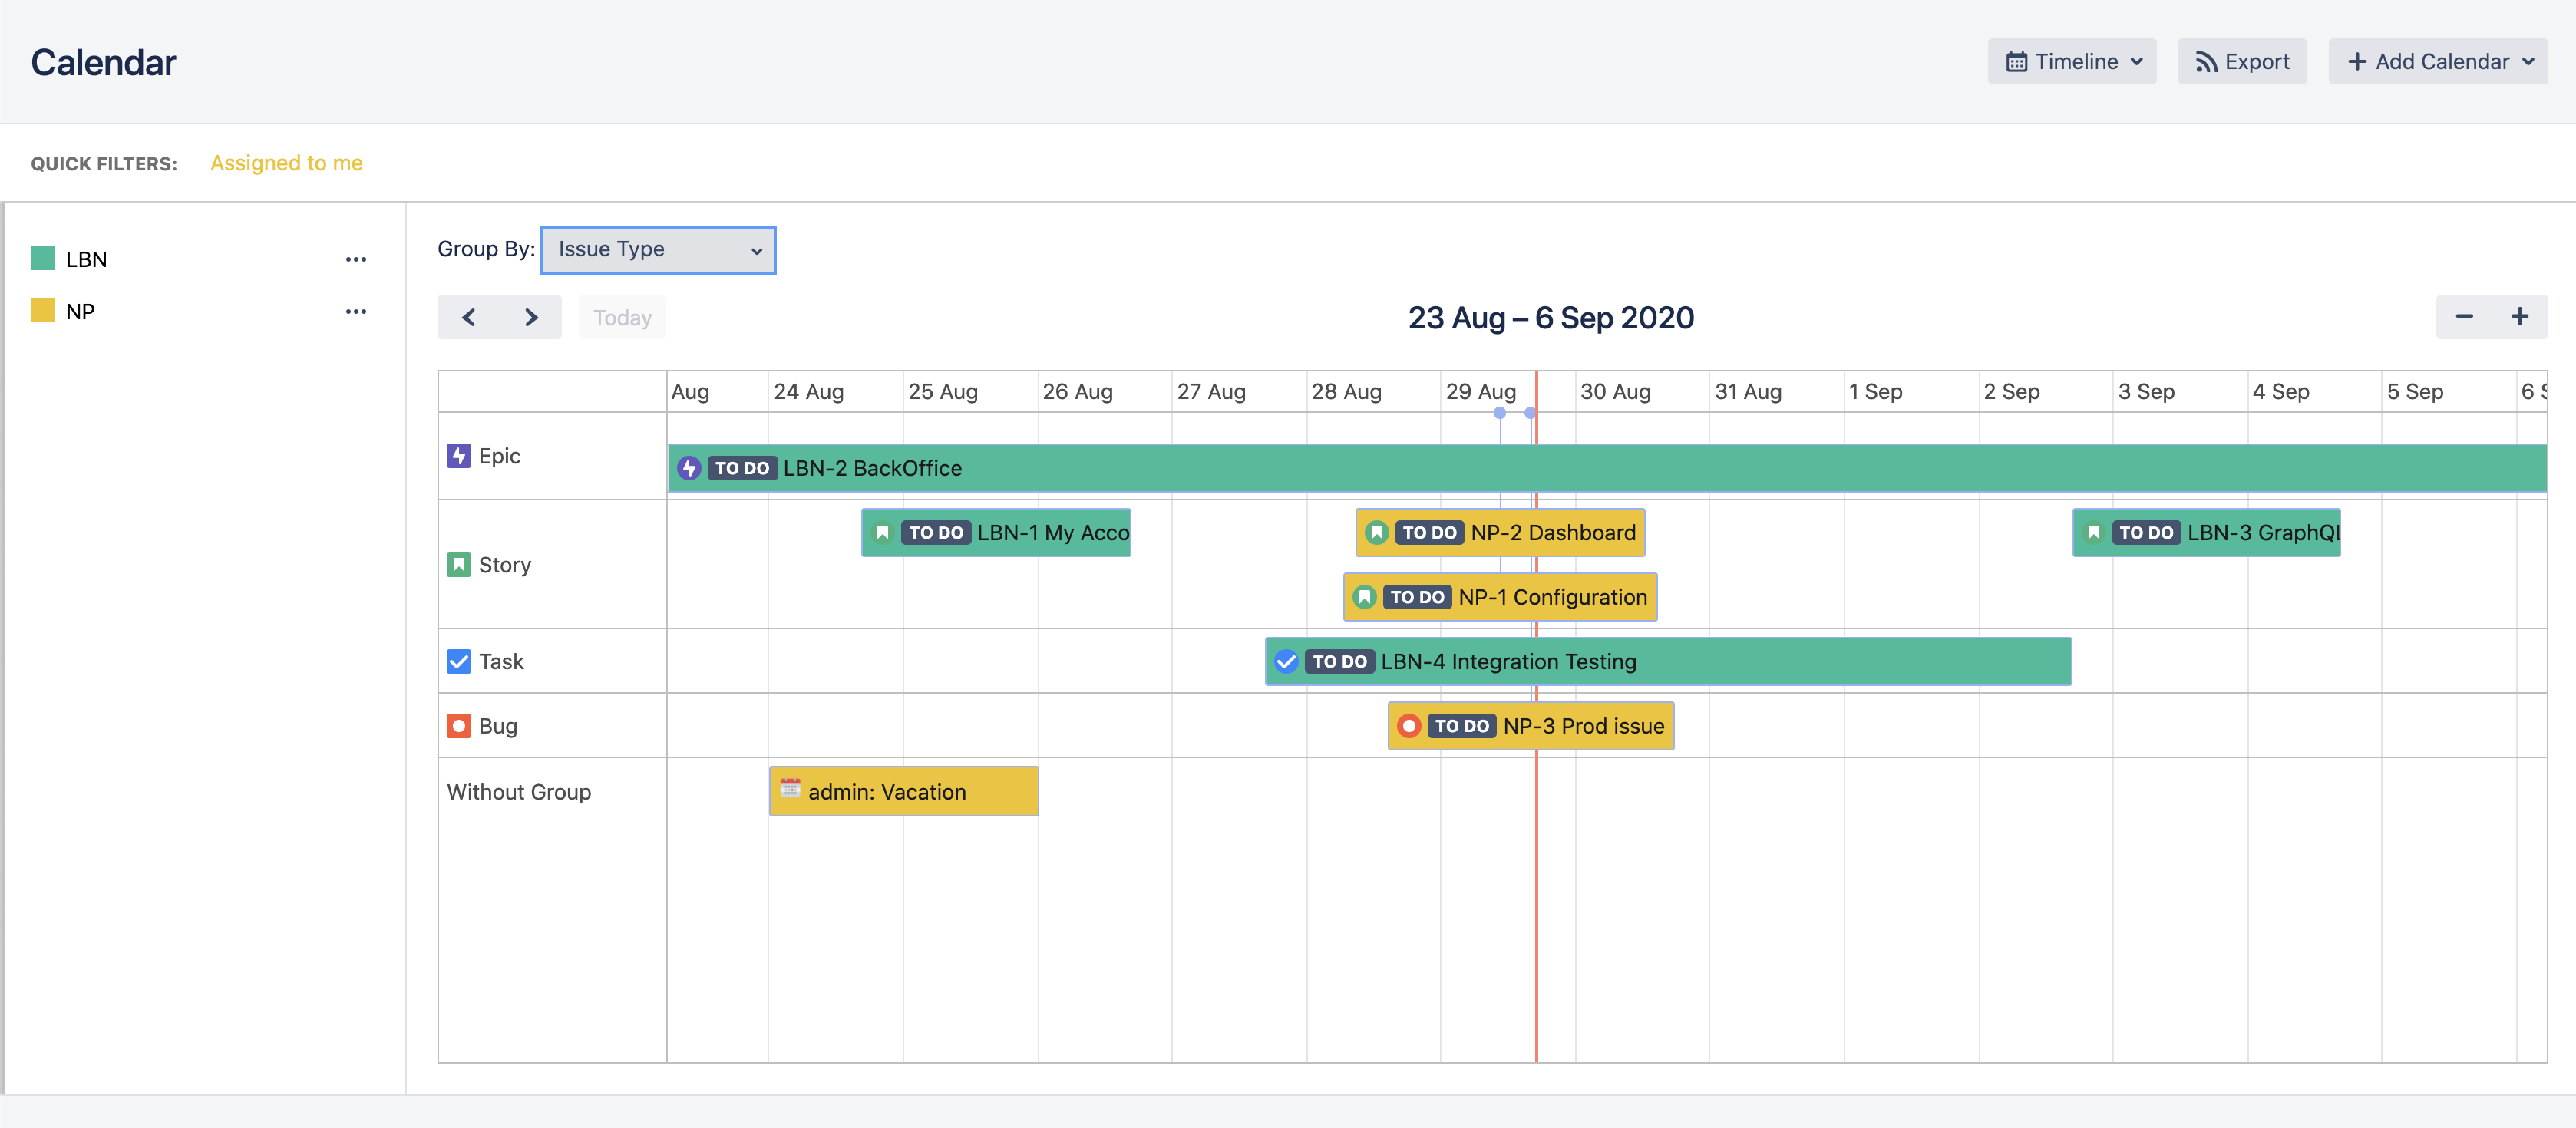
Group Tasks by Assignee

- - In order to drag and drop events in timeline view, you need click on it firstly
-

- - You can change scope of timeline view by clicking + and - buttons at the right of calendar header
-

- - In order to create new events on the timeline view click the three dots to the right of the calendar name and select "New Event"
-
Agenda Week View #back to
top
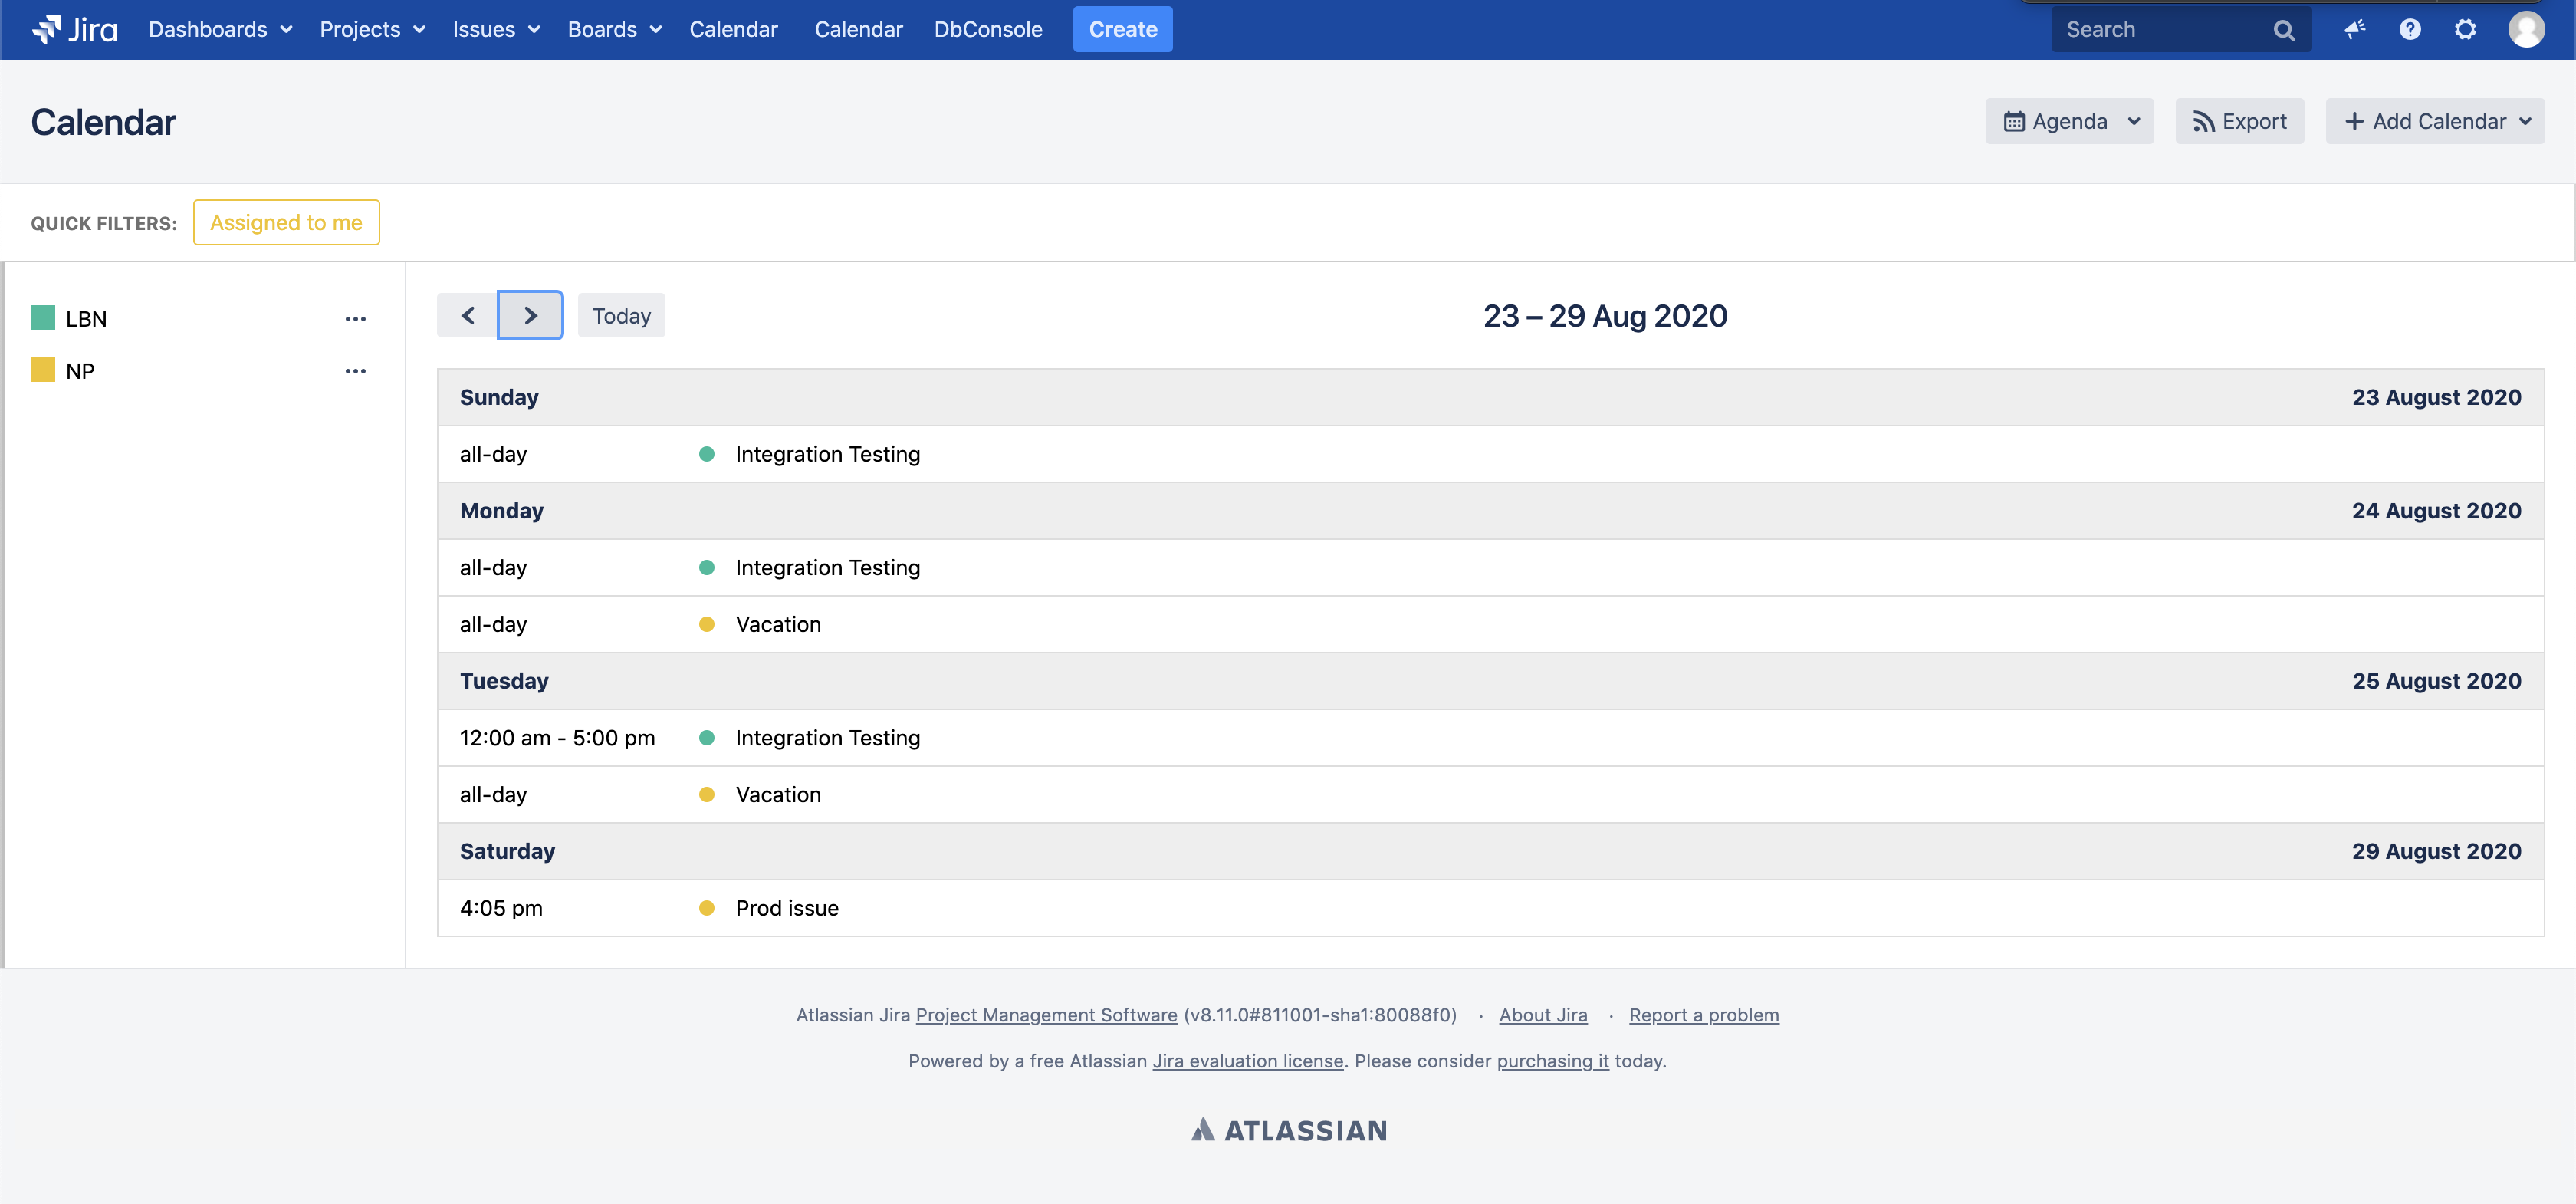
- Step 1 - Click on "Views" dropdown on the top right corner
- Step 2 - Select Agenda.
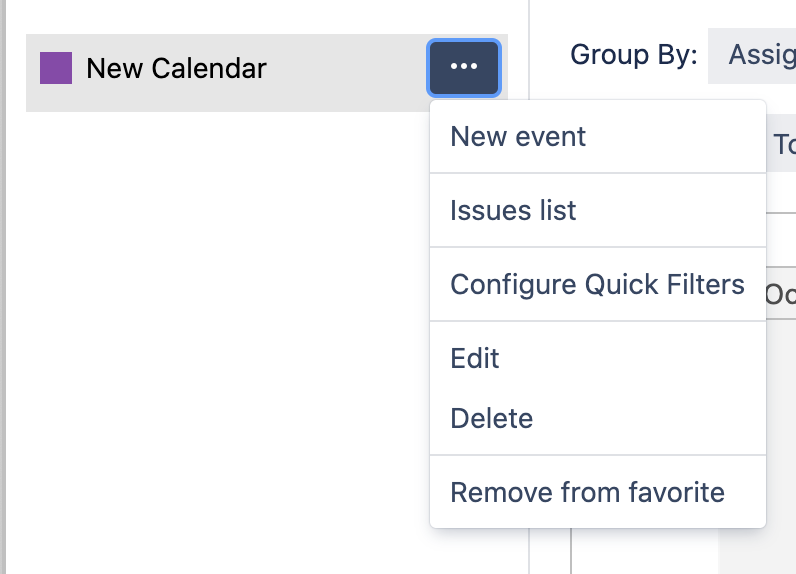
Calendar Permission #back to
top
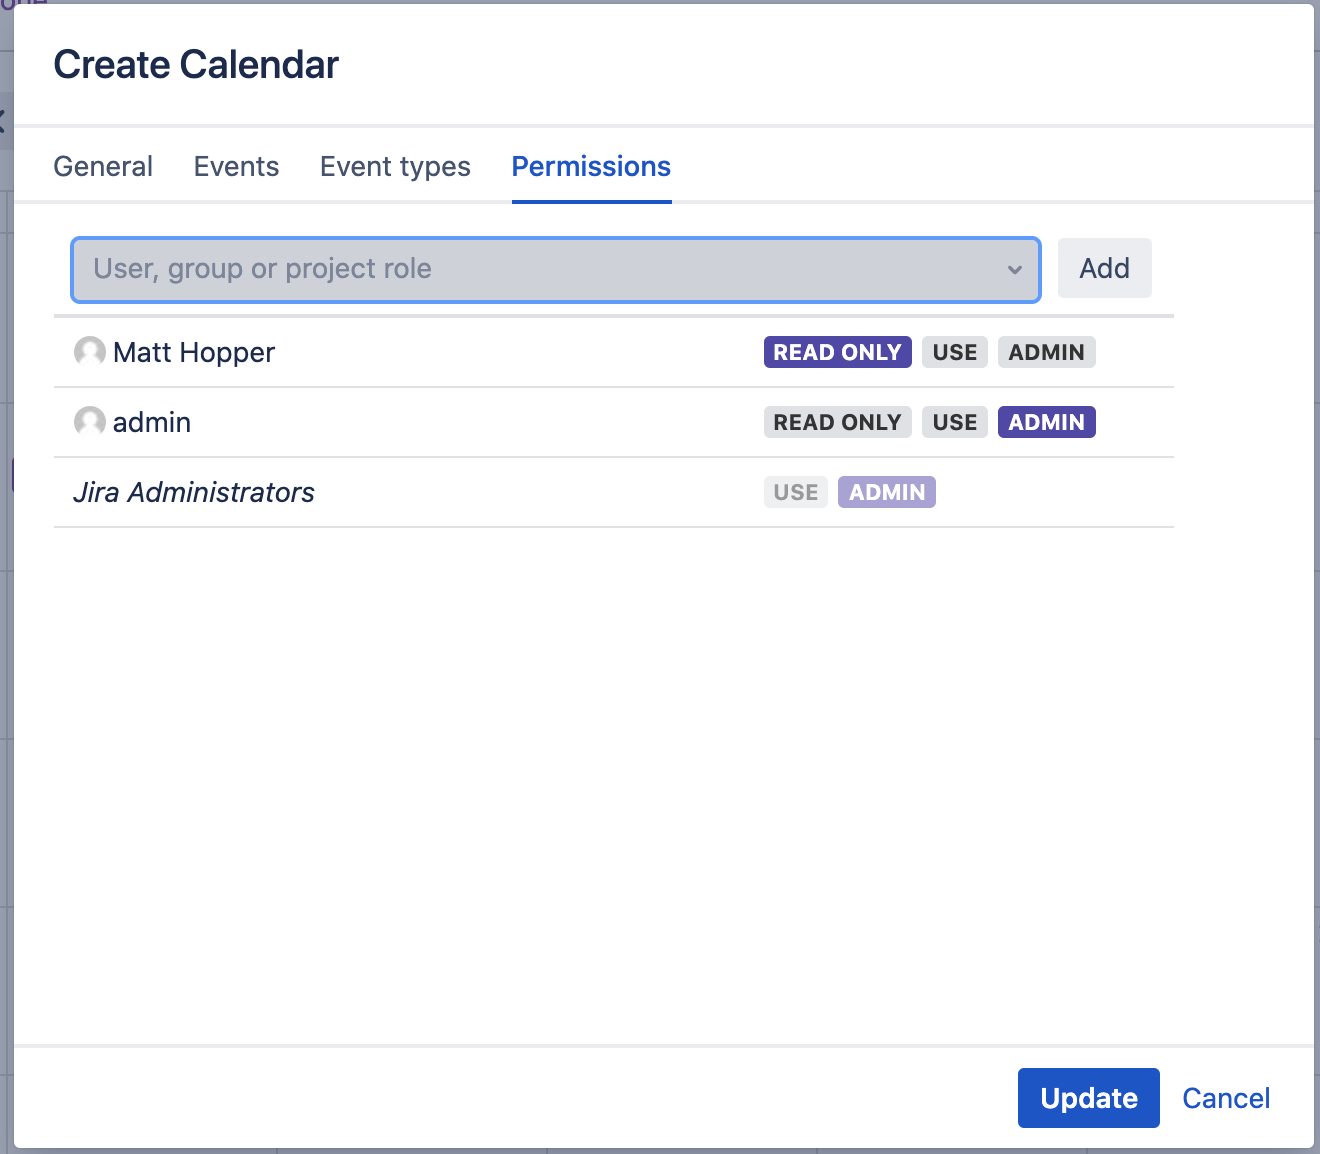
- Step 1 - Click the three dots to the right of the name of calendar to which you want to restrict access
- Step 2 - Click Edit button.
- Step 3 - Open "Permission" tab.
- Step 4 - Choose a user or group for which you want to grant access.
- ADMIN permission
- All possible actions are allowed
- USE permission
- All possible actions are allowed except calendar edit and new event types creation
- Read Only permission
- User will be able to view existing events/issues. No any other actions are allowed in this mode (edit, delete, move, etc...)
- ADMIN permission
- Step 5 - Click edit.
Create Quick Filters for Calendar #back to
top
- Step 1 - Click the three dots to the right of the calendar named for which you want to create a quick filter
- Step 2 - Click "Configure quick filters".
-
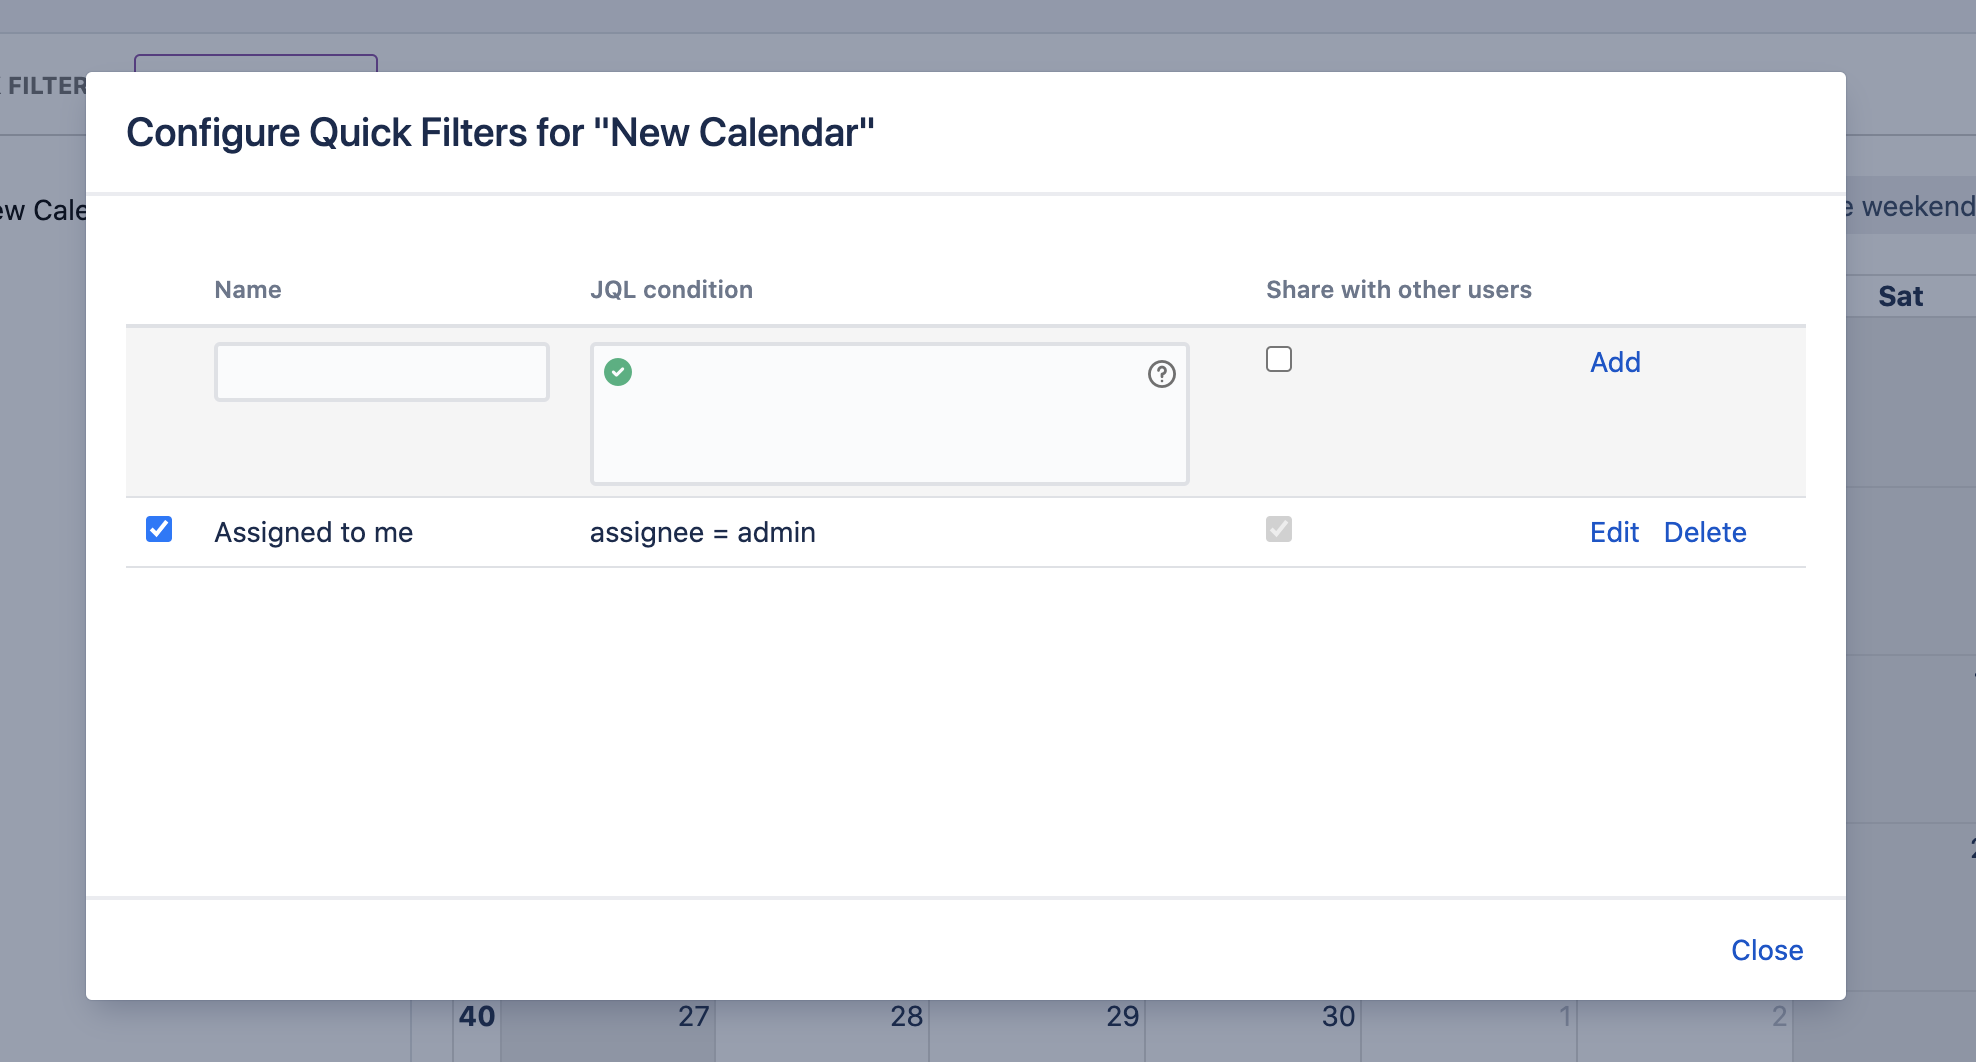
- Step 3 - Enter required fields:
- Name - The name of Quick Filter
- Condition - JQL condition
- Share with other users - Select if other users can use this quick filter
- Step 4 - Click Save.
- Step 5 - Click checkbox near the filter name in order to have possibility to apply this filter to the calendar.
- Step 6 - Click close.
- Step 7 - Apply quick filter by clicking on it.
-
Export Calendar #back to
top
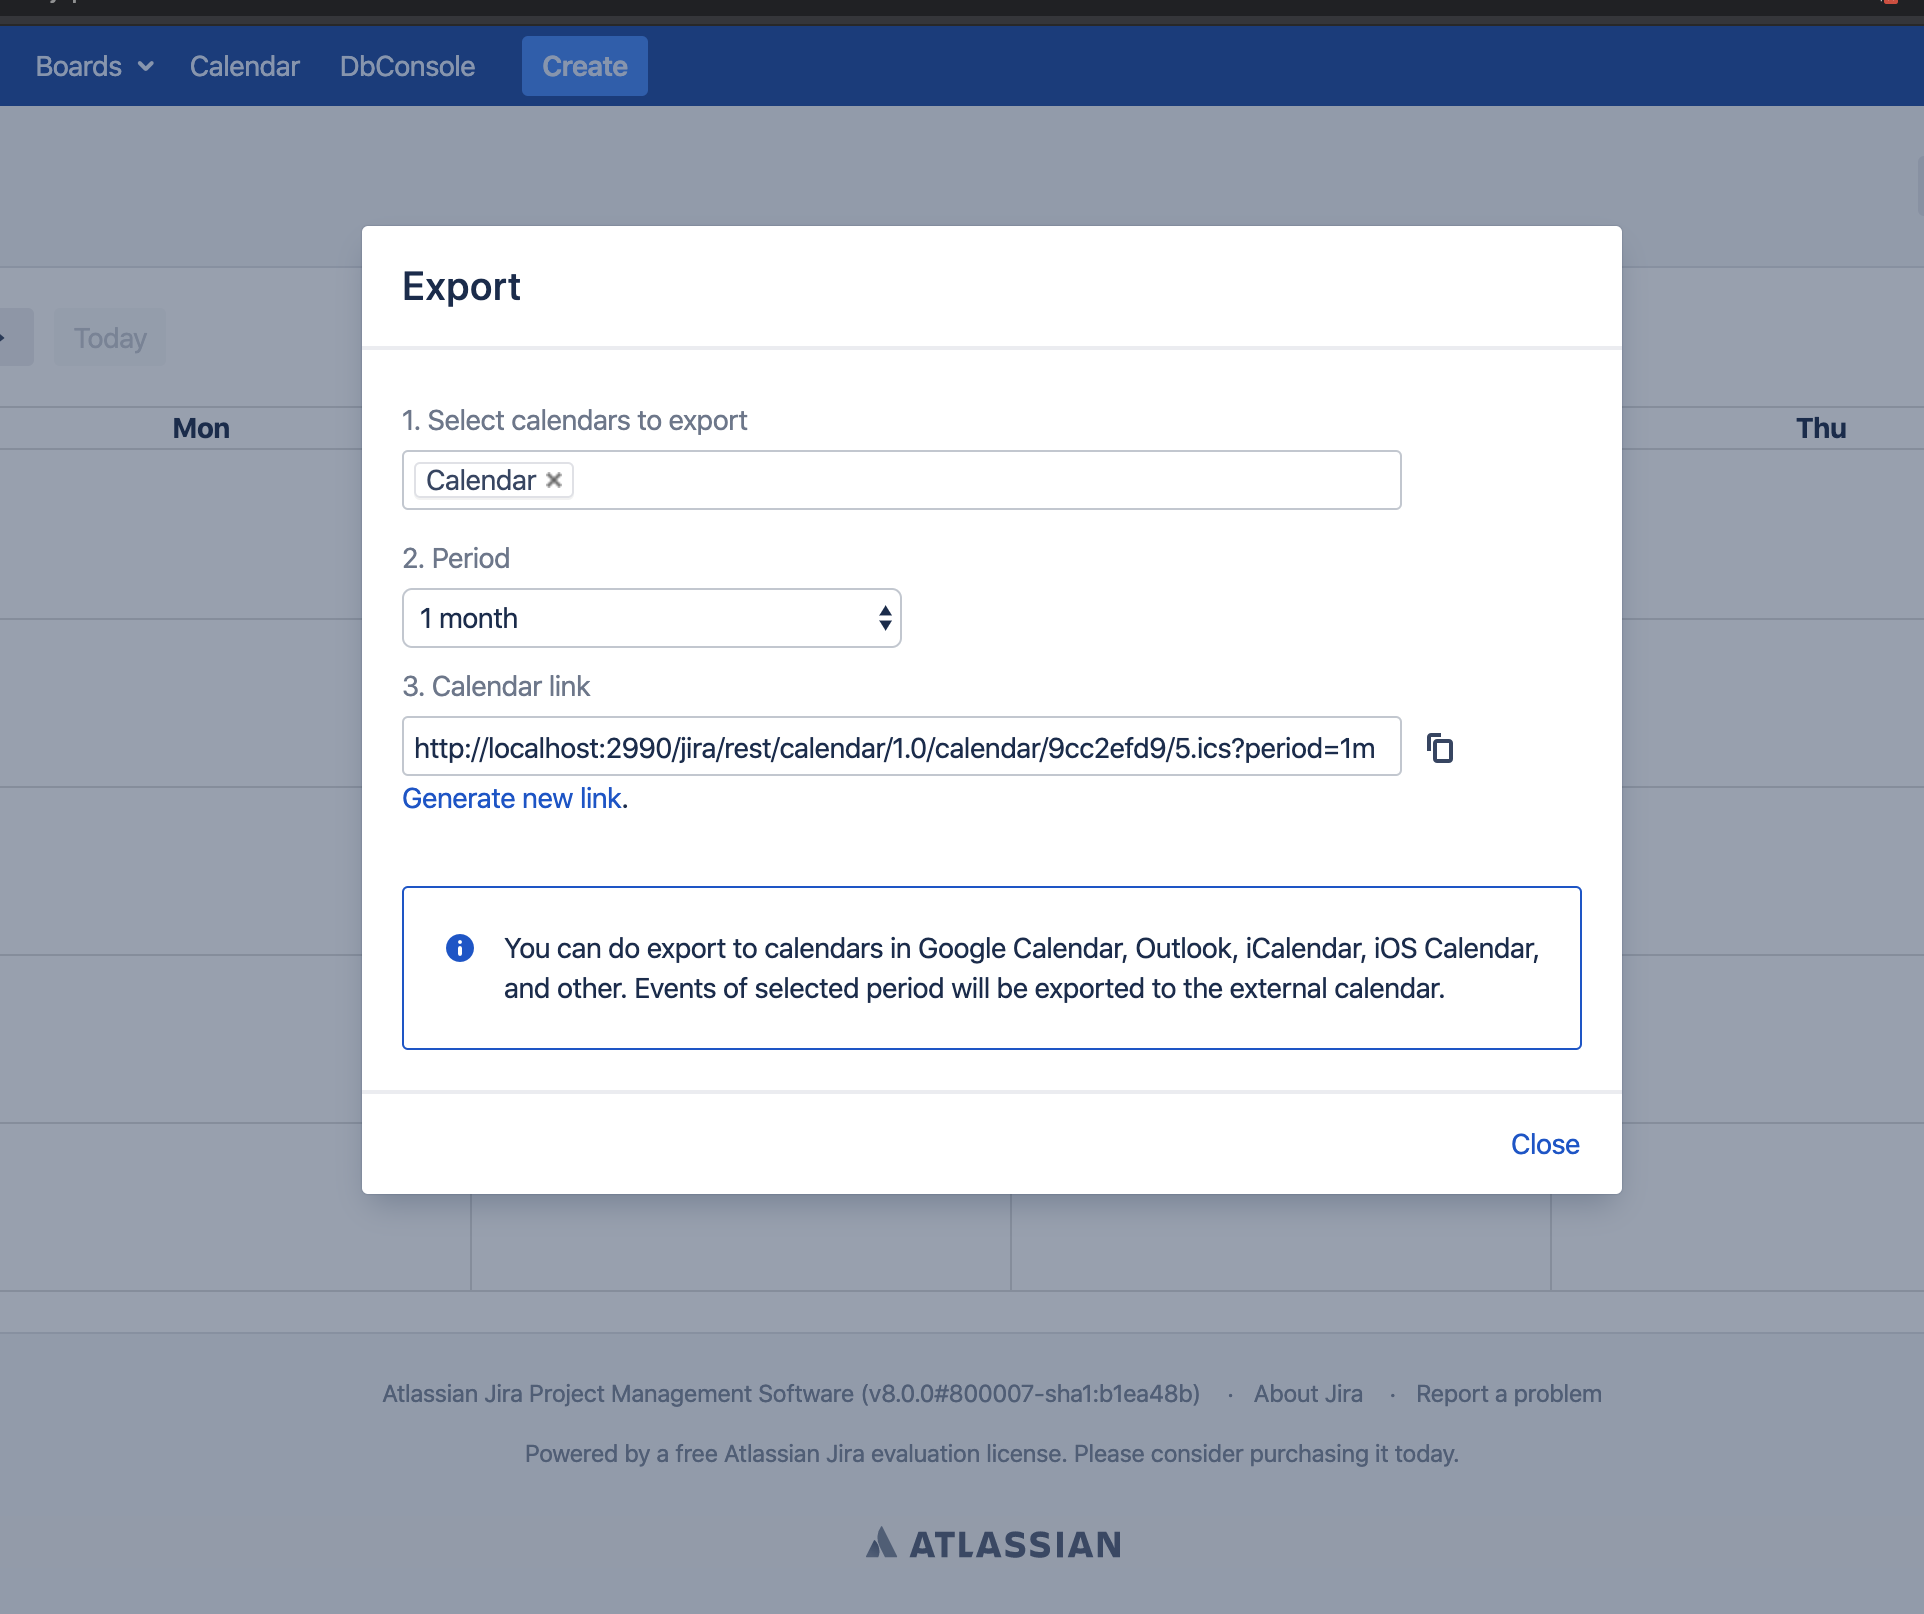
- Step 1 - Click Export button on the top right corner
- Step 2 - Select calendars to export.
- Step 3 - Select period.
- Step 4 - Click "generate calendar" link.
- Step 5 - Copy link and import it to Google, Apple, your phone, and many other calendars app.
Configure Calendar Gadget #back to
top
- Step 1 - Go to the Jira Dashboard
- Step 2 - Click "Add Gadget" button on the top right corner .
-

- Step 3 - Click on "Load all gadgets" link if "More gadgets available" popup appears.
-

- Step 4 - Find "Flexible Calendar" gadget and click "Add Gadget" button.
-

- Step 5 - Configure new gadget:
-
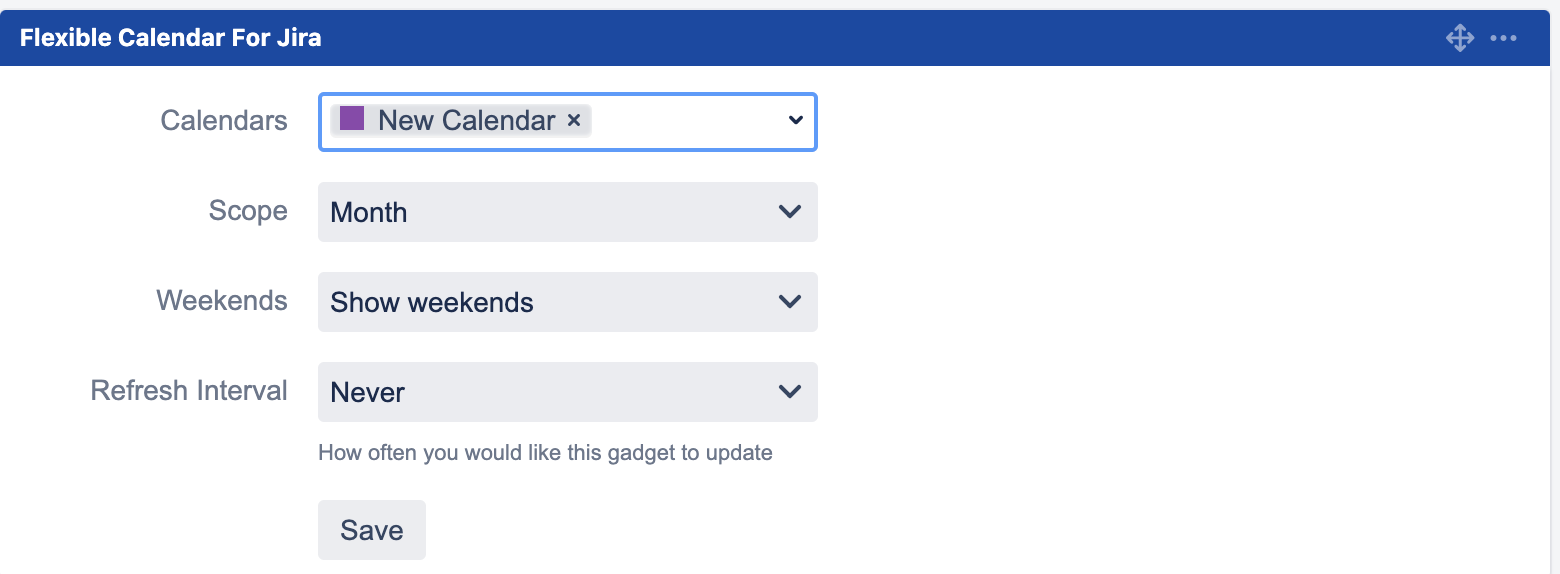
- Calendars - Select calendars that should be displayed
- Scope - Calendars scope
- Weekends - display weekends on the calendars or not
- Refresh Interval - How often you would line this gadget to update
-
- Step 6 - Click Save
Configure Working Days and Hours #back to
top
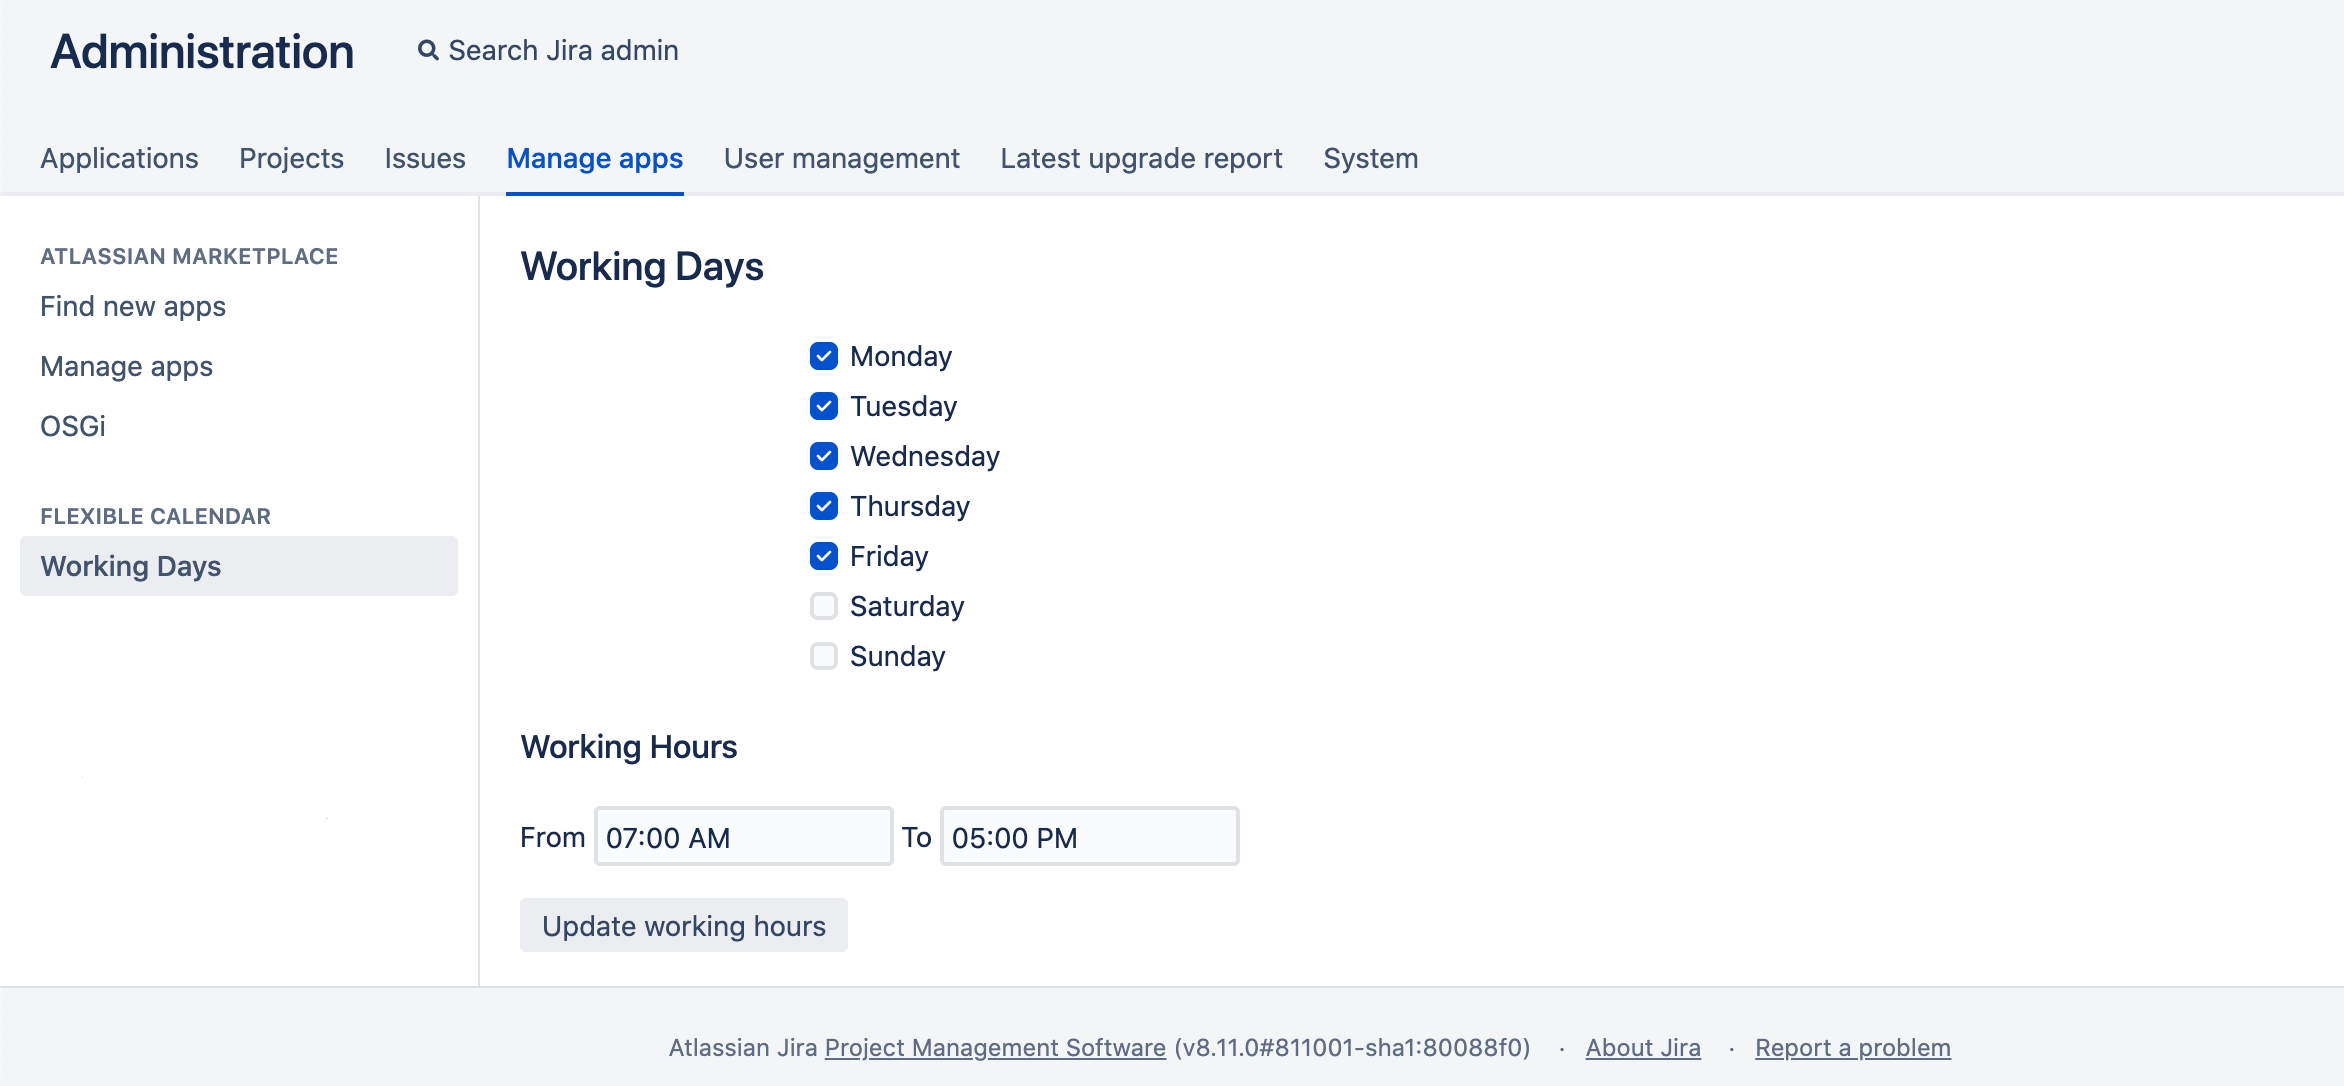
- Step 1 - Go to the "{jiraUrl}/secure/CalendarWorkingDaysConfiguration.jspa"
- Step 2 - Select days that are working (saves automatically on click).
- Step 3 - Specify work day start and end hours (click "Update working hours" button to save changes).