Sidebar & Timeline Management Back to top
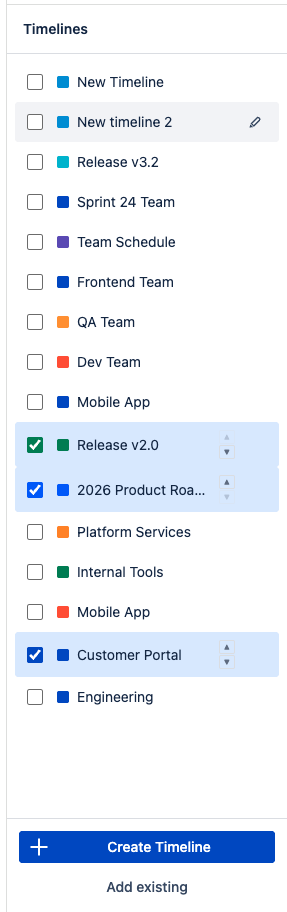
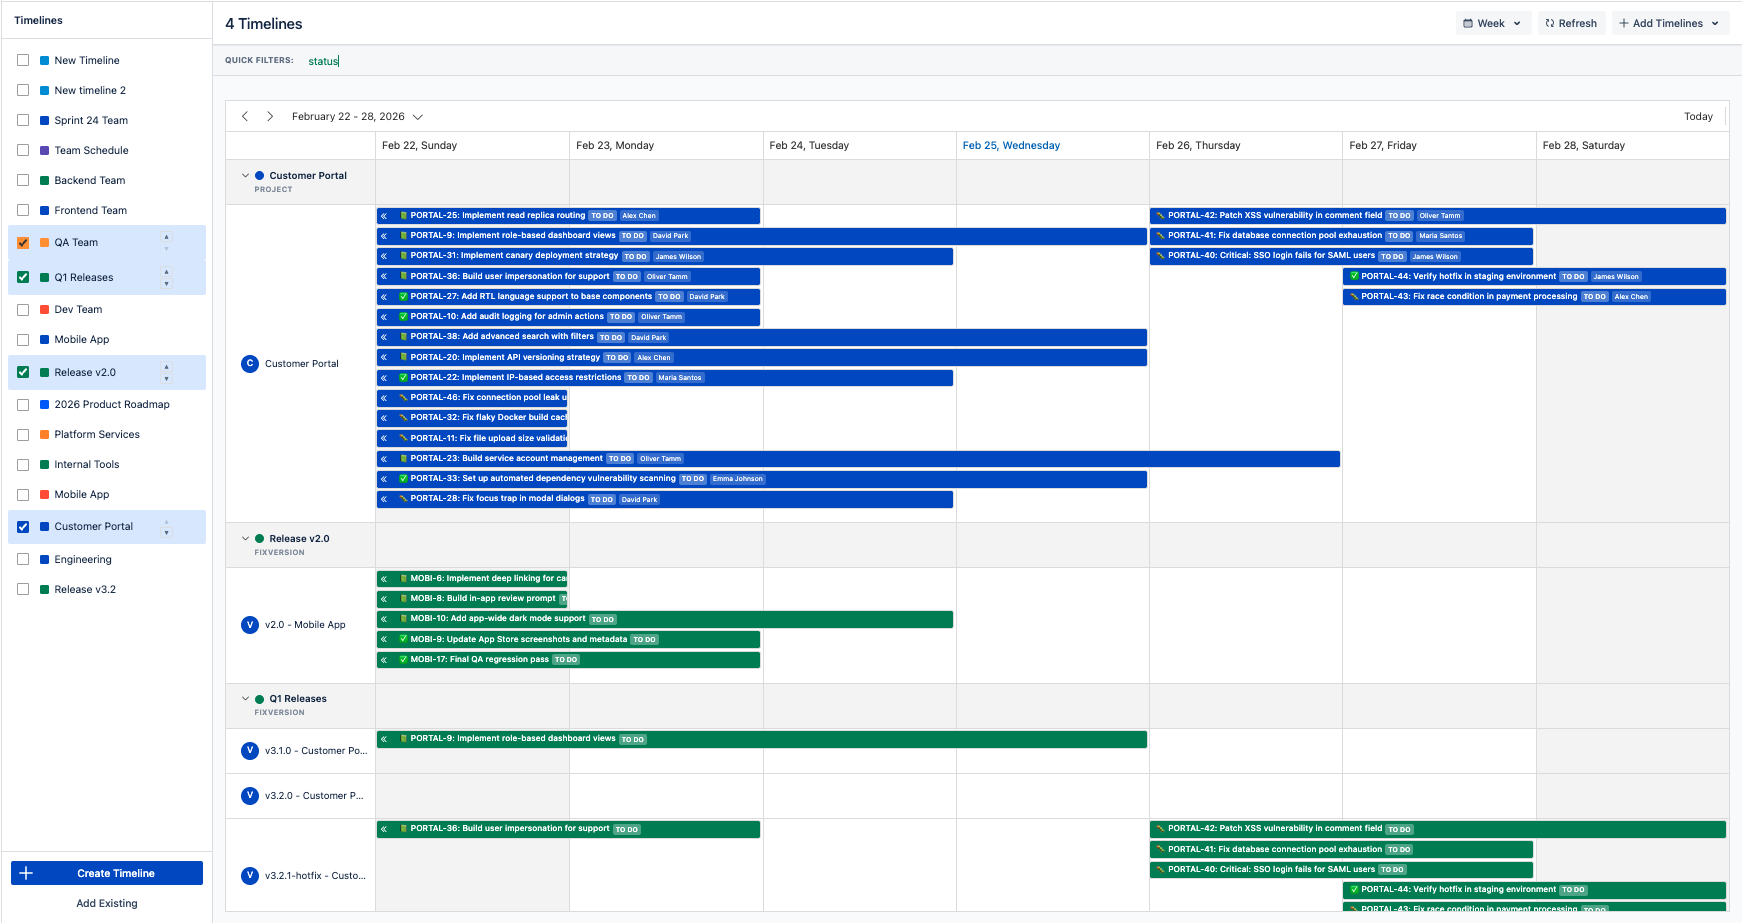
The sidebar is the main control panel for managing your timelines. It lists all timelines you have access to and provides quick actions for each.
Selecting Timelines
Use the checkboxes to select one or more timelines. Selected timelines are displayed on the scheduler. Each timeline shows a color dot matching its assigned color.
Collapsing the Sidebar
Click the arrow button in the sidebar header to collapse it into a narrow strip, giving more space to the scheduler. Click the arrow again to expand it back. The collapsed state is saved across sessions.
Reordering
When multiple timelines are selected, use the up/down arrow buttons to change their display order. The order is saved automatically and persists across sessions.
Timeline Actions
Hover over a timeline name to reveal the action menu (pencil icon). Available actions depend on your permission level:
- Configure Quick Filters — Set up JQL-based filters for this timeline (requires Admin or Use permission)
- Edit — Open the timeline settings dialog (requires Admin permission)
- Delete — Permanently delete the timeline (requires Admin permission)
- Remove from Favorites — Remove the timeline from your sidebar without deleting it
Footer Buttons
- Create Timeline — Create a brand new timeline (see Create a Timeline)
- Add existing — Browse and add timelines created by others (see Add Existing Timelines)
Create a Timeline Back to top
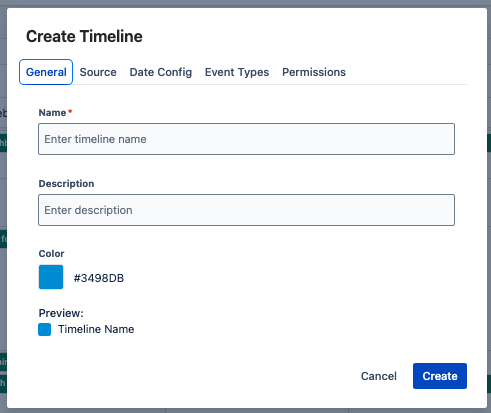
- Click "Add Timeline" in the upper right corner, then choose create.
- Enter a name for your timeline.
- Add a description (optional) to help identify this timeline.
- Choose a color — Events and issues on this timeline will use this color.
- Select a source type — Choose the resource strategy that determines how rows are grouped (see Source Configuration below).
- Configure date fields — Map start and end dates for Jira issues (see Date Field Mapping below).
- Set up event types — Configure custom event types with names, icons, and default reminders. Read more about Custom Events →
- Set Permissions (optional) — Control who can view and edit this timeline by adding users or groups with different access levels. Read more about Permissions →
- Click Create to save the timeline.
Edit & Delete Timelines Back to top
To edit an existing timeline, hover over its name in the sidebar and click the pencil icon, then select Edit. The edit dialog has five tabs:
- General — Change the timeline name, description, and color
- Source — View the resource strategy and update source values (e.g., add/remove team members, projects, sprints). The source type itself cannot be changed after creation
- Date Config — Change the start/end date fields and display options (see Display Options)
- Event Types — Add, edit, or remove custom event types with names, icons, and default reminders
- Permissions — Manage who can view and edit the timeline (see Permissions)
To delete a timeline, use the same hover menu and select Delete. Deleting a timeline permanently removes it and all its custom events. This action requires Admin permission and cannot be undone.
Source Configuration Back to top

The source type determines what resource rows appear in your timeline and how Jira issues are grouped. Each resource row represents one value of the chosen field (e.g., one team member, one sprint, one version).
| Source Type | Resource Rows | Best For |
|---|---|---|
| Assignee | Team members (optionally filtered by project) | Team workload, sprint planning |
| Fix Version | Project versions across selected projects | Release planning, version tracking |
| Project | Jira projects | Cross-project coordination, portfolio view |
| Sprint | Sprints from selected boards | Sprint planning, iteration tracking |
| Epic | Epics across projects | Epic-level roadmap, feature tracking |
| Component | Components with project context | Component-based scheduling |
| Custom Field | Values from any custom field | Any custom categorization (team, department, region, etc.) |
Assignee

Select individual team members. Optionally filter by project to show only users assigned to issues in specific projects. Each user appears as a separate row in the timeline.
Fix Version
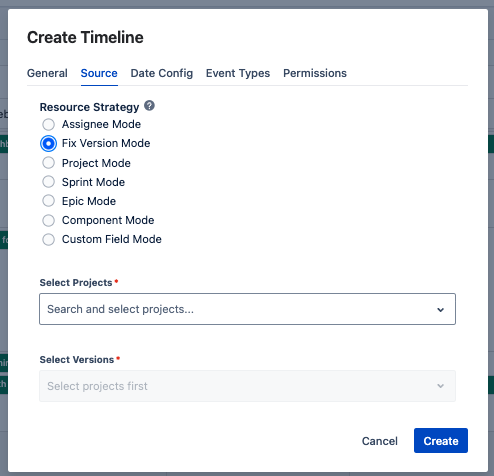
Select versions from one or more projects. Each version appears as a resource row, displaying issues assigned to that version.
Sprint
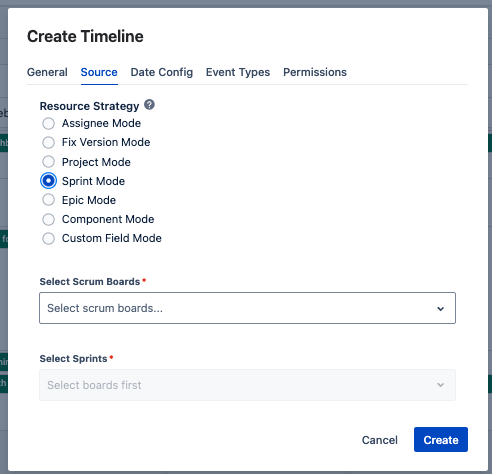
First select one or more boards, then pick the sprints you want to display. Each sprint appears as a row, showing its issues on the timeline.
Epic
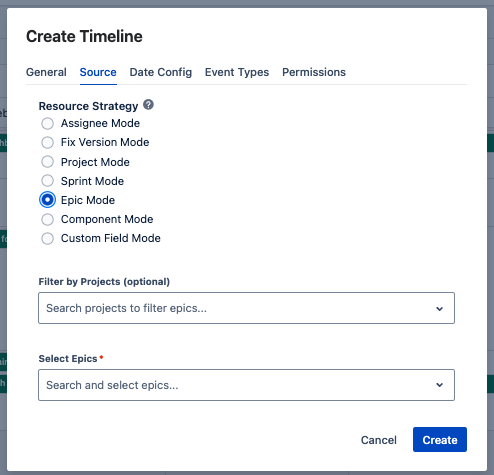
Search and select epics across projects. Each epic appears as a row showing all child issues on the timeline.
Project
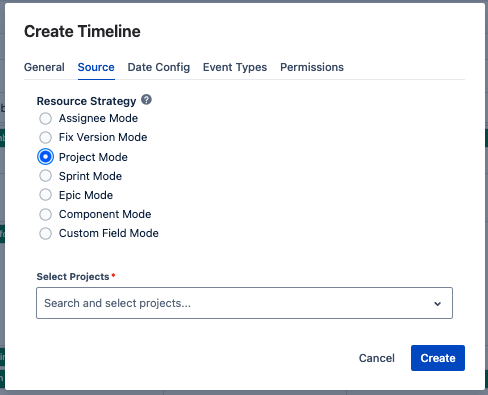
Select one or more Jira projects. Each project appears as a resource row, displaying all issues from that project.
Component
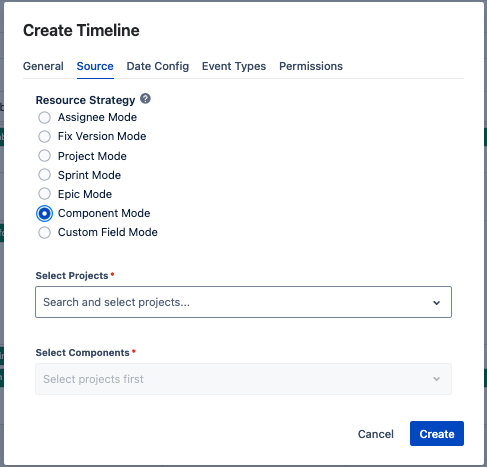
Select components from one or more projects. Each component becomes a resource row displaying its associated issues.
Custom Field
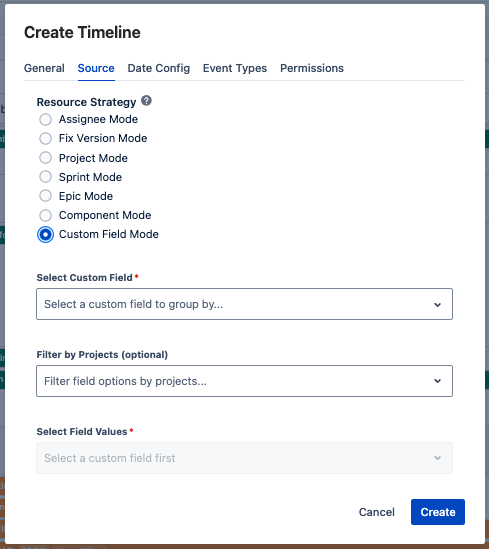
Select a custom field and its values. This is useful when you have custom categorization fields like Team, Department, Region, or Priority Level. Each field value becomes a resource row.
Date Field Mapping Back to top
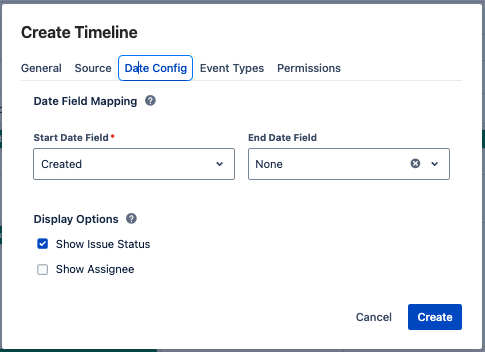
- Select a Start Date field — This determines where each issue starts on the timeline.
- Select an End Date field — This determines where each issue ends. If empty, issues are shown as single-day events.
Display Options Back to top
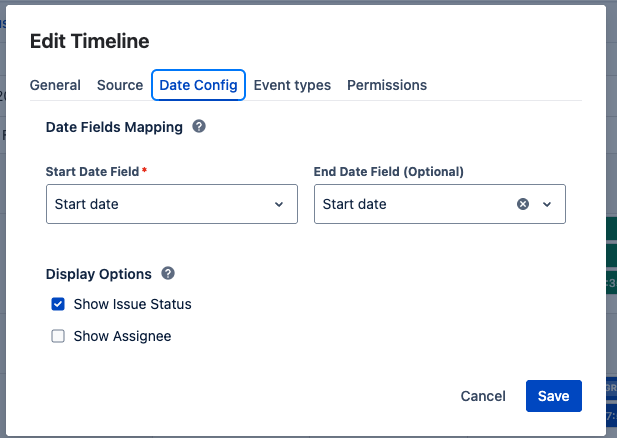
Display options control what information appears on Jira issue bars in the timeline. These settings are found in the Date Config tab of the timeline edit dialog.
- Show Issue Status — Displays a status badge (e.g., TO DO, IN PROGRESS, DONE) on each issue bar
- Show Assignee — Displays the assignee name on each issue bar
Add Existing Timelines Back to top
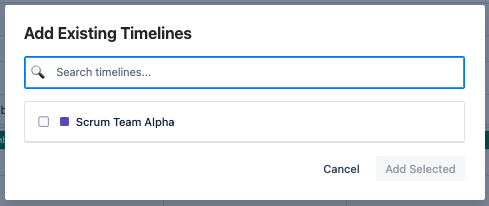
- Click "Add Timeline" in the upper right corner, then choose add existing.
- Browse available timelines — Only timelines you have permission to access are shown.
- Select one or more timelines to add to your view.
- Click Add to add the selected timelines.
Resource Timeline Views Back to top
Resource Timeline supports 7 time scopes to match your planning needs. Switch between scopes using the view selector at the top of the timeline.
Working with Jira Issues Back to top

Issue Display
Each Jira issue appears as a colored bar spanning its start and end dates. The bar shows the issue key, summary, and any configured display fields. Issue bars use the color assigned to the timeline they belong to.
Viewing Issue Details
Click on any issue bar to open a popup with full issue details. From the popup you can navigate to the Jira issue, edit fields, or view linked events.
Event Popups Back to top
Click on any event bar to open a detail popup. The popup content depends on the event type.
Jira Issue Popup
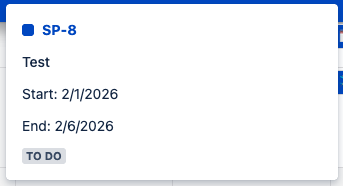
Shows the issue key (clickable link to Jira), summary, start and end dates, and status badge. Click the issue key to open the issue in Jira.
Custom Event Popup
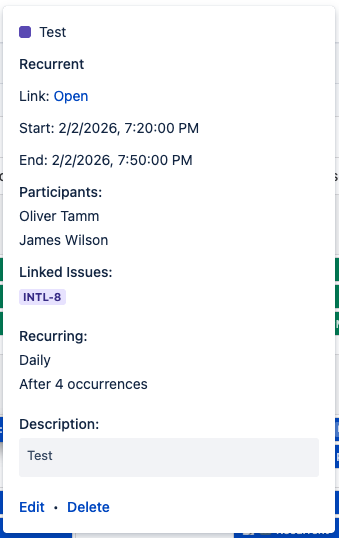
Shows full event details including:
- Event type and title
- External link (if set)
- Start and end dates with times
- Participants list
- Linked Jira issues (clickable badges that open in Jira)
- Recurrence details (pattern, frequency, end condition)
- Description (rich text)
- Edit and Delete action links (if you have permission)
Custom Events Back to top
Custom events let you add non-Jira items to your timeline — such as holidays, meetings, milestones, or deadlines.
Creating an Event
Double-click an empty cell on the timeline to open the event creation dialog. The dialog includes fields for:
- Title, description (rich text), and external link
- Start and end dates with an all-day toggle
- Event type — each timeline has its own configurable event types with custom icons
- Participants, linked Jira issues, reminders, and recurrence
Linked Issues
Custom events can be linked to Jira issues. Linked events display a 🔗 badge with the issue count on the timeline bar. Hover over the badge to see the linked issue keys, or click the event to view them in the popup.
For full details on event types, recurrence, and editing, see Custom Events →
Quick Filters Back to top
Quick filters let you narrow down the issues displayed on each timeline using JQL queries. Each timeline has its own set of filters.
Using Filters
When a timeline has quick filters configured, filter chips appear in a bar above the scheduler. Click a chip to toggle it on or off. Active filters within the same timeline are combined with OR logic — meaning issues matching any active filter are shown.
Configuring Filters
To set up quick filters for a timeline, hover over its name in the sidebar, click the action menu, and select Configure Quick Filters. Each filter has a name and a JQL query. Hover over a filter chip to see its JQL in a tooltip.
For full details on creating and managing quick filters, see Quick Filters →
Issue Planner Back to top
The Issue Planner is a collapsible side panel that lets you search for Jira issues and schedule them onto the timeline by dragging and dropping. Open it by clicking the Plan Issues button in the toolbar.
Text Mode
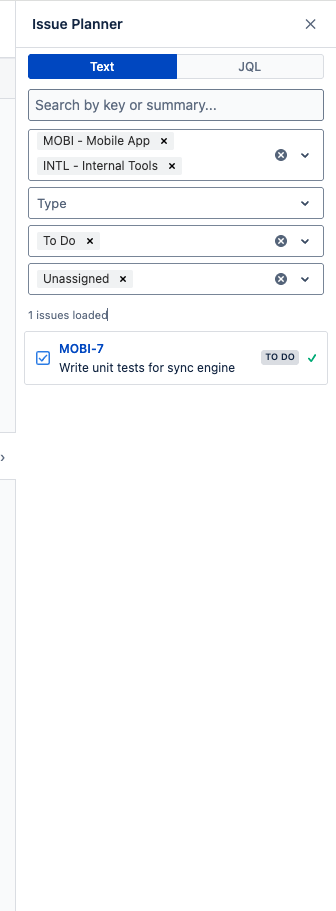
Text mode provides a quick filter-based search. You can combine any of the following filters:
- Free text — Search by issue key or summary (minimum 2 characters)
- Project — Filter by one or more projects (multi-select)
- Type — Filter by issue type (Bug, Story, Task, etc.)
- Status — Filter by status (To Do, In Progress, Done, etc.)
- Assignee — Filter by assignee (type to search users) or select Unassigned to find issues with no assignee
JQL Mode
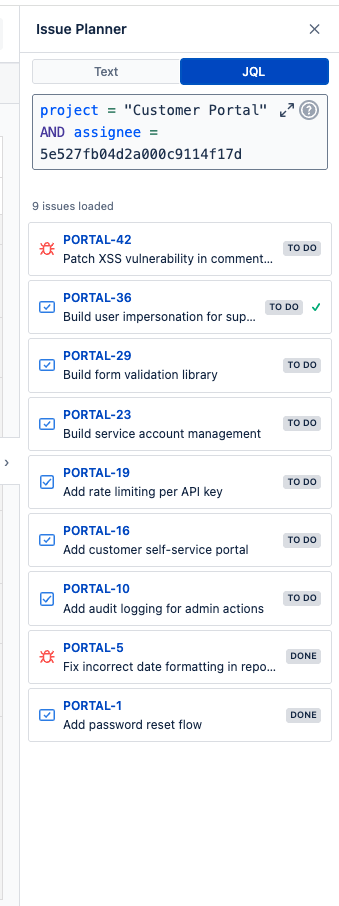
Switch to JQL mode for advanced queries. The editor provides autocomplete for field names, values, and functions. Results update automatically as you type. JQL mode is useful when you need complex filters that go beyond the built-in dropdowns (e.g., labels, custom fields, date ranges, or boolean combinations).
Scheduling an Issue
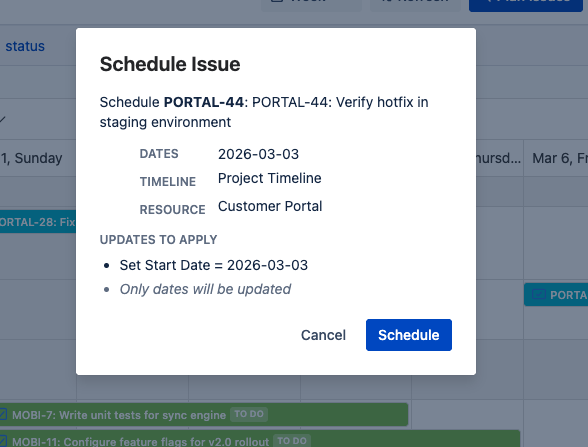
- Search for the issue using text filters or JQL.
- Drag an issue card from the panel onto a timeline cell. The target cell highlights as you hover over it.
-
Review the confirmation dialog — A dialog appears showing what will be updated:
- The date fields that will be set (e.g., Start Date = 2026-03-03)
- The resource field that will be updated (e.g., reassign to a user, move to a sprint, set fix version)
- Any cross-project warnings if the resource field cannot be set (e.g., the issue belongs to a different project than the target sprint or version)
- Click Schedule to confirm. The issue dates and resource field are updated in Jira.
What Gets Updated
The confirmation dialog shows exactly which Jira fields will be modified. The updates depend on the target timeline's source type:
| Target Timeline Source | What the Scheduler Updates |
|---|---|
| Assignee | Dates + Assignee — the issue is reassigned to the target user. Works across projects since assignees are global. |
| Epic | Dates + Epic Link — the issue's epic is set to the target epic. Works across projects since epics can link issues from any project. |
| Sprint | Dates + Sprint — the issue is moved to the target sprint. Only if the issue belongs to the same project as the sprint. See cross-project note below. |
| Fix Version | Dates + Fix Version — the issue's fix version is set to the target version. Only if the issue belongs to the same project as the version. See cross-project note below. |
| Component | Dates + Component — the issue's component is set to the target component. Only if the issue belongs to the same project as the component. See cross-project note below. |
| Project | Dates only — the issue's project is never changed. Scheduling onto a Project timeline always updates dates only. |
| Custom Field | Dates + Custom Field — the custom field value is set to the target resource value (e.g., Team = "Platform"). If the field cannot be updated (e.g., the field is not on the issue's screen), an error is shown and dates are still preserved. |
Cross-Project Note
Sprints, fix versions, and components are project-scoped in Jira — they belong to a specific project and cannot be assigned to issues from other projects. When you drop an issue from Project A onto a Sprint/Fix Version/Component row that belongs to Project B, the confirmation dialog displays a warning explaining that the resource field will be skipped. The issue's dates are still updated, but the sprint/version/component assignment is not changed. This keeps your timeline visually up to date without making invalid Jira field changes.
Drag & Drop Back to top
Drag and drop lets you reschedule issues and events by moving or resizing them directly on the timeline. The behavior depends on whether the item is a Jira issue or a custom event.
Moving Jira Issues
When you drag a Jira issue to a different date, the mapped date fields are updated in Jira. When you drag an issue to a different resource row, the corresponding Jira field is updated:
| Source Type | What Happens on Row Change |
|---|---|
| Assignee | Issue's assignee is updated to the new user |
| Fix Version | Issue's fix version is updated. If the issue belongs to a different project than the target version, the version change is blocked and only dates are updated. |
| Sprint | Issue is moved to the new sprint. If the issue belongs to a different project than the target sprint, the sprint change is blocked and only dates are updated. |
| Epic | Issue's epic link is updated |
| Component | Issue's component is updated. If the issue belongs to a different project than the target component, the component change is blocked and only dates are updated. |
| Custom Field | Custom field value is updated |
| Project | Row changes are blocked — moving issues between Jira projects is not supported via drag and drop. Date changes (horizontal drag) still work. |
Cross-Timeline Moves (Different Source Types)
When multiple timelines are visible, you can drag an issue from one timeline to another even if they have different source types (e.g., from a Project timeline to an Assignee timeline, or from an Assignee timeline to a Sprint timeline).
Instead of applying the change immediately, a confirmation dialog appears — the same dialog used by the Issue Planner. It shows you exactly what will be updated:
- The date fields that will be set on the issue (based on the target timeline's date configuration)
- The resource field that will be updated (based on the target timeline's source type — e.g., assignee, sprint, fix version)
- Any warnings if the resource update cannot be applied (e.g., dropping onto a sprint from a different project)
The same rules apply as described in Issue Planner → What Gets Updated: Assignee, Epic, and Custom Field updates always work across projects. Sprint, Fix Version, and Component updates are skipped with a warning if the issue belongs to a different project. Project timelines only update dates.
Resizing Jira Issues
Drag the left or right edge of an issue bar to change its start or end date. This updates the mapped date fields in Jira.
Moving Custom Events
Custom events can be moved freely within a timeline. When moving a custom event between different timelines, a dialog appears asking you to select the event type for the destination timeline, since each timeline has its own event type configuration.
Multi-Timeline View Back to top

You can view multiple timelines simultaneously on a single screen. Each timeline appears as a collapsible group with its own resource rows beneath it.
- Select multiple timelines from the timeline selector in the header.
- Reorder timelines by dragging them in the selector list.
- Collapse or expand individual timelines by clicking their header row. Each timeline group shows a two-level hierarchy: Timeline → Resources.
Selection Persistence
Your multi-timeline selection and order are saved automatically and persist across sessions.
Permissions Back to top
Each timeline has three permission levels that control what users can do:
| Level | What It Allows |
|---|---|
| Admin | Full control — edit timeline settings, manage permissions, configure quick filters, create/edit/delete events and the timeline itself |
| Use | Create, edit, and delete events; configure quick filters. Cannot change timeline settings or permissions |
| Read Only | View the timeline and its events. Cannot create, edit, or delete anything |
Permissions can be granted to individual users, groups, or project roles. The timeline creator is always an Admin and cannot be removed. For full details, see Permissions & Admin →
Need Help?
If you have questions or need assistance with Resource Timeline, our support team is here to help.
Contact Support