Overview
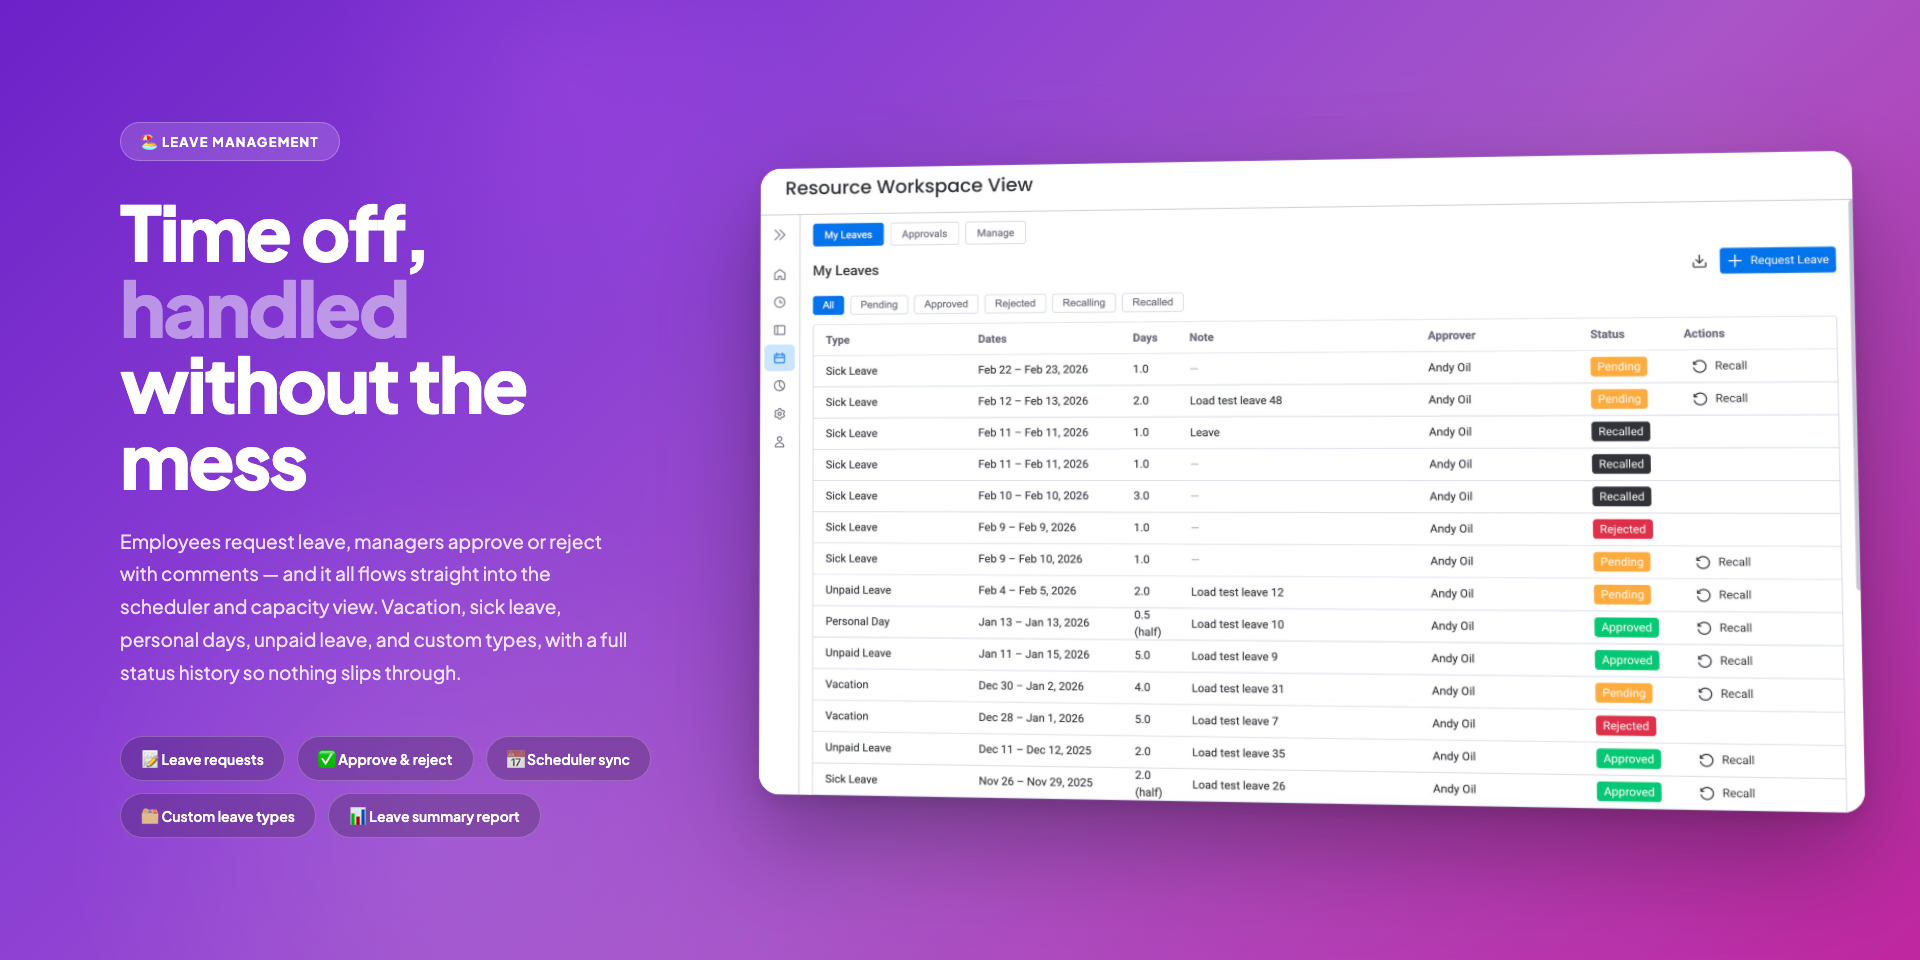
Leave Management lets your team request time off and route requests to the right approver. Approved leave appears on the Resource Scheduler automatically, so capacity and workload numbers always reflect who is actually available.
Open the app in Workspace View and click Leave in the sidebar to get started.
Requesting Leave
Any team member can submit a leave request in a few clicks. The request form collects everything the approver needs to make a decision.
How to request leave
- Go to Leave > My Leaves and click Request Leave.
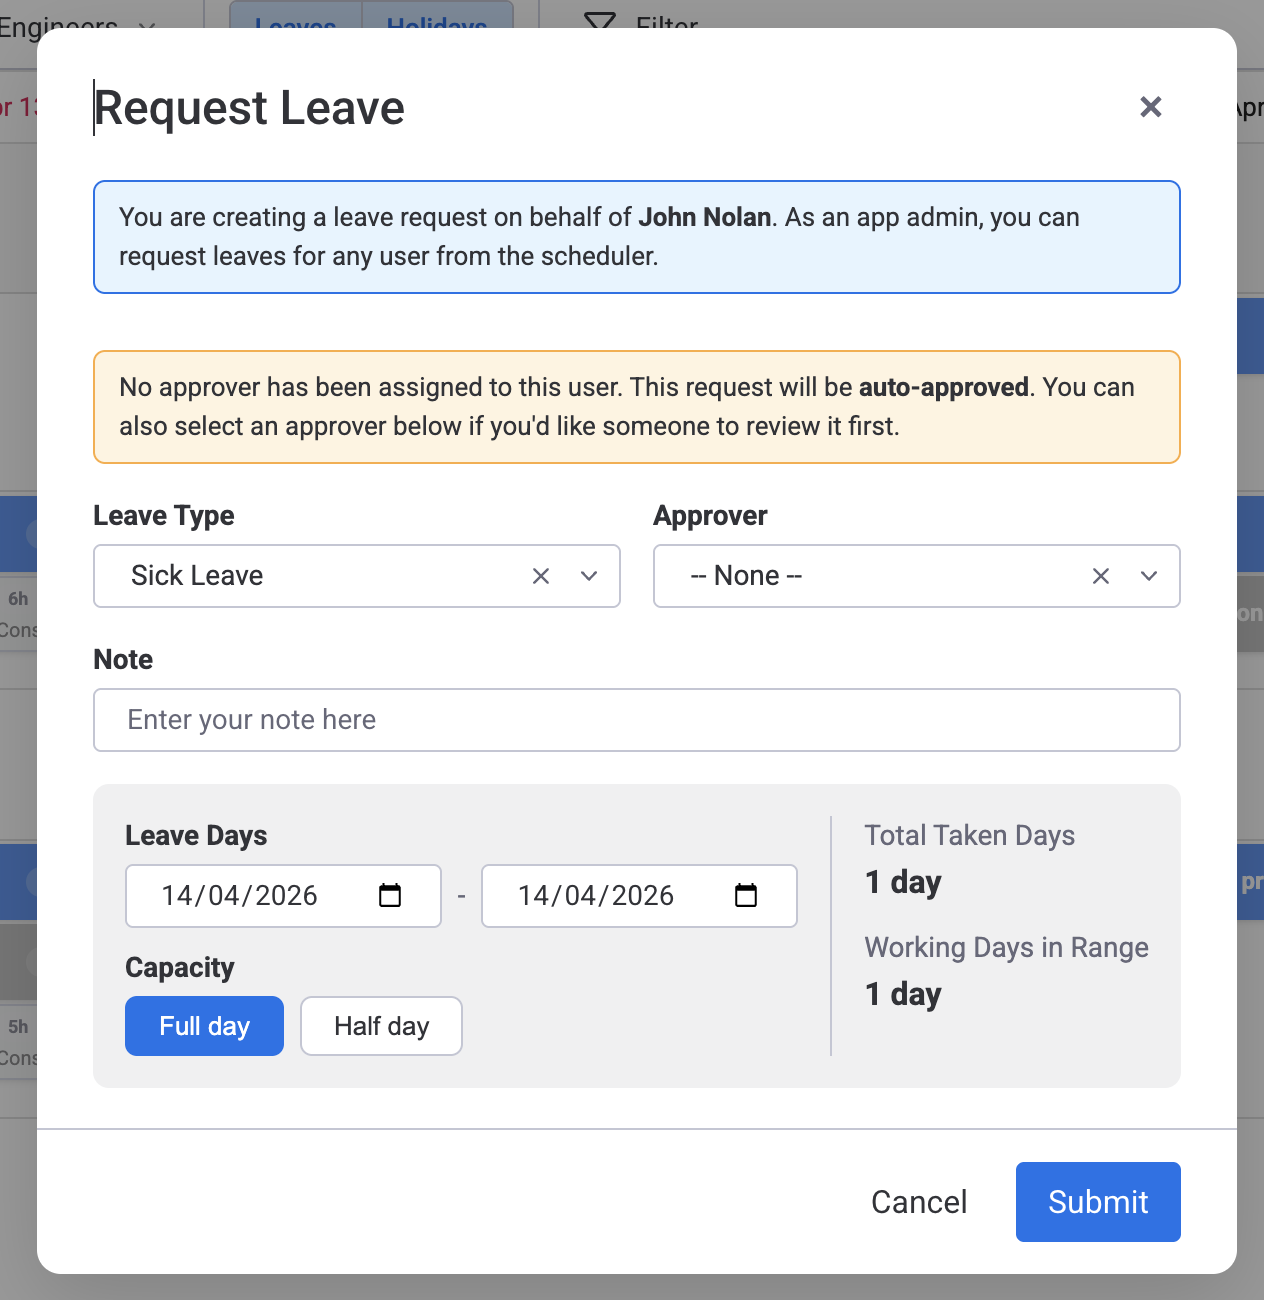
- Choose a Leave Type from the dropdown (Vacation, Sick Leave, Personal Day, Unpaid Leave, or any custom type your admin has created).
- Select the Day Mode — Full Day, AM only, or PM only.
- Pick a Date Range (start and end dates). For a single day, set both dates to the same day.
- The Approver field defaults to your assigned approver. If no approver has been assigned to you, the field is left empty and a notice explains the request will be auto-approved — you can still select any user as approver if you'd like someone to review it first.
- Add an optional note, then click Submit.
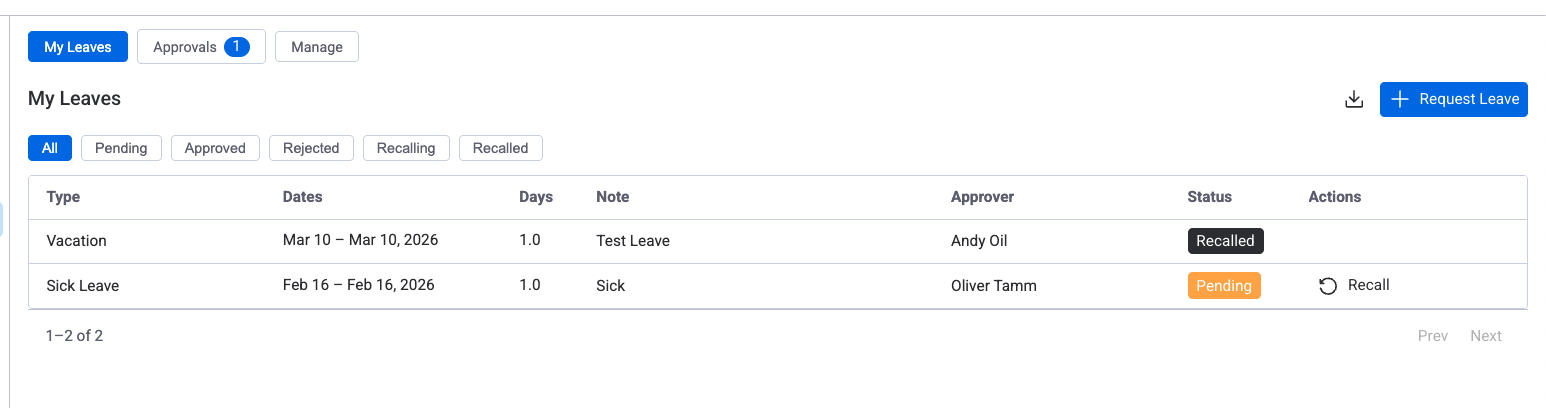
Your request appears immediately with a Pending status. The approver is notified and can act on it from the Approvals tab. If no approver was selected, the request is created with Approved status directly.
Requesting leave from the Scheduler
You can request leave directly from the Resource Scheduler without navigating to the Leave tab. This is the fastest way to record time off while planning.
- Open the Resource Scheduler.
- Double-click an empty cell on the row of the user who needs leave. The New Item dialog opens with the assignee and date pre-filled.
- Click Request Leave at the bottom-left corner of the dialog.
- The Request Leave form opens with the date and user already filled in. Choose a Leave Type, adjust the date range if needed, and click Submit.
App admins can double-click on any user's row to create leave on their behalf. Designated approvers can do the same for their approvees — the request is auto-approved immediately.
Requesting leave on behalf of another user
Designated leave approvers and app admins can create leave requests on behalf of other users. This is useful when a manager needs to record leave for a team member who is unavailable.
For designated approvers
If you are assigned as the leave approver for one or more users, you will see a "Request for" dropdown in the leave request dialog. Select the team member you want to create leave for. As their designated approver, the request will be auto-approved immediately.
You can create leave on behalf from two places:
- My Leaves tab — click Request Leave and use the "Request for" dropdown.
- Approvals tab — click Create leave for team member button.
For app admins
App admins can create leave requests for any user. The "Request for" dropdown in the leave request dialog shows all users in the account.
- If the admin is also the selected user's designated approver, the request is auto-approved.
- Otherwise, the request is sent with Pending status to the user's designated approver for review.
Admins can also double-click on another user's row in the Resource Scheduler and select Request Leave to pre-fill the target user.
Auto-approval applies in three cases: (1) an approver creates leave for their approvee, (2) a user is their own designated approver, and (3) no approver has been assigned to the user. In all cases the request is created with Approved status — no manual approval step needed. In case (3), the user can still choose an approver from the dropdown if they prefer someone to review the request.
Both the My Leaves and Approvals tables show a "Created by" column. When a leave was created on behalf by another user, their name appears here. A dash (—) means the employee created the request themselves.
Approval Workflow
Every leave request follows a simple workflow: submit, review, act.
Statuses
| Status | Meaning |
|---|---|
| Pending | Request submitted; waiting for the approver to act. |
| Approved | Leave confirmed. It now appears on the scheduler. |
| Rejected | Approver declined the request with a reason. No impact on the scheduler. |
| Recalling | You asked to cancel an approved leave; waiting for the approver to confirm. |
| Recalled | Recall confirmed. Leave is removed from the scheduler. |
Approving or rejecting requests
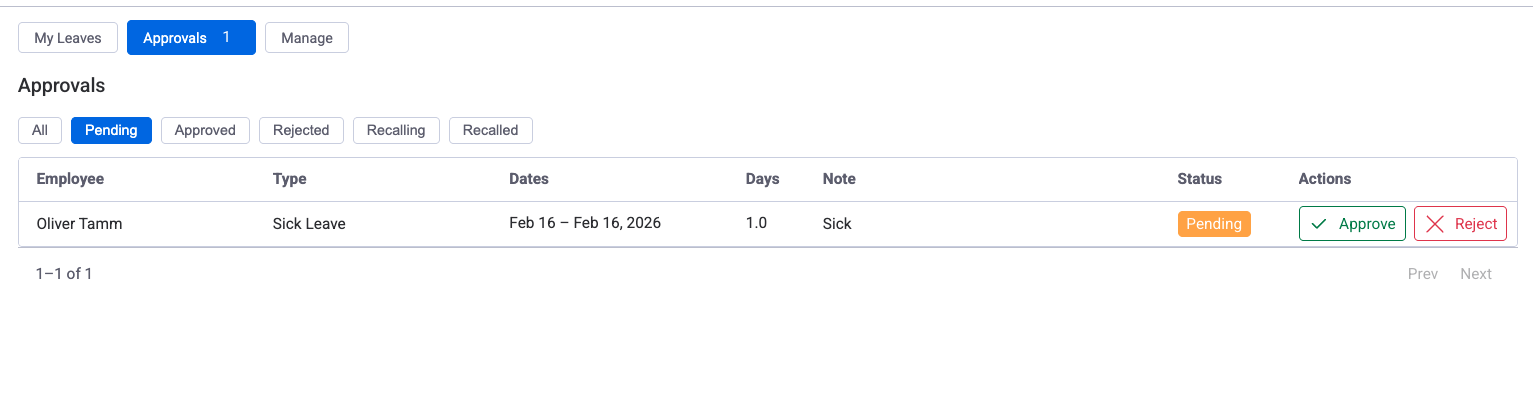
If you are assigned as an approver for any users, you will see a Pending Approvals view under Leave > Approvals. This shows all leave requests waiting for your action. For each request you can:
- Approve — Leave appears on the scheduler and capacity is adjusted.
- Reject — A reason is required so the requester understands the decision.
- Revoke — Cancel a previously approved leave. Leave is removed from the scheduler. Available to the assigned approver and to app admins (so an admin who created leave on behalf of someone else can also undo it).
If you need to cancel your own leave, click the leave block on the scheduler (or open it from My Leaves) and choose Recall. If the leave is still Pending, it is recalled immediately. If it is already Approved, it moves to Recalling and waits for the approver to confirm — unless you have no separate approver assigned (you are your own approver), in which case the recall completes immediately with no consent step.
When an app admin or approver creates leave on behalf of someone else and the leave is auto-approved at creation, the assigned approver or any app admin can Revoke it directly from the scheduler tooltip — no separate approval step is needed.
For details on how leave approvers are assigned, see Permissions & Access.
Leave on the Scheduler
Approved leave is displayed directly on the Resource Scheduler so project managers can see who is available at any time.
Visual display
- Leave days appear as colored blocks on the user's row, visually distinct from task cards.
- Each leave type has its own color for quick identification.
- Hover over a leave block to see the leave type, dates, and status in a tooltip.
Capacity impact
| Day Mode | Effect on Capacity |
|---|---|
| Full Day | Capacity set to 0 for that day. Scheduling a task triggers a conflict warning. |
| AM / PM (Half Day) | Capacity reduced by 50%. Tasks can fill the remaining half. |
If you assign a task on a day where someone has full-day leave, the scheduler shows a conflict indicator. You can still force the assignment, but the workload bar will turn red for that day.
Configuring Leave Types
App Admins manage leave types in Workspace View > Settings > Leave. The plugin ships with four default types:
| Leave Type |
|---|
| Vacation |
| Sick Leave |
| Personal Day |
| Unpaid Leave |
Creating custom leave types
Click Add Leave Type in the Leave settings to create a new type. For each type you can configure:
- Name and description — shown in the leave type dropdown when requesting leave.
Common custom types include Parental Leave, Bereavement Leave, Jury Duty, and Study Leave.
Related Pages
- Capacity Schemes — Define daily work hours so leave correctly reduces available capacity.
- Holiday Schemes — Set up public holidays that work alongside leave to reflect true availability.
- Permissions & Access — Control who can approve leave and manage leave settings.