These walkthroughs cover the most common problems teams solve with the Resource Planning plugin. Each use case includes the features you need, clear steps you can follow right away, and tips to get the best results.
1. Catch Slipping Work Before It’s Too Late
The Problem
A developer has a 40-hour task scheduled Monday to Friday. On Monday morning, everything looks fine — the workload indicator shows 8h/day, perfectly within their 8h capacity. But the developer gets pulled into an urgent bug fix and doesn't work on the task at all on Monday.
In a traditional Gantt chart, nothing changes. The plan still says 8h/day. The manager doesn’t know there’s a problem until Friday’s deadline is missed.
How WorkHub Handles It
With the Remaining Estimate mode enabled, the scheduler recalculates remaining work in real time based on logged hours:
Morning: 40h task, 5 working days. Indicator shows 8h/day — on track.
End of day: Developer logs 0h. No worklogs recorded for Monday.
Morning: The scheduler recalculates. 40h remaining, but only 4 working days left (Tue–Fri). That’s 10h/day — above the 8h capacity.
The indicator turns Red. The manager sees the overload immediately.
The manager checks with the developer:
- “Did you work on it Monday and forget to log?” → Developer logs the hours. Remaining drops. Indicator returns to Green.
- “No, I was on the bug fix.” → The work is genuinely behind. Manager extends the deadline to next Tuesday, or assigns part of the task to a teammate who has Green availability.
Why This Matters
Traditional planning tools show the original plan. WorkHub shows reality. Every hour logged (or not logged) updates the remaining estimate and redistributes it across future days. Problems surface on Day 2, not Day 5.
This is the core value of remaining estimate distribution: the plan updates itself as work happens.
Features Used
- Remaining Estimate mode — excludes past days and shows remaining estimate for today and future days
- Remaining estimate distribution — automatically recalculates as worklogs are logged
- Overlog warning — red dashed border when logged hours exceed the original estimate
- Item tooltip — shows Original Estimate, Logged (clickable), Remaining, and Your Allocation
- Mobile time tracking — developers can log hours from their phone so the plan stays current
2. Mid-Sprint Capacity Check
The Problem
It’s Wednesday mid-sprint. A new urgent task comes in. The PM needs to know: who actually has bandwidth to take this on? Looking at the original plan doesn’t help — some people have finished their tasks early, others are behind.
Step-by-Step
- Switch to Availability mode in the workload indicator.
- Availability mode shows free hours = capacity minus remaining work. Since remaining work accounts for worklogs already logged, people who finished tasks early show more availability.
- Look for people with positive availability (green) on Thursday and Friday.
- Assign the urgent task to the person with the most bandwidth. The indicator updates instantly.
Why This Matters
Without remaining estimates, the original plan would show everyone fully booked even if half their work is done. Availability mode gives you the real picture of who can take on more work right now.
3. Verify Logged Hours Before Client Invoicing
The Problem
At month-end, you need to invoice a client for hours worked on their project. But you’re not sure if all team members logged their time, or if the logged hours make sense against what was planned.
Step-by-Step
- Open the scheduler in Remaining Estimate mode and filter to the client’s board.
- Each item’s tooltip shows Original Estimate, Logged, and Remaining, so you can see exactly how many hours have been tracked against every task.
- Look for items with the red dashed border (overlog warning) — these exceeded the estimate and may need client discussion.
- Click any item’s Logged link to open the View Worklogs dialog with a full breakdown of every entry (hours, date, and who logged them).
- Run the Detailed Worklog report filtered to the client’s board and export to Excel for the invoice.
Why This Matters
The remaining-estimate view together with the Detailed Worklog report gives you confidence that your invoice reflects reality. Overlog warnings highlight scope creep before it becomes a billing dispute.
4. Balance Team Workload Across Projects
The Problem
Your team works on several projects at once, and you cannot easily see who has too much work and who has room for more. One person ends up with 10 hours of tasks on an 8-hour day while another is only half busy. Deadlines slip because work is spread unevenly.
Features Used
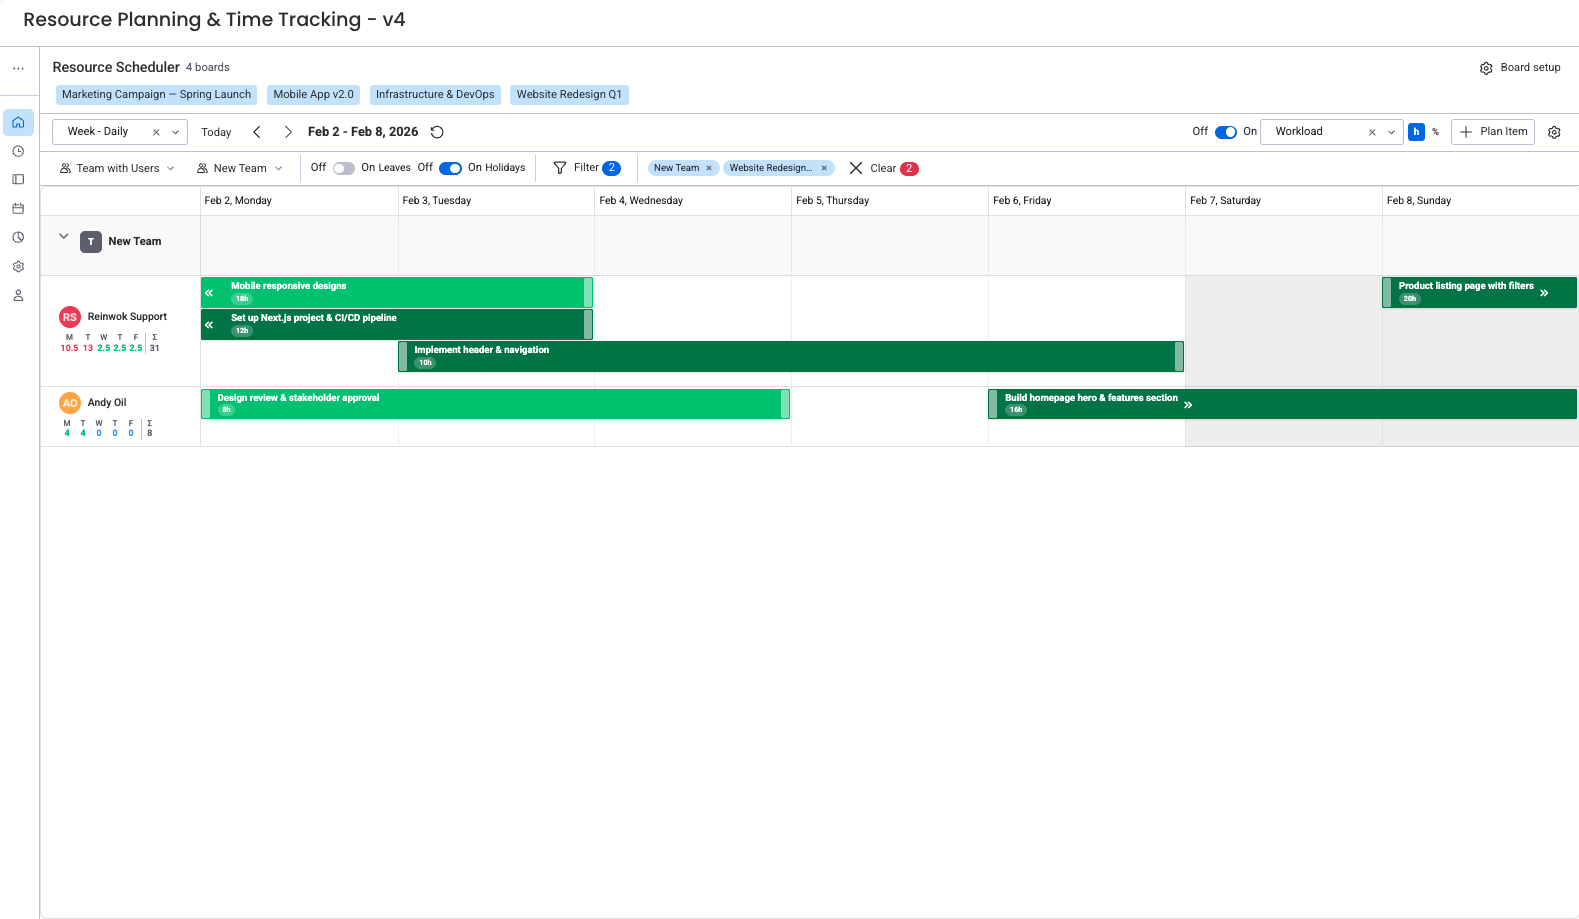
- Resource Scheduler — calendar view showing all items on a board, grouped by person
- Workload overlay — color-coded bars showing how much of each person's capacity is used each day
- Workspace View Scheduler — a single view that combines multiple boards
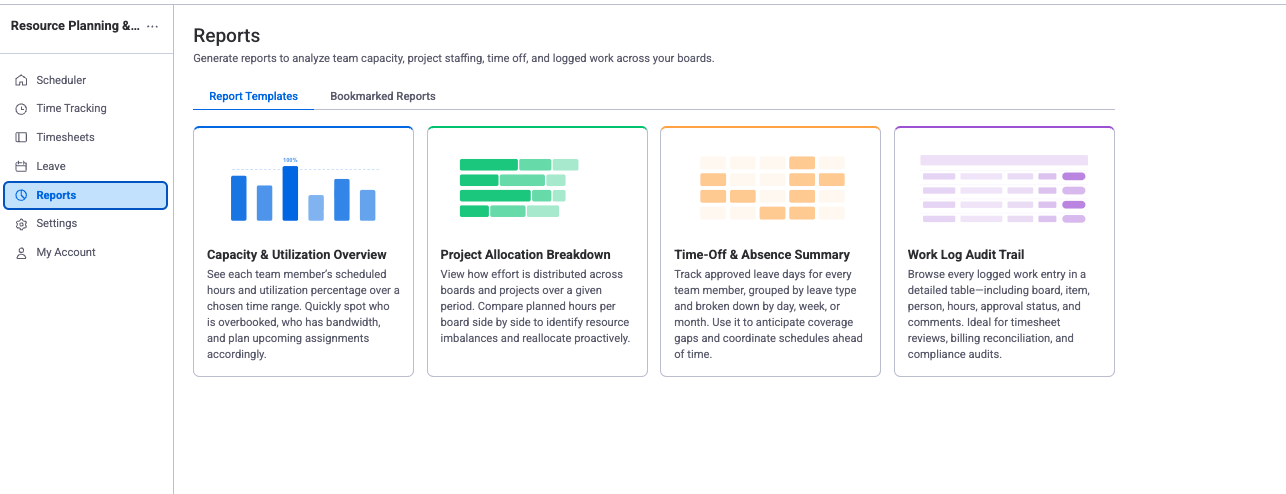
- Capacity & Utilization Overview — a report showing each person's workload as a percentage
Step-by-Step
- Open your project board and launch the Resource Scheduler from the Board View.
- Turn on the Workload toggle and select Remaining Estimate mode (recommended for teams that track time) or Original Estimate mode (for teams that only estimate). Color-coded capacity bars appear in each day cell of every person's row.
- Look for Red days — these mean a person has more work than they can handle (over 120% capacity).
- Drag an overloaded task from a red person's row to someone who shows Green (under 100%) or Yellow (100–120%). The plugin reassigns the item and updates the bars right away.
- Check your other project boards the same way.
- For a combined view, open the Workspace View and add all your project boards using the board picker in the toolbar. Now you see everyone across all boards at once.
- Go to Workspace View > Reports and run a Capacity & Utilization Overview. Review the percentage for each person to confirm the workload is balanced.
Measurable Outcome
You can see each person's daily and weekly workload at a glance. After rebalancing, aim for 85–95% utilization — busy but not overloaded. You can repeat this check any time new tasks come in, and it takes less than five minutes.

- Use the workload color coding as a quick daily health check: Green = at or under capacity, Yellow = near the limit, Red = overloaded.
- The Workspace View Scheduler stays up to date in real time. Add your boards once, and the view refreshes as tasks are added, completed, or reassigned.
5. Track Time and Bill Clients Accurately
The Problem
You need to know exactly how many hours your team spends on each project so you can bill clients fairly. But people forget to log time, record hours in different places, or enter rough estimates at the end of the week. You end up under-billing or over-billing, and you cannot produce a clean report for your client.
Features Used
- Time Tracking (timer and manual entry) — log work against specific board items
- Work Log Audit Trail — filterable report of all worklogs, exportable to Excel
- Scheduler task tooltip — log time without leaving the scheduler
Step-by-Step
- Open your project board and launch the Resource Scheduler.
- Click any task bar to open the task tooltip. Select "Log Work" to open the worklog form.
- Enter the hours, select the date, and add an optional note (for example, "Client feedback revisions — round 2"). Click Save.
- You can also log time from Workspace View > Time Tracking by clicking "+ Worklog", searching for the item, and filling in the details.
- Team members on the go can log hours directly from their phone using the mobile item view — no laptop needed. See Mobile Time Tracking.
- At the end of the week, go to Workspace View > Reports and select Work Log Audit Trail.
- Filter by board (your client's project), date range (this week), and optionally by team member.
- Review the table. Each row shows the person, item, date, hours, and description.
- Click Export to download an Excel file you can attach to your invoice or share with your finance team.
Measurable Outcome
You have an itemized, exportable record of every hour your team spent on the project. You can produce a client-ready report in under a minute, broken down by task, person, and date. This removes guesswork from billing and gives clients clear proof of the work done.

- Click any task bar in the scheduler to log time, edit, or duplicate the item without leaving the view.
- Encourage your team to use the real-time timer instead of manual entry when possible. Timer-based logs are more accurate and take less effort — just start, work, and stop. Manual entry works best for logging time after the fact.
6. Set Up Timesheet Approval for Your Team
The Problem
Your team logs time throughout the week, but nobody checks those entries before they go to payroll or client billing. Mistakes slip through — hours on weekends, duplicate entries, or time logged against the wrong item. You need a review step so only verified hours are used for payroll and invoices.
Features Used
- Timesheet Approval — a review cycle where team members submit worklogs and approvers accept or reject them
- Approvals tab — central view for all pending timesheet and leave requests
- Work Log Audit Trail — export worklogs with approval status for payroll
Step-by-Step
Part A: Team Members Submit Timesheets
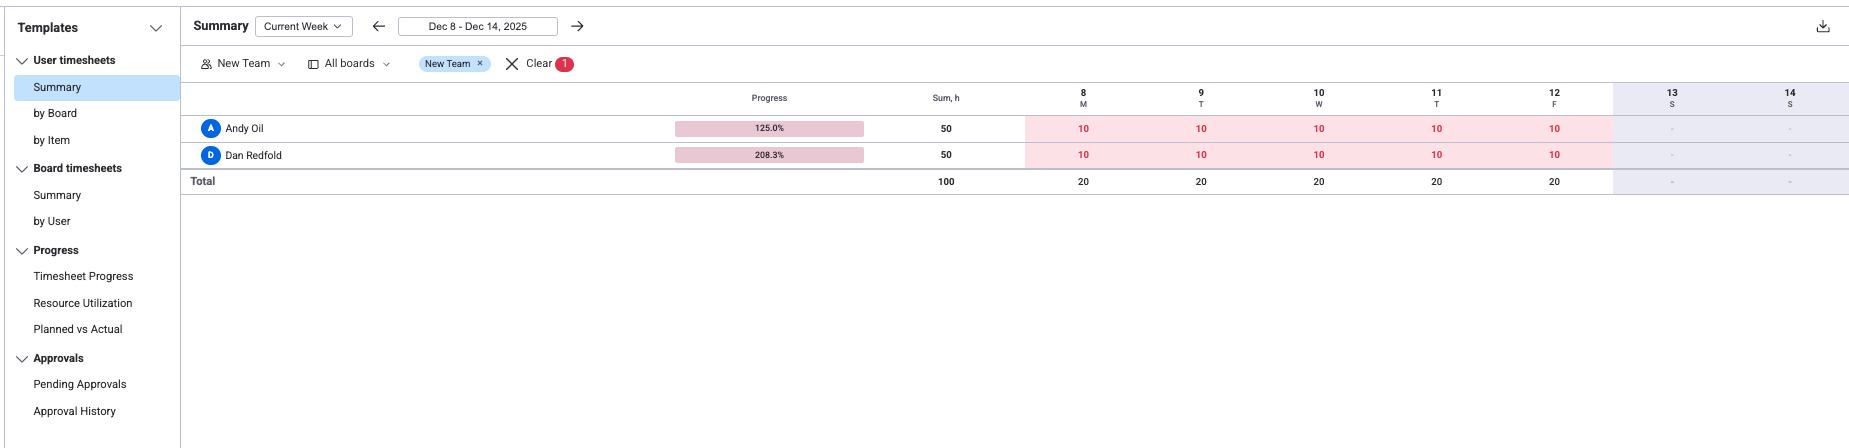
- Each team member opens Workspace View > Timesheet.
- The timesheet grid shows every worklog for the current period (for example, the past week), organized by item and day.
- The team member reviews their entries, fixes any mistakes, and clicks Submit for Approval.
- The status changes to "Pending" and appears in the approver's queue.
Part B: Review and Approve
- Open Workspace View > Approvals. You see submitted timesheets with each person's name, the period, and total hours.
- Click a timesheet to expand it. Check the daily breakdown for anything unusual, such as hours on weekends or entries that exceed daily capacity.
- If everything looks correct, click Approve.
- If something is wrong, click Reject and add a comment explaining what to fix (for example, "Please check the 8 hours on Saturday — our weekend capacity is 0h"). The team member gets a notification, makes the correction, and resubmits.
Part C: Export Approved Hours for Payroll
- At the end of the pay period, go to Workspace View > Reports and select Work Log Audit Trail.
- Set the date range to cover the full pay period and filter to show only approved timesheets.
- Click Export. The export includes approval status, approver, person, date, board, item, hours, and comments.
- Hand the file to payroll or finance. Only reviewed, approved hours are included.
Measurable Outcome
Every worklog goes through a review before it reaches payroll. This reduces billing errors, catches mistakes early, and gives you a full audit trail of who approved what and when. The approval step adds less than 10 minutes per week for a team of 10.

- Set up a weekly reminder for your team to submit timesheets every Friday. The plugin can notify users who have not submitted by the deadline.
- For compliance and audits, the Work Log Audit Trail includes approval status for each entry, so you can see which hours have been verified and by whom.
7. Get a Cross-Project Overview for Leadership
The Problem
You manage multiple project boards across different teams, and you need one view that shows where everyone is allocated. Before quarterly reviews or headcount discussions, you spend hours pulling numbers from separate boards. You need a way to spot overcommitted people, find spare capacity, and produce executive-ready reports without switching between boards.
Features Used
- Workspace View Scheduler — combines multiple boards into one view
- Capacity & Utilization Overview — shows workload percentages per person across boards
- Time-Off & Absence Summary — shows upcoming leave that affects capacity
- Excel Export — generates files for presentations and spreadsheets
Step-by-Step
- Open the Workspace View and click Scheduler.
- Use the board picker to add all the project boards you want to monitor (for example, engineering, design, marketing, and operations).
- The scheduler now shows every person across all selected boards. Turn on the Workload toggle to see who is overcommitted.
- Look for people with a high item count across boards — they may be overloaded even if each individual board looks fine.
- Go to Workspace View > Reports and run a Capacity & Utilization Overview. Check for anyone consistently above 100% or below 60%.
- Run a Time-Off & Absence Summary for the coming month. Flag any approved leave that overlaps with important milestones.
- Click Export on the utilization report. Use the Excel file in Google Sheets or Numbers to build charts for your quarterly review or headcount planning.
Measurable Outcome
You have a single dashboard showing allocation across your organization. You can produce a data-driven utilization report for leadership in under five minutes, catch capacity risks before they cause missed deadlines, and make staffing decisions based on real numbers instead of guesswork.
- Add your boards to the Workspace View once and the scheduler stays current in real time as work is logged, completed, or reassigned.
- When presenting to executives, use the Excel export to create charts and trend lines. Comparing utilization across sprints or months shows whether your team is consistently over- or under-committed — key data for headcount planning.
8. Manage Holidays, Leave, and Capacity for Distributed Teams
The Problem
Your team is spread across countries with different public holidays. When you plan a sprint, you forget that half the team is off for a regional holiday, and the rest get overloaded. Leave requests arrive through chat or email with no central record, and nobody knows how many vacation days each person has left. You need a system that automatically accounts for holidays and leave in your capacity planning.
Features Used
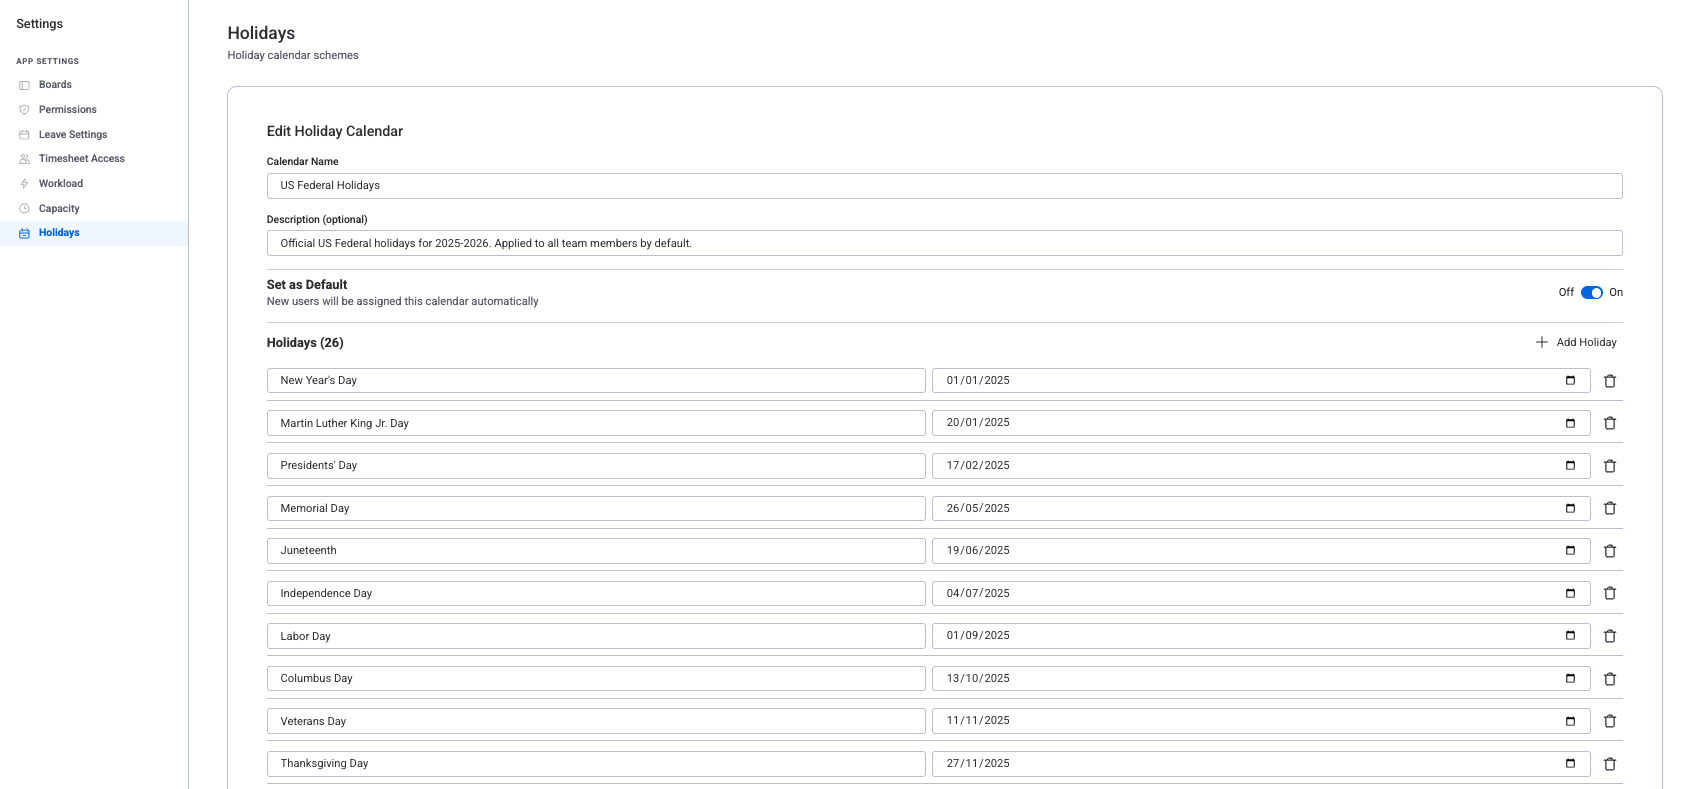
- Holiday Calendars — region-specific calendars that set capacity to zero on public holidays
- Leave Types & Allocation — configurable leave categories with yearly allowances and carry-over rules
- Leave Requests & Approval — team members request leave; approvers accept or reject
- Work Capacity Schemes — define working hours per day for each person (for example, 8h/day full-time, 6h/day part-time)
- Time-Off & Absence Summary — see leave usage across the team
Step-by-Step
Step 1: Set Up Holiday Calendars by Region
- Open Workspace View > Settings > Holiday Calendars and click + Create Calendar.
- Name the calendar after the region (for example, "US Holidays" or "Germany Holidays").
- Select a country to fill in public holidays for the current and next year automatically.
- Optionally add company-specific days off (for example, "Company All-Hands Day") by clicking + Add Holiday.
- Assign team members to the calendar using the user picker. Each person should be on the calendar that matches their location, or set one calendar as the default for everyone.
- Repeat for each region. A person in Germany sees German holidays; a person in the US sees US holidays. Capacity drops to zero on those days automatically.
Step 2: Configure Leave Types
- Go to Settings > Leave Types. Create the types your company uses, such as:
- Vacation — 20 days/year, up to 5 days carry-over
- Sick Leave — no fixed limit (as needed)
- Personal Day — 3 days/year
- Unpaid Leave — no limit
- Set the default days per year for each type. You can override this per person later (for example, senior staff with 25 vacation days).
- For Vacation, turn on accumulation and set the carry-over maximum to match your HR policy.
Step 3: Process Leave Requests
- Team members go to the Leave Management view, click + Request Leave, choose a leave type, enter dates, and pick an approver.
- You see the request in Workspace View > Approvals.
- Check the person's remaining balance, look for project deadline conflicts on the scheduler, and see whether others are already off on those dates.
- Click Approve or Reject (with a comment if rejecting). Approved leave appears on the scheduler immediately and sets capacity to zero for those days.
- Run a Time-Off & Absence Summary to check whether multiple people are planning to be out during the same sprint.

Step 4: Adjust Capacity for Part-Time or Flexible Schedules
- Go to Settings > Work Capacity Schemes and click + Create Scheme.
- Set the working hours for each day of the week. For full-time: Monday through Friday at 8 hours, Saturday and Sunday at 0.
- For part-time staff, create a separate scheme (for example, "Part-Time 6h") with 6 hours on weekdays.
- Assign each person to the right scheme. The scheduler and workload overlay will use the correct hours when calculating utilization.
Measurable Outcome
Your scheduler now reflects regional holidays, approved leave, and individual work schedules automatically. When you plan a sprint, you see the real available hours per person per day — no surprises from forgotten holidays or unapproved absences. Leave balances are tracked in one place, and you can produce a report showing how many days each person has used and how many remain.
- Start with a simple set of leave types (Vacation, Sick, Personal, Unpaid) and add more later as needed. You can always add new types without affecting existing records.
- Use the carry-over setting to match your HR policy. If your company allows rolling over up to 5 unused vacation days, set the maximum to 5.
- Always check the Time-Off & Absence Summary before sprint planning. If several people in the same region are off the same week due to a public holiday, your available capacity drops sharply.
Related Pages
- Getting Started — install the plugin and set up your first board view
- Resource Scheduler — schedule and assign work across your team
- Reports — generate utilization, worklog, and absence reports