Overview
The Timesheets module lets your team submit logged hours for approval and gives managers a clear way to review and approve them. The entire workflow runs inside the WorkHub Workspace View.
Here is how the process works at a high level:
- An admin sets up approval rules that decide who approves whose timesheets.
- An employee picks a time period, reviews their worklogs, and submits a timesheet.
- An approver reviews the submission and either approves or rejects it.
Approved timesheets lock the underlying worklogs so they cannot be changed. If Lock on Approval is enabled, worklogs are also locked while the timesheet is pending review. Rejected timesheets unlock them so the employee can make corrections and resubmit.
The approval workflow can be enabled or disabled, and submission periods and week boundaries can be customized in Settings › Timesheet Config. When approval is disabled, the Submit button and all approval-related UI are hidden from Time Tracking, and worklog locking is turned off.
Configuring Approval Rules
Before anyone can submit a timesheet, an admin must create at least one approval rule. Rules live in Settings › Permissions › Timesheet Approval. Additionally, the approval workflow itself must be enabled in Settings › Timesheet Config.
Rule types
There are three types of rule, listed from most specific to broadest:
| Rule Type | Whose timesheets | Who approves | Example |
|---|---|---|---|
| Per-user | A specific person | A specific person or team | Alice → approved by Bob |
| Per-team | Everyone on a team | A specific person or team | Engineering → approved by Team Lead |
| All users | Everyone in the workspace | A specific person or team | All users → approved by HR Manager |
How the system picks an approver
When someone submits a timesheet the system looks for a matching rule in this order:
- Per-user rule — is there a rule for this exact person?
- Per-team rule — is there a rule for one of this person's teams?
- All-users rule — is there a catch-all rule?
The first match wins. If nothing matches and no admin exists, the submission fails with an error asking an admin to add a rule.
Setting up rules in the UI
The Permissions screen offers two tabs:
- Rules tab — create broad rules for teams or the whole workspace. For example, assign a team lead as the approver for the Engineering team.
- Per-User Assignments tab — assign specific approvers to specific people. You can multi-select on both sides and the system creates every combination.
Submitting Timesheets
Employees submit timesheets from the Time Tracking screen. The steps below walk through the process.
Select a period
Use the date-range picker at the top of Time Tracking to choose a full week or full month. The Submit for Approval button only appears when the selected range matches a complete period.
Review your worklogs
Before you submit, scroll through the table or stack view and make sure every worklog is correct. Once you submit, your worklogs are locked and you cannot edit them until the timesheet is rejected or reopened.
Submit for approval
Click "Submit for Approval"
A confirmation dialog opens. It shows the period dates and your total hours.
Add an optional note
Include any context for your approver, such as notes about overtime or project changes.
Confirm
Click Submit. The system picks the right approver automatically based on the rules your admin configured. Your timesheet moves to Pending Approval and your worklogs are locked.
Timesheet statuses
Every timesheet moves through a set of statuses:
| Status | What it means | Can you edit worklogs? |
|---|---|---|
| Not Submitted | No submission exists yet. You can freely add, edit, or delete worklogs. | Yes |
| Pending Approval | Submitted and waiting for the approver to act. | Locked |
| Approved | The approver accepted the timesheet. Hours are finalized. | Locked |
| Rejected | The approver returned the timesheet with a reason. Fix the issues and resubmit. | Yes |
| Reopened | An approver or admin reopened a previously approved timesheet so corrections can be made. | Yes |
Reviewing, Approving, and Rejecting
If you are an approver you will see an Approvals section in the Timesheets sidebar with two items: Pending Approvals and Approval History.
Pending Approvals
This view shows a list of submitted timesheets on the left and a detail panel on the right. For each submission you can see:
- Employee name and avatar
- Date range and total hours
- Number of worklogs
- Submission note (if provided)
Taking action
Select a submission to open its detail panel. From there you can:
- Review the full worklog breakdown — item names, boards, hours, and descriptions.
- Read the employee's note.
- View the status history timeline showing all past transitions.
- Click Approve to accept the timesheet.
- Click Reject and enter a reason (at least 10 characters) explaining what needs to change.
Approval History
The Approval History view lists every timesheet you have acted on. You can filter by status, employee, and date range.
Reopening an approved timesheet
If a timesheet was approved but later needs corrections, an approver or admin can reopen it:
Find the approved timesheet
Go to Approval History and locate it, or open it from the detail panel.
Click "Reopen"
Enter a reason explaining why the timesheet needs to be reopened.
Employee corrects and resubmits
Worklogs are unlocked. The employee edits them in Time Tracking and submits again.
Timesheet Layout
The Timesheets workspace has two main areas: a sidebar on the left for switching between views, and the main panel showing the selected view's data.
Sidebar
The sidebar organizes all timesheet views into four categories:
- User Timesheets — Summary, by Board, by Item. Person-centric views.
- Board Timesheets — Summary, by User. Project-centric views.
- Progress — Timesheet Progress, Resource Utilization, Planned vs Actual. Comparison views.
- Approvals — Pending Approvals, Approval History. Manager views for the approval workflow.
Toolbar & Filters

The toolbar at the top controls what data is shown across all views:
- Period preset — choose from Current/Previous Week, Current/Previous Month, Current/Last Quarter, Current/Last Year, or Custom from the dropdown.
- Date navigation — use the arrows to move forward/backward by period. Click Today to jump to the current period.
- Team filter — filter by one or more monday.com teams. Active filters show as chips.
- Board filter — limit worklogs to specific boards (useful for project-specific timesheets).
- Clear — remove all active filters.
- Export Excel — download the current view as an Excel file (icon in the top-right corner).
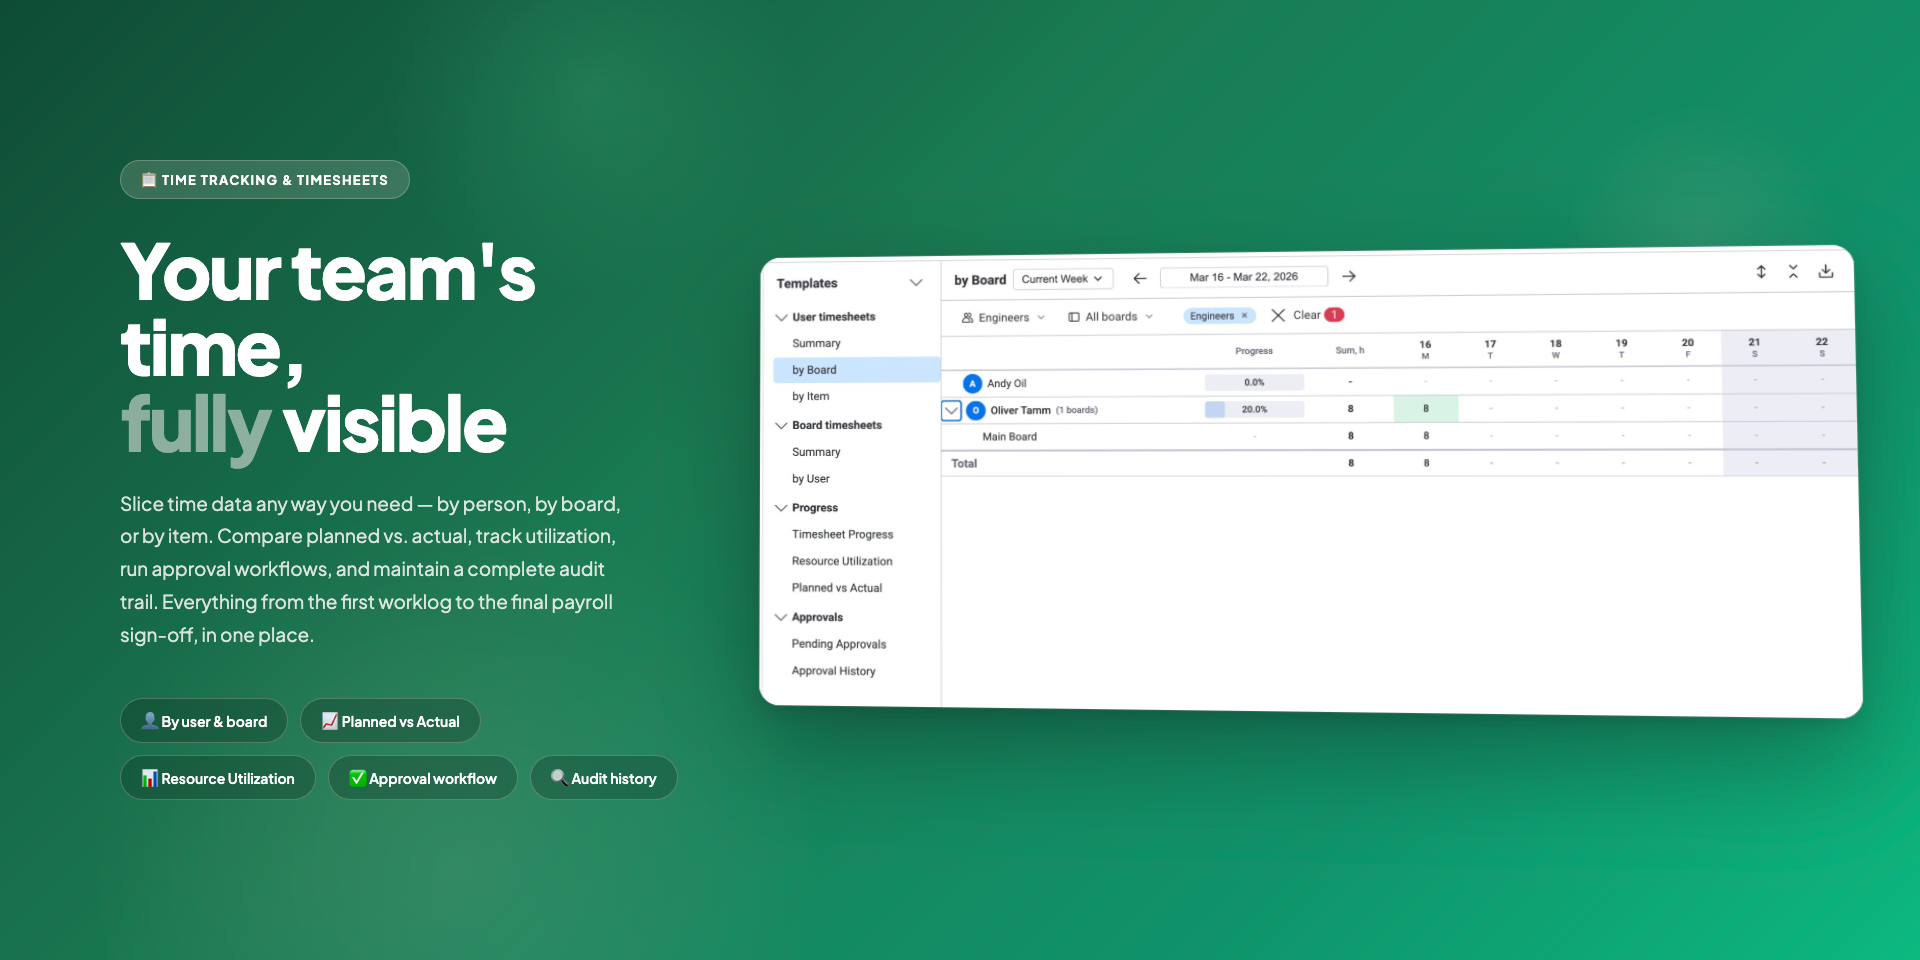
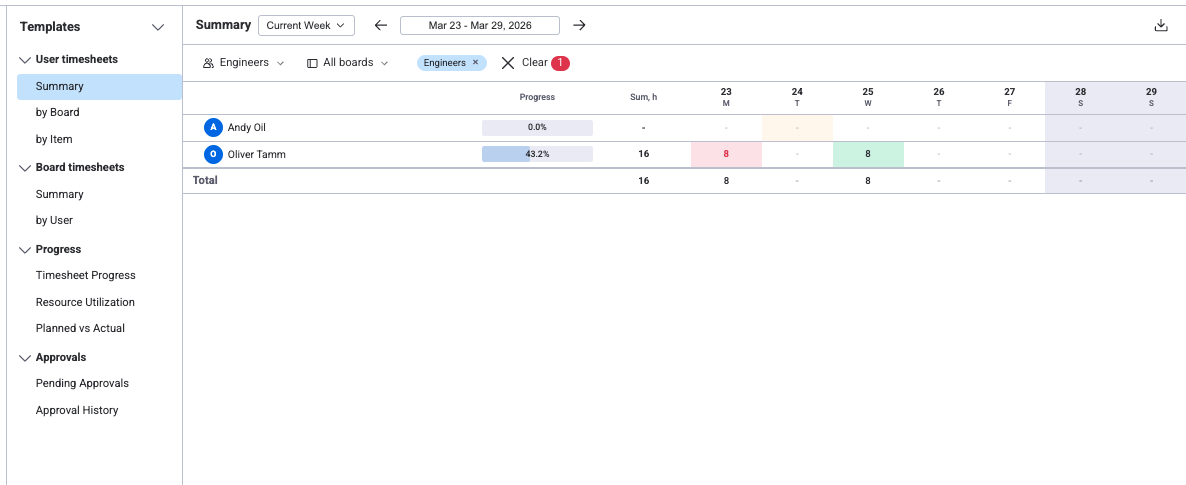
User Timesheets
User Timesheets show logged hours per person in a weekly grid. Each row is a user (or a user with expandable sub-rows). Day columns show hours logged, with a progress bar and sum total. Click any cell to see the individual worklogs for that user/day.
Summary
One row per user. Each cell shows the total hours logged on that day across all boards. The Progress column shows a bar of logged hours vs required capacity. The Sum column totals the week.
Best for: Quick overview of who has logged how much this week. Ideal for managers checking team completion before the submission deadline.
by Board
Users as parent rows, boards as expandable child rows. Each child row shows hours logged on a specific board for that day. Collapse users to see totals; expand to see the per-board breakdown.
Best for: Understanding how each person splits their time across projects.
by Item
Users as parent rows, individual items as expandable child rows. The most granular view — see exactly which items each person worked on each day.
Best for: Detailed time audits, finding items with unexpectedly high or low hours.
Board Timesheets
Board Timesheets flip the perspective — rows represent boards (projects) instead of people. This helps project managers see how hours are allocated across projects.
Summary
One row per board. Each cell shows the total hours logged on that board for that day, summed across all team members. The Sum column totals the week per board.
Best for: Project-level time overview. Quickly see which projects consumed the most hours this week.
by User
Boards as parent rows, users as expandable child rows. Expand a board to see each team member's contribution. This is the inverse of "User Timesheets → by Board".
Best for: Checking per-person contribution to a specific project. Useful for client billing where you need to show who worked how many hours on a project.
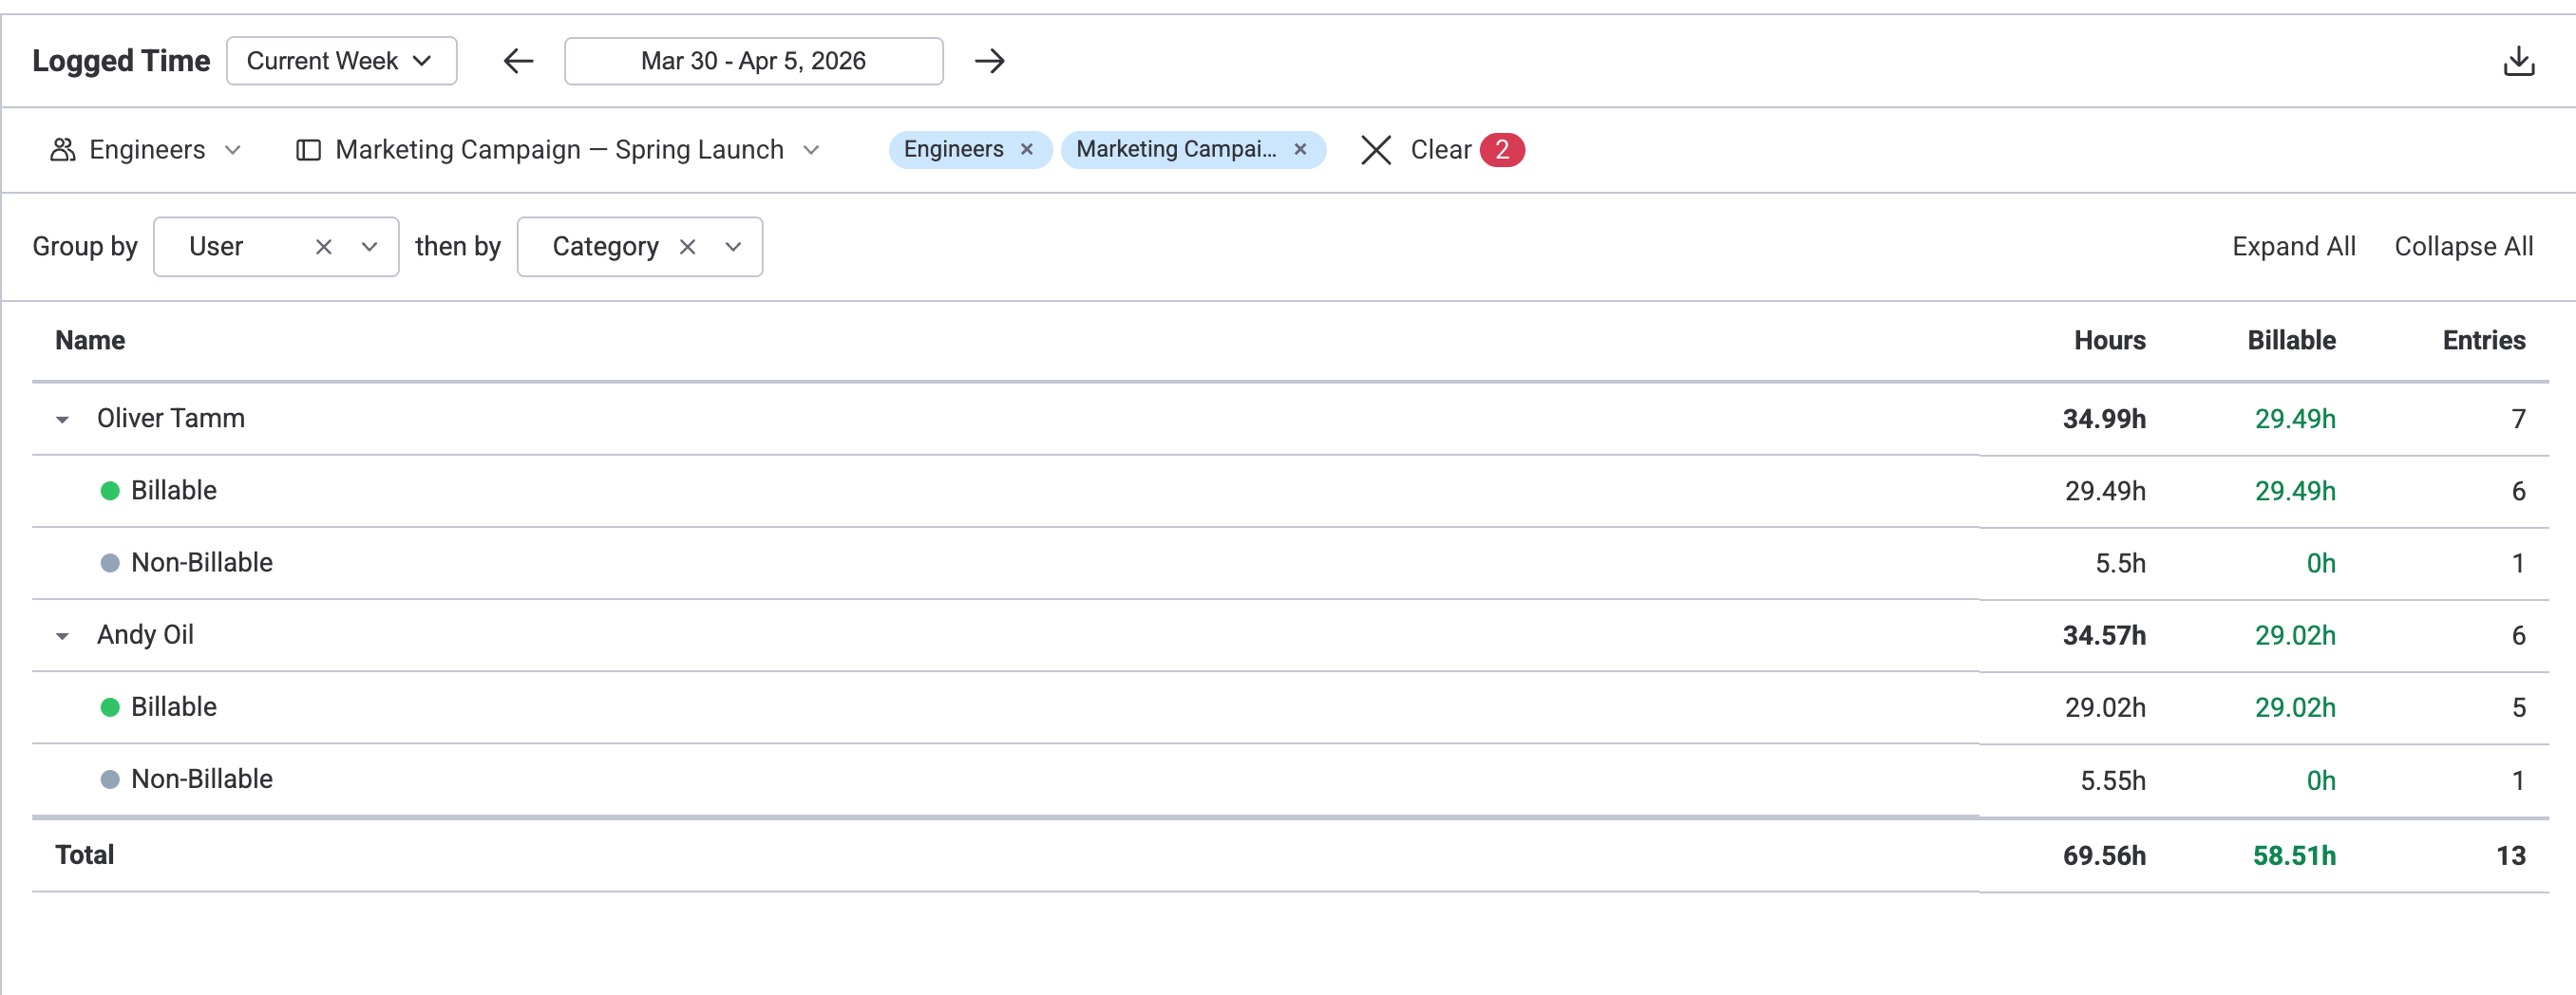
Logged Time Report
The Logged Time Report provides an aggregated summary of all worklogs for the selected period. Unlike the timeline grid, it shows totals grouped by two configurable dimensions rather than a day-by-day breakdown.
Use the Group by and then by dropdowns to choose how data is organised:
- User → Category — see each person's billable vs non-billable hours.
- Board → User — see how hours are distributed across projects per person.
- Category → Board — see billable hours split by project.
Each row shows Hours, Billable hours, and Entries count. Expand a parent row to see the secondary grouping breakdown. The Total row at the bottom sums everything.
Progress Reports
The Progress section in the Timesheets sidebar switches from the timeline grid to a table view. Three report modes are available, each answering a different question about your team's time.
1. Timesheet Progress
Question it answers: How much of their required capacity has each person logged?
| Column | What it shows |
|---|---|
| Person | Team member name and avatar. |
| Required Hours | Available capacity for the period (from the user's capacity scheme, minus holidays and approved leave). |
| Logged Hours | Total worklogs recorded by this person in the period. |
| Progress bar | Visual bar showing Logged / Required as a percentage. Green when on track, red when over capacity. |
How to use: Run this at the end of each week to check who hasn't finished logging. If someone's bar is well below 100%, they may have unrecorded work. If it's over 100%, they may be working overtime.
2. Resource Utilization
Question it answers: How does planned work compare to available capacity?
| Column | What it shows |
|---|---|
| Person | Team member name and avatar. |
| Required Hours | Available capacity for the period. |
| Planned Hours | Total scheduled hours from item estimates (Original Estimate distributed across working days, or Hours Per Day applied daily). |
| Progress bar | Planned / Required as a percentage. Shows how loaded the person is by plan — before any work is actually logged. |
How to use: Use this during sprint planning or at the start of a period to check if the workload is balanced. If someone is over 100%, they are overbooked. If well below 100%, they have room for more work.
3. Planned vs Actual
Question it answers: How does actual logged time compare to what was planned?
| Column | What it shows |
|---|---|
| Person | Team member name and avatar. |
| Planned Hours | Total scheduled hours from item estimates for the period. |
| Logged Hours | Total worklogs recorded by this person in the period. |
| Progress bar | Logged / Planned as a percentage. Green when close to plan, red when significantly over or under. |
How to use: Run this after a sprint or at month-end to compare estimates versus actuals. If logged hours consistently exceed planned, your team may be underestimating. If logged is much lower, work may be untracked or estimates too generous.
Common features
- Period filter — all three views respect the active date range selected in the Timesheets period picker.
- Team grouping — when teams are selected in the filter, rows are grouped by team with team-level totals.
- User filter — filter to specific people or teams to focus on a subset.
- Board filter — limit planned hours to specific boards (affects Resource Utilization and Planned vs Actual only).
All three timesheet progress views use original estimates for planned hours and raw worklogs for logged hours. They are not affected by the workload indicator mode selected on the scheduler. The remaining estimate calculation (Original Estimate minus worklogs) is used only in the Reports Gallery reports and the scheduler workload indicator.
Related Pages
- Time Tracking — Log work hours and manage worklogs before submitting timesheets
- Permissions & Access — Full role matrix, approver resolution chain, and view access details
- Settings — Configure approval rules, column mappings, and workspace preferences
- Worklog Categories — Configure billable/non-billable categories for time entries
Need Help?
If you have questions about timesheets or need help with your setup, our support team is here for you.
Live Chat