Overview Back to top
The Resource Scheduler is a Gantt-like calendar view where team members are listed on the left and dates span across the top. Jira issues appear as colored bars on each person's row, representing the work assigned to them over specific date ranges.
Drag issues horizontally to reschedule them to different dates while preserving their duration. Drag vertically to reassign work to another team member. Resize the right edge of a bar to change its end date. All changes sync back to Jira in real time — updating the issue's start date, end date, and assignee fields automatically.
In addition to Jira issues, the scheduler supports custom allocations — manual bookings such as "Training" or "Meetings" that are not tied to specific Jira issues but still contribute to workload calculations.
The full Scheduler is the team-scope view. For a personal page that pairs your single row with a daily logged-hours chart and stays in sync with your worklogs, see My Work. Scope, time scale, and visible date are kept independently from this view, so changing one does not affect the other.
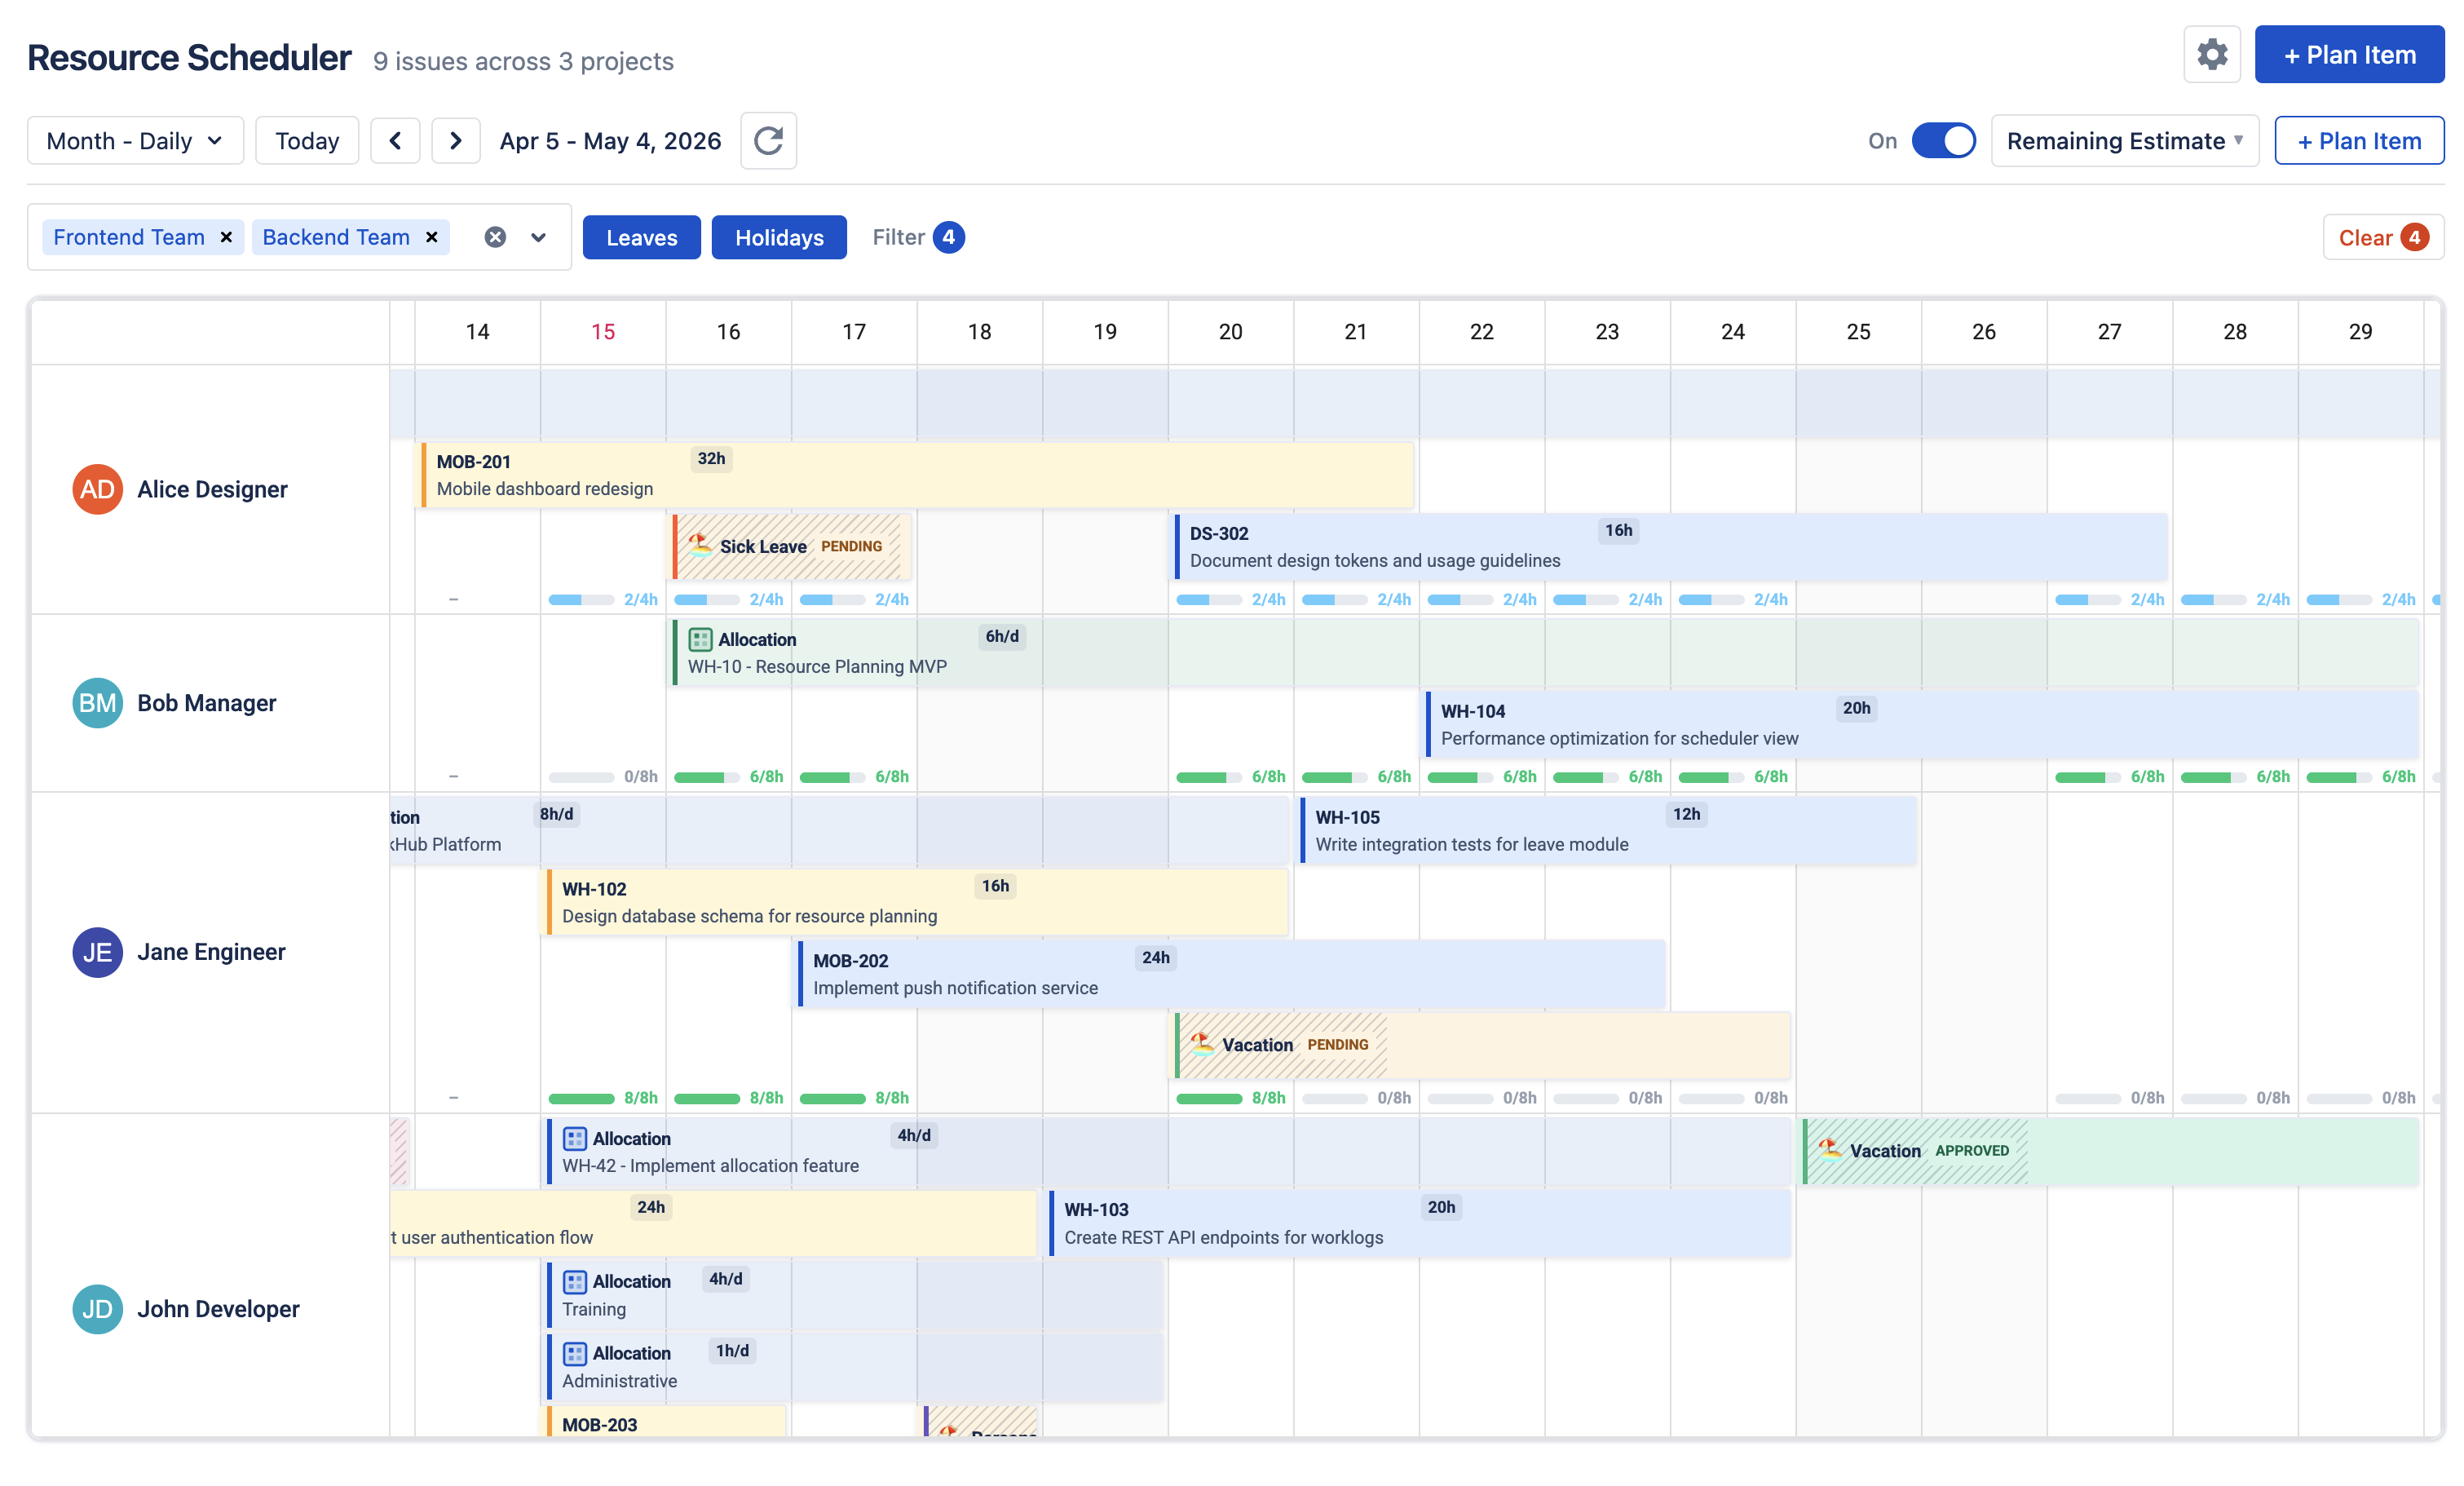
- Configurable Start/End Dates: Issues display on the timeline based on your configured start/end date field mappings. You can change this in Settings > General.
- Visual timeline: See all team members and their assigned issues on a single calendar view
- Drag-and-drop scheduling: Reschedule and reassign issues by dragging bars on the timeline
- Real-time Jira sync: Date and assignee changes are written back to Jira immediately
- Custom allocations: Book time for non-issue work (training, meetings, support rotation)
- Workload indicators: Per-user per-day capacity bars showing scheduled vs available hours
- Six view modes: Week, 2-Week, Month, Year Monthly, Year Daily and Custom
- Leave and holiday overlay: Leave and public holidays displayed alongside issues
Right after the initial field setup, a short guided tour highlights the key controls in place — the Plan Item panel, the team/user selector, filters, day-cell actions, drag-and-drop, and the workload indicator. Open it anytime from the button in the header.
View Modes Back to top
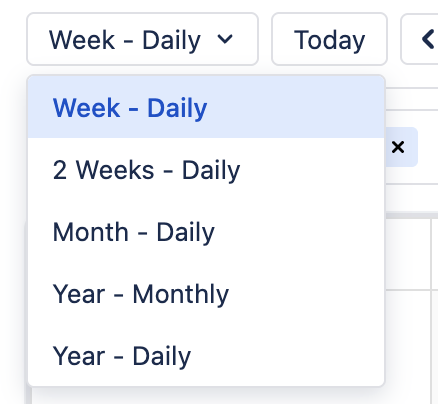
The scheduler provides five zoom levels to match different planning horizons. Switch between them using the view selector in the toolbar.
| View | Time Span | Column Unit | Best For |
|---|---|---|---|
| Week | 7 days | Day | Daily planning and task management (default) |
| 2-Week | 14 days | Day | Sprint views and short-term planning |
| Month | Calendar month | Day | Monthly capacity review and resource balancing |
| Year Monthly | 12 months | Month | High-level annual roadmap and portfolio planning |
| Year Daily | Full year | Day | Granular long-range planning with day-level detail |
Toolbar & Filters Back to top

The scheduler header has three rows: action buttons on top, timeline navigation and workload controls in the middle, and the team/user filter plus the issue Filter button at the bottom. There is no free-text search box in the header itself — issue search lives in the Plan Item sidebar.
Action Buttons (Row 1)
- Plan Item: Opens the issue search sidebar where you can find an existing Jira issue by key or text and drop it onto a row to schedule it.
- Bulk Allocate: Opens a dialog for creating allocations across multiple users at once (training, support rotation, etc.).
- Settings (gear icon): Opens the admin Settings page (visible only to App Admins / Jira site admins).
- Colors: Detailed explanation of issues color rules.
Scheduler Scope (Row 1)
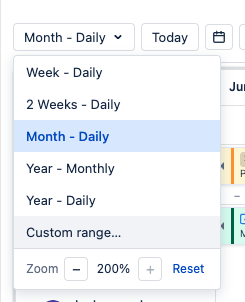
The scope dropdown controls how many days fit on the visible timeline. Six zoom levels are available — see View Modes above for the full list. Zoom controls at the bottom of the dropdown make day columns wider or narrower (the timeline scrolls horizontally when zoomed in).
Date Navigation (Row 2)
- Today: Snaps the timeline back to the current period.
- Date picker (calendar icon): Jumps to a specific date.
- ◂ / ▸ arrows: Step backward or forward by one period at a time (one week in Week view, one month in Month view, etc.).
- Date range label: Shows the currently visible window (for example, Apr 26 – May 9, 2026).
- Refresh (↻): Re-fetches issues, allocations, and leave for the current window. Also runs automatically after Log Work, Schedule Issue, and other mutations.
Workload Controls (Row 2 right)
- On/Off toggle: Show or hide the per-day workload indicator under each cell.
- Mode selector: Switch between Remaining Estimate (default), Original Estimate, and Availability. See Workload Management for what each mode shows.
Fullscreen (Row 2 right)
The Fullscreen button enlarges the scheduler and compacts the header to a single row. Click Exit fullscreen or press Esc to leave.
Team / User Filter (Row 3)
A single combined picker drives which rows appear on the timeline. It supports two types of selection in one control:
- Teams: Pre-defined groups configured in Team Management. Selecting a team shows all of its members.
- Users: Type at least 2 characters to search users by display name or email. Pick one or more.
Selections are additive — you can mix teams and individual users freely. The picker is empty by default; nothing is shown until you make a selection, which keeps Jira queries fast on large sites with many projects.
Each user row in the timeline shows the team(s) the user belongs to under their name (multiple teams joined by ·), so members are easy to attribute when filtering across several teams.
Leaves & Holidays Toggles (Row 3)
Two independent toggles control which bars are drawn on the timeline: Leaves shows or hides approved-leave bars, and Holidays shows or hides public-holiday bars from your Holiday Calendars (each holiday appears as a read-only bar labelled with the holiday name on every affected user's row). Either toggle only affects whether the bars are drawn — even when hidden, leave and holidays still reduce capacity in workload calculations.
Issue Filters (Row 3)
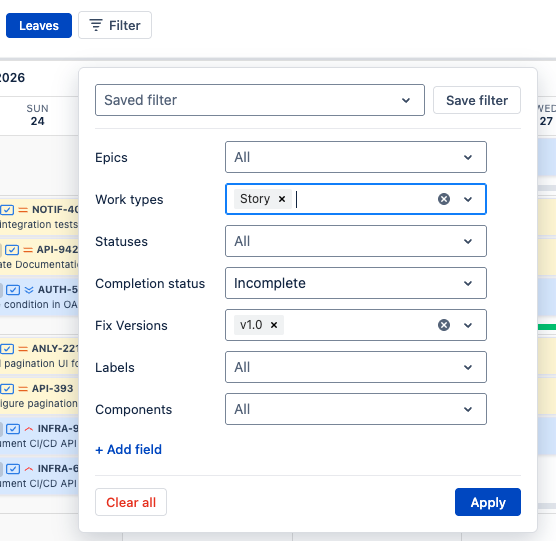
The Filter button opens a panel that narrows which issues are shown for the selected users — without changing which rows appear. A count badge on the button shows how many filters are active. Available filters:
- Projects: Show only issues from one or more selected projects. Start typing to search projects by name or key.
- Epics: Show only issues whose parent is one of the selected epics.
- Work types: Filter by issue type (Story, Bug, Task, …).
- Statuses: Filter by workflow status (To Do, In Progress, Done, …).
- Completion status: Quickly show only Complete (Done category) or Incomplete issues.
- Fix Versions: Filter by release / fix version.
- Labels: Filter by issue labels.
- Components: Filter by project components.
- + Add field: Add a filter on any custom field — pick the field, then choose one or more of its values. (Date and date/time fields are not offered, since they have no fixed value list.) Use the × in the field picker to dismiss it without adding anything.
Each filter accepts multiple values (matched as "any of"), and filters combine with "and" across rows. Value lists are searchable — start typing to look up projects, labels, components, versions, epics, or custom-field values beyond the first page. Selections are staged: nothing changes on the timeline until you click Apply, so you can set several filters at once. Use Clear all to reset the panel. Your applied selection is remembered between sessions.
Saved filters: Use Save filter in the panel header (top-right) to store the current selection as a named preset, then re-apply it later from the Saved filter dropdown (top-left) — pick it (the dropdown shows the selected preset), then Apply. After loading a preset and tweaking it, an Update button appears to overwrite that preset with your changes; Save filter still creates a new one. Delete a preset via the × next to its name in the dropdown. Saved filters are personal to you.
Clear
A Clear button on the right of Row 3 resets the team/user selection, turns the Leaves and Holidays toggles off, and clears any active issue filters in one click. It only appears when there is something to clear. (The filter panel also has its own Clear all that resets just the issue filters.)
Issue Cards Back to top
Each Jira issue appears as a colored horizontal bar on the timeline. The bar spans from the issue's start date to its end date, positioned on the row of the assigned team member.
Bar Content
By default each issue bar shows the issue key on the first line and the summary on the second, with the issue-type icon, priority icon, and an hours badge. The text on the bar is configurable — admins choose which fields appear on each line under Settings → Issue Display → Issue Card. Two other things are always true:
- Bar length: Proportional to the date range (start date to end date)
- Color: Based on the issue's status category, or your custom color rules
Issue Tooltip
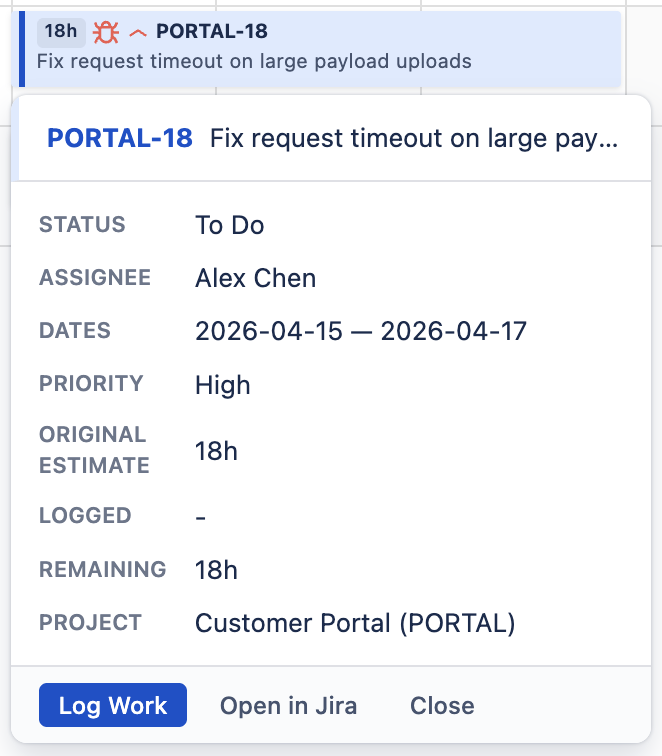
Click on an issue bar to see a tooltip with detailed information. The header always shows the issue key (clickable, opens the issue in Jira) and full summary. The body is configurable — admins choose which Jira fields appear in the popover under Settings → Issue Display → Issue Tooltip. You can pick any combination of system fields (Status, Assignee, Priority, Due date, Project, etc.) and custom fields (Story Points, Sprint, Epic Link, any select / multi-select / user / date custom field, etc.) and arrange them in the order you want.
How it loads: field values are fetched on demand the moment the popover opens, not eagerly across every issue on the board, so picking heavy custom fields does not slow down the schedule fetch. The fetch respects Jira's per-field permissions — fields you do not have permission to view are silently omitted.
Out of the box (before any admin saves a configuration) the popover shows a sensible default set: Status, Assignee, Priority, Due date, Time estimate, and Project. If an admin saves an empty selection, the body shows a placeholder pointing to Settings.
Action Buttons
The tooltip includes action buttons for quick operations:
- Log Work: Open the Log Work dialog to record time spent on this issue.
- Edit: Open the Edit Issue dialog to change the issue's start date and end date (the Jira fields you selected in Settings → General → Field Mapping), the Original Estimate, the Remaining Estimate, and the Assignee. Estimates accept Jira's native time syntax (e.g.
1w 2d 4h 30m); leave a field blank to leave it unchanged. If one of these fields isn't available in the issue's project, Jira rejects the save and the error notification identifies the field and offers a How to fix action. - Open in Jira: Open the issue in Jira's native view in a new tab.
- Actions: A menu with two quick removals. Unschedule clears the issue's start and end dates, and Unassign removes its assignee. In either case the issue drops off the timeline and returns to the search sidebar as an unscheduled or unassigned issue.
Split Issues (Multiple Assignees) Back to top
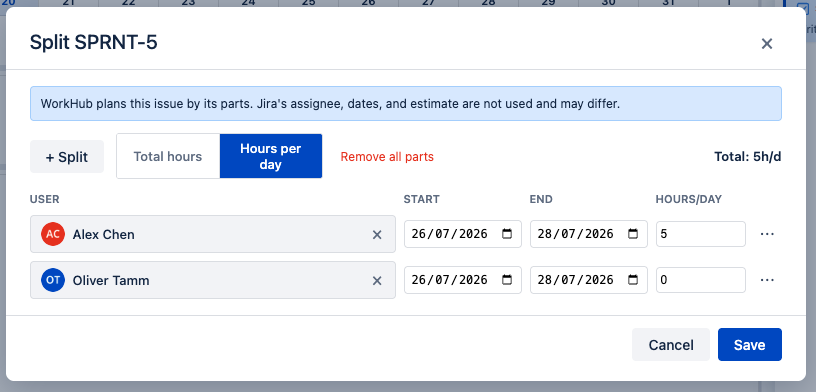
Jira allows only one assignee per issue. The Split action in the issue tooltip divides an issue into parts — one per person, each with its own date range and hours — so several people can be planned on the same issue. Each part's hours are entered either as Total hours for its date range or as Hours per day; the choice applies to the whole issue.
Part Bars
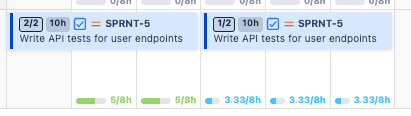
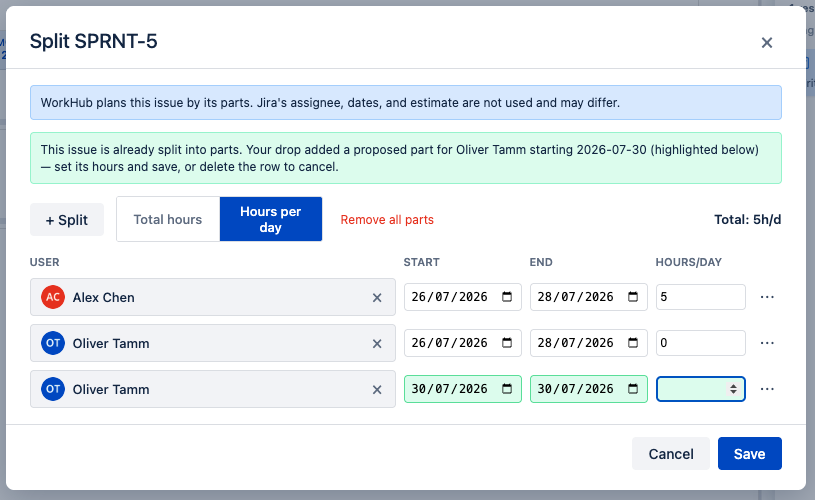
Once split, the issue shows as one bar per part on each owner's row, marked with a split badge (e.g. 1/2). Part bars behave like regular issue bars — drag, resize, reassign, log work — but changes affect only the part, never the Jira issue. Parts can be removed individually or all at once; removing the last part returns the issue to normal Jira-driven scheduling. Dropping a split issue from the search panel proposes a new part for the target person and date.

Split Panel on the Issue View
The same Split editor is available as the WorkHub Split panel directly on the Jira issue view, so parts can be created and managed without leaving the issue — open it from the issue's apps menu. New part-owners are not notified — they discover their parts on the scheduler or in the issue panel.
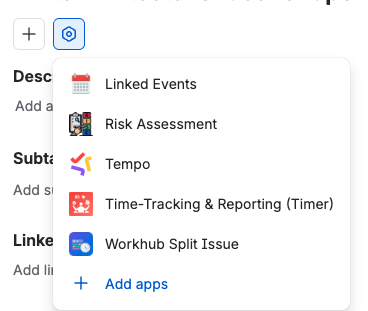
Why do WorkHub totals differ from Jira estimates for split issues?
Splitting copies the issue's estimates once as a starting point; from then on the issue is planned entirely by its parts and Jira's assignee, dates, and estimates are ignored (they are never written back either). Editing the issue in Jira therefore does not change its parts, and part totals may legitimately drift from Jira's estimate fields — the Split editor shows a note on split issues, and each part's hours stay editable as the correction point. Work logged through WorkHub reduces the author's part remaining hours (see Split Issues in Workload Management). Deleting all parts returns the issue to normal Jira-driven behavior.
Custom Allocations Back to top
Allocations are manual bookings you create in WorkHub, shown on the scheduler next to the Jira issues. Use them for planned work that has no Jira issue — training, meetings, code reviews, support rotation, client calls. Like issues, they sit on the timeline and count toward each person's workload, so managers see the full picture of how capacity is used.
Key Properties
Each allocation has the following properties:
- Name: A descriptive label (e.g., "Sprint Planning", "Client Workshop", "Training")
- Custom title: Optional free text — when set, the bar and detail popup show "[Allocation] title | target", useful to tell apart several allocations to the same project. Without a title the target name is shown as usual
- Assignee: The team member this allocation is for
- Date range: Start and end dates for the allocation period
- Hours per day: How many hours per working day this allocation takes (e.g., 2h/day)
- Color: Optional color override for visual distinction on the timeline
How Allocations Appear on the Scheduler
Allocations are displayed as colored bars alongside Jira issue bars on the user's row. They are visually similar to issues but carry a distinct style and label so you can tell them apart at a glance.
- Positioned on the assigned team member's row, spanning the configured date range
- Contribute to workload calculations — the hours per day value is added to the user's daily scheduled hours
- Reflected in workload indicators (green/yellow/red capacity bars) just like Jira issues
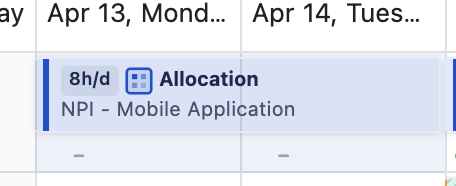
Creating an Allocation
There are two ways to create a single allocation (see the Bulk Allocate section below for booking the same work across many users at once):
- Click the "Create Allocation" button in the scheduler toolbar, OR right-click an empty cell on the timeline and select "Create Allocation" from the context menu.
- Fill in the allocation details: an optional Custom title, Name, Assignee (pre-filled if you right-clicked on a specific user's row), Date range, and Hours per day.
- Click Create. The allocation appears immediately on the timeline.
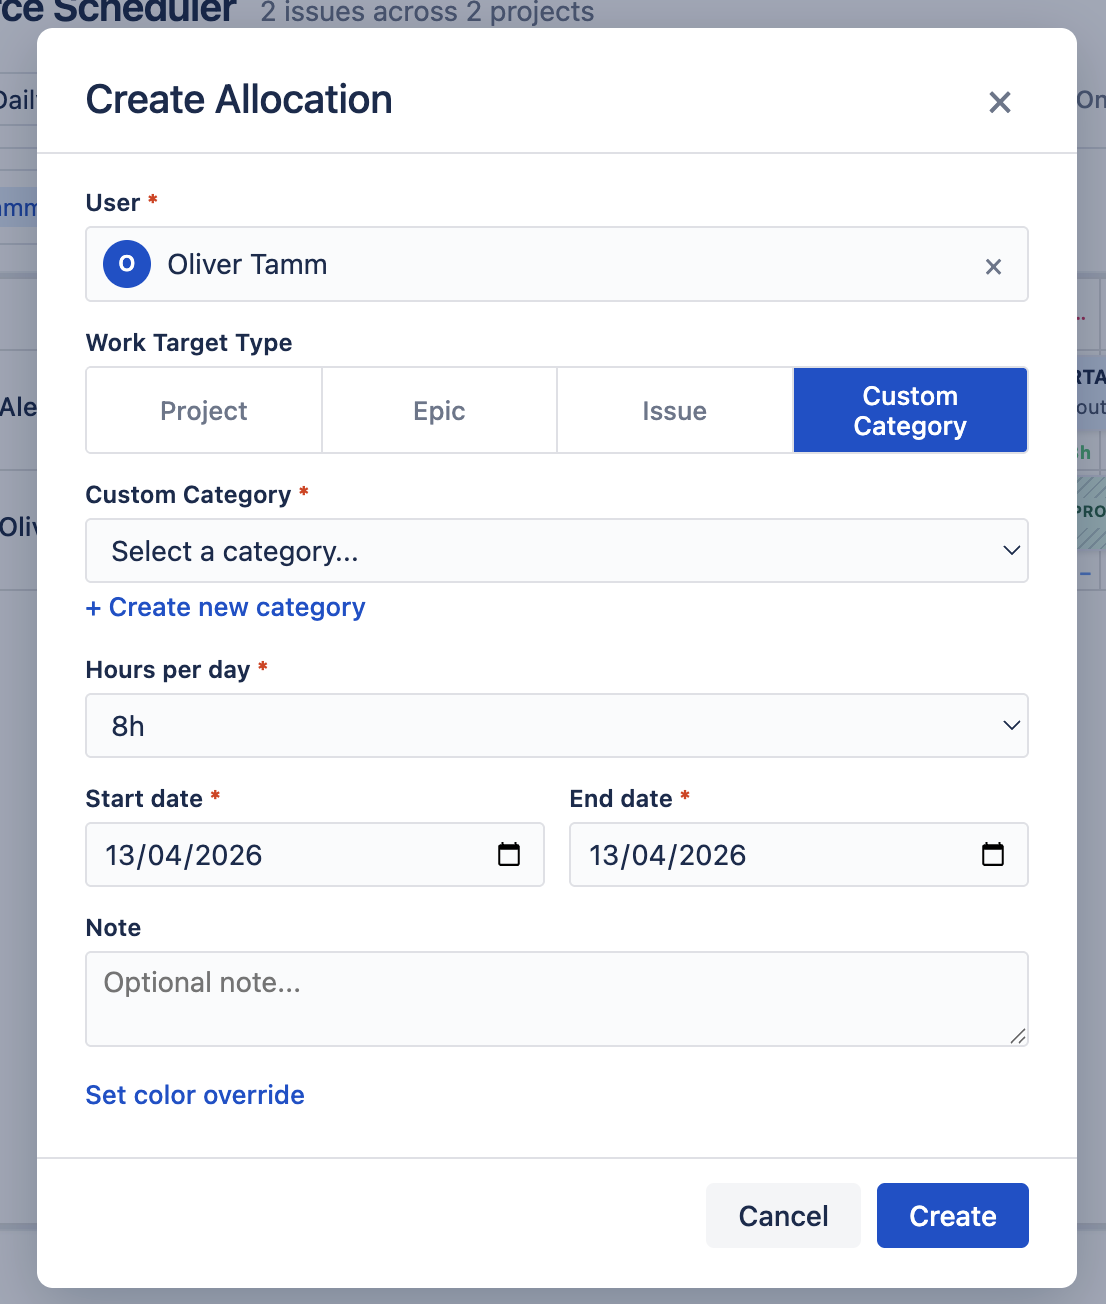
Bulk Allocate
When you need to book the same work for several people at once — sending a whole team to a training week, assigning everyone to a customer workshop, or reserving capacity for an ops rotation — click the white "Bulk Allocate" button in the scheduler toolbar (top-right, immediately to the left of the blue "Plan Item" button). It opens a single dialog that creates one allocation per selected user in one round-trip.
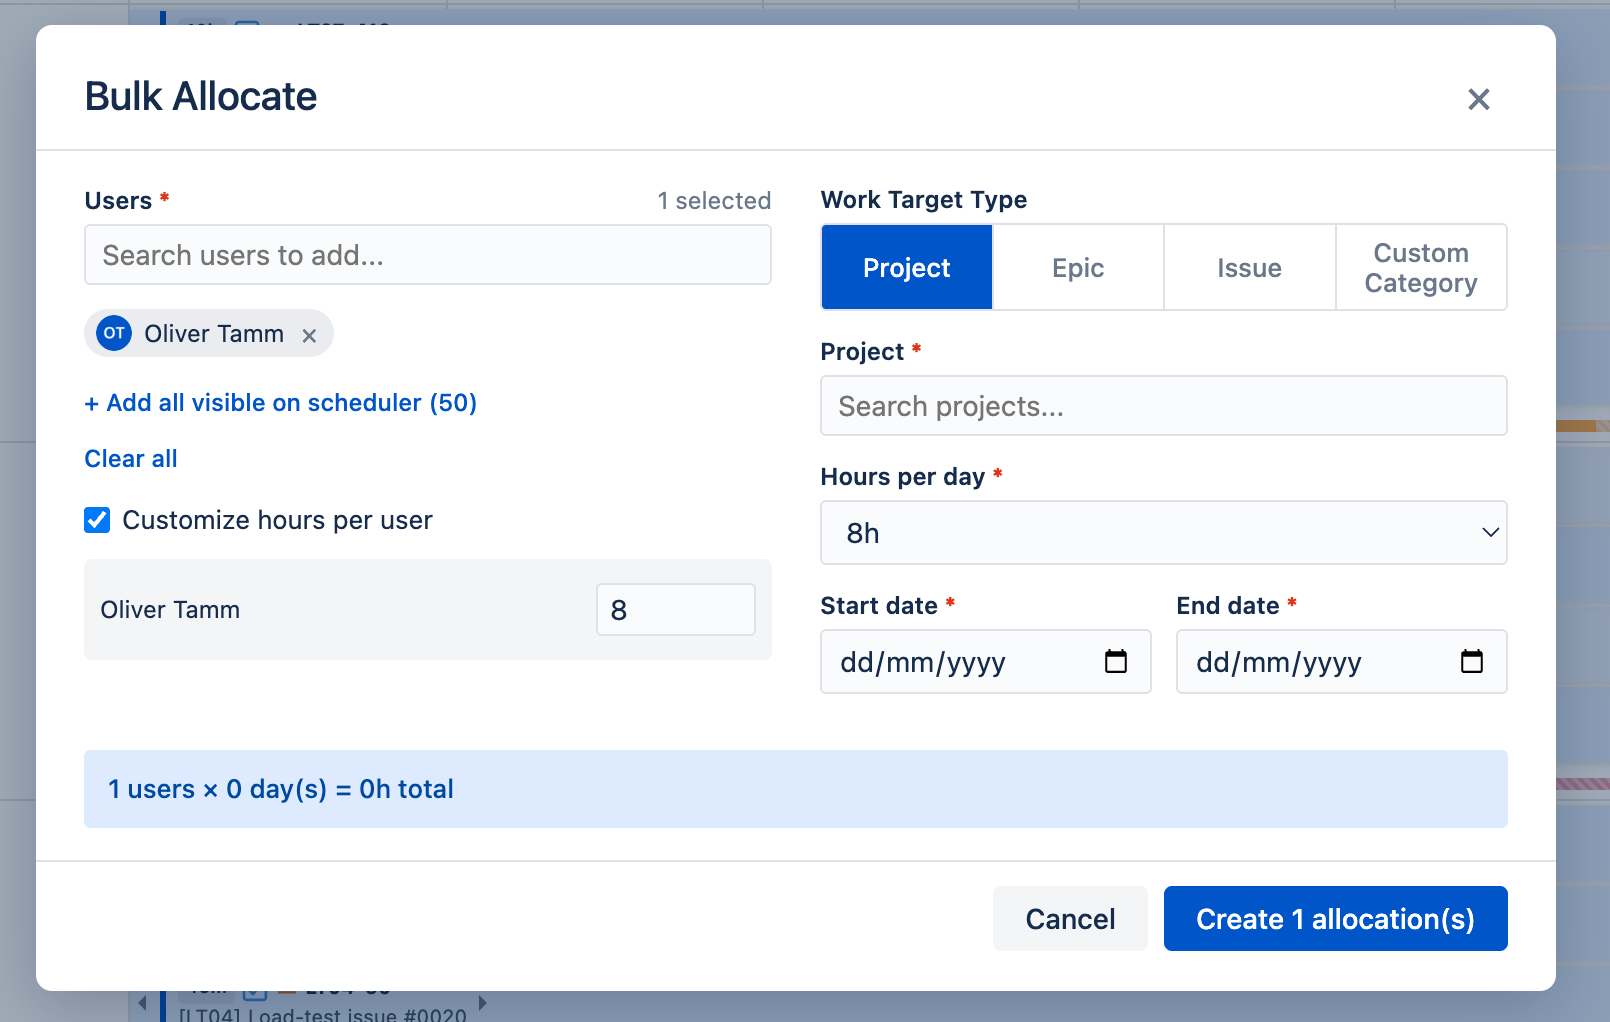
The dialog is laid out in two columns:
- Left — Users: a searchable user picker. Type at least 2 characters to find users; click a result to add it. Selected users appear as removable chips below the search box, and a count ("N selected") is shown to the right of the label.
- Right — Work Target Type: an optional Custom title field, then a segmented control for choosing Project, Epic, Issue, or Custom Category; the matching target picker appears below. Hours per day (0.5h–24h) and Start date / End date are shared by every selected user.
A few helpers make filling it in faster:
- Add all visible: if the scheduler is filtered to a team, click "+ Add all visible on scheduler (N)" to add everyone on the timeline at once. Clear all empties the selection.
- Per-user hours: everyone gets the same hours/day by default. Tick "Customize hours per user" to set a different value (0.5h–24h) per person.
- Live total: a summary bar shows "N users × M days = Xh total" (weekends excluded) so you see the commitment before you submit.
- Limit: up to 200 users per bulk request. If some succeed and some fail, the dialog stays open and shows which to retry. Overlapping allocations on the same user are allowed (no warning), same as single allocations.
Recurring Allocations
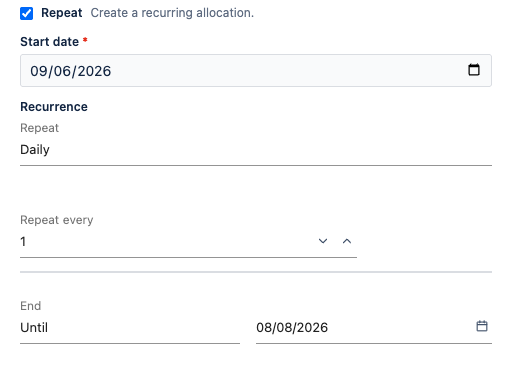
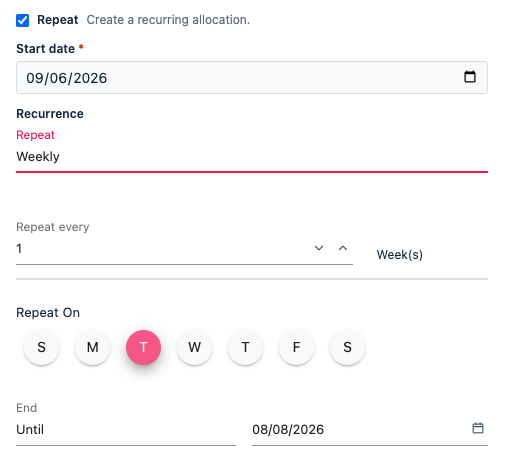
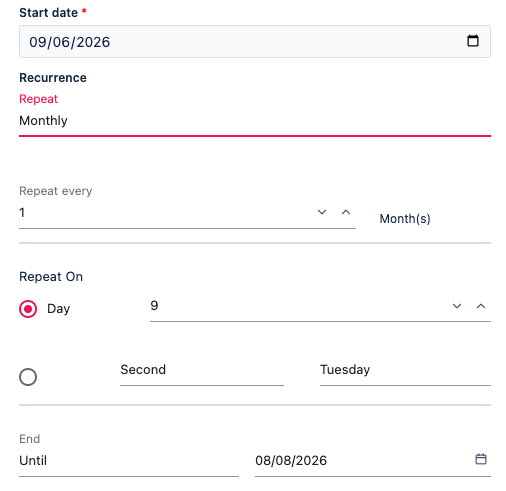
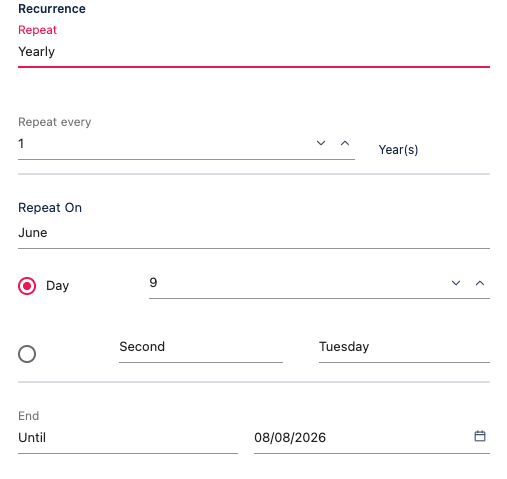
Need the same booking to repeat — a weekly team meeting, a monthly review, a daily stand-up? Tick Repeat in the Create Allocation (or Bulk Allocate) dialog to turn it into a recurring allocation. WorkHub creates one single-day allocation for each occurrence, all linked together as a series.
Choose a Start date, a repeat pattern, and an end condition (Until a date, or after N times):
- Daily — every N days.
- Weekly — every N weeks on the weekdays you select (S M T W T F S).
- Monthly — on a fixed day of the month (e.g. the 9th), or on a weekday position (e.g. the second Tuesday).
- Yearly — once a year, on a fixed day of a month or a weekday position.
Recurring allocations show a small marker on each occurrence bar. When you move, resize, delete, or edit one of them, WorkHub asks how widely to apply the change:
- This occurrence — changes only the one you touched. It becomes a standalone allocation, no longer part of the series.
- This and following — applies to this occurrence and every later one.
- All occurrences — applies to the whole series.
To change the repeat pattern itself, delete the series and create a new one. Deleting occurrences that have logged time keeps the worklogs and asks you to confirm first.
Choosing This occurrence takes that bar out of the series — it becomes a one-off you can size freely. Choosing This and following or All applies the new length to each occurrence, but it's capped so bars never overlap the next one (a weekly series, for example, can't stretch past 7 days).
Interacting with Allocations
Once an allocation is on the timeline, you can interact with it in several ways:
- Resize: Drag the right edge of the allocation bar to extend or shorten the date range
- Click: Click the allocation bar to view its details in a tooltip/popup, including name, assignee, dates, hours per day, and who created it
- Delete: Remove the allocation from the tooltip/popup
- Drag: Drag an allocation bar horizontally to reschedule it to different dates, or vertically to reassign it to another team member
Workload Impact
Allocations contribute to workload calculations just like Jira issues. The hours per day value is added to the scheduled hours for each working day within the allocation's date range. This ensures that workload indicators accurately reflect the team member's total commitments, including both Jira issue work and non-issue activities.
Logging Time Against Allocations
Users can log worklogs directly against an allocation, not just Jira issues. This is useful for tracking time spent on non-issue work such as training sessions, support rotation, or internal meetings.
To log time against an allocation:
- Click the allocation bar on the timeline to open its tooltip/popup.
- Click the "Log Work" button. The Log Work dialog opens with the allocation pre-selected.
- Enter the hours spent, date, and an optional description.
- Click Save.
The logged hours appear in Time Tracking, Timesheets, and Reports just like issue worklogs, ensuring that all work — whether tied to a Jira issue or not — is captured in a single unified view.
Drag and Drop Back to top
The scheduler supports three types of drag-and-drop interactions for Jira issues. All changes are saved to Jira immediately.
Horizontal Drag (Reschedule)
Drag an issue bar left or right to move it to new dates. The duration of the issue is preserved — both the start and end dates shift by the same number of days. The issue's date fields in Jira are updated automatically.
Vertical Drag (Reassign)
Drag an issue bar up or down to another team member's row. This reassigns the issue to that person — the assignee field in Jira is updated in real time. The issue's dates remain unchanged.
Resize (Change Duration)
Grab the right edge of an issue bar and drag it to extend or shorten the end date. The start date remains fixed. This is useful for adjusting how long a task is expected to take without changing when it begins.
Scheduling Issues Back to top
You can schedule existing Jira issues onto the timeline directly from the scheduler. This assigns start and end dates to unscheduled issues so they appear on a team member's row.
Drag from the Plan Item Sidebar
Open the Plan Item sidebar, find an issue, and drag its card onto a team member's row. The bar is automatically sized to fit the issue's estimate — the hours shown on the card, which follow the active workload mode and include story-point estimates when a conversion factor is configured — spanning enough of that person's working days to absorb them while skipping holidays and approved leaves. An issue without an estimate gets a single-day bar. In the Year (monthly) scale the bar is additionally extended to the last day of the month in which it would otherwise end.
Context Menu
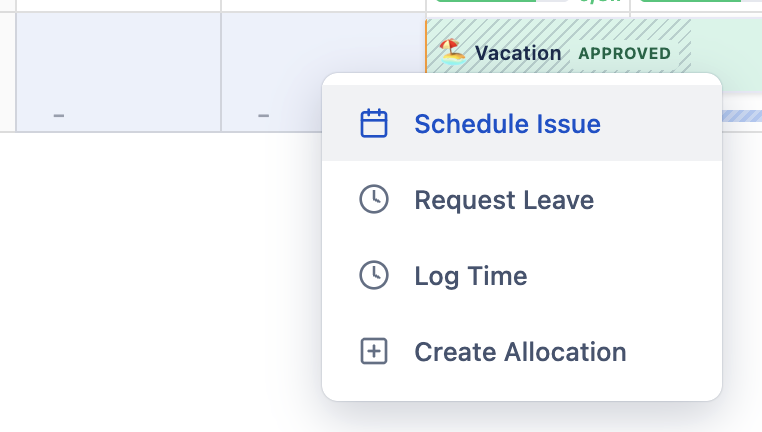
The cell context menu offers:
- Schedule Issue: Opens the Schedule Issue dialog to pick an existing Jira issue and assign it dates on the timeline
- Request Leave: Opens the Leave Request form for the selected team member and date
- Log Time: Opens the Log Work dialog to record time spent
- Create Allocation: Opens the Create Allocation dialog for non-issue work
How to open it
The scheduler follows the universal desktop convention — left-click acts on what you clicked, right-click always shows the cell context menu:
- Left-click an empty cell — opens the cell context menu for that day and user.
- Click and drag across multiple cells, then click again — opens the menu with the multi-day range pre-filled (used for "Schedule Issue" and "Request Leave" spanning several days).
- Left-click an issue / leave / allocation bar — opens that item's own popup (issue details, leave details, etc.), not the cell menu.
- Right-click anywhere on a row (two-finger click on Mac) — opens the cell context menu, even when the cell is fully covered by issue bars or workload indicators. This is the guaranteed way to reach cell actions when there's no empty cell area to click.
If a row is busy with several stacked issues and you want to schedule another one or log time for that day, use right-click — left-click would just open whatever's underneath the cursor.
Schedule Issue Dialog
The Schedule Issue dialog allows you to search for an existing Jira issue and assign it to the timeline:
- Issue: Search and select an existing Jira issue by key or summary
- Assignee: Pre-filled from the row where you clicked; can be changed
- Start date and end date: Pre-filled from the clicked cell(s); can be adjusted
- Original estimate: Enter or update the estimated hours for the issue
Once saved, the issue's dates and assignee are updated in Jira and the issue appears on the scheduler timeline.
Leave & Holiday Display Back to top
The scheduler can overlay approved leave requests and public holidays on the timeline. This gives a complete picture of team availability alongside scheduled work.
Toggle Visibility
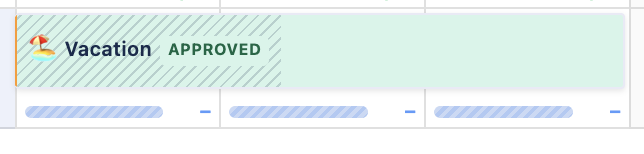
Use the Leaves and Holidays toggle buttons in the toolbar to show or hide each kind of block. When enabled, approved leave requests appear as colored blocks on the respective team member's row (a partial-day leave block shows the hours taken per day), and public holidays appear as read-only bars labelled with the holiday name on each affected team member's row. Holiday bars cannot be dragged, resized, or edited — they reflect the assigned holiday calendar.
Recalled and rejected leaves are shown by default. An admin can hide them site-wide with the Settings → Leave Settings → "Show recalled/rejected leave on scheduler" toggle — a display-only filter that does not change capacity.
Workload Impact
Regardless of whether leave and holidays are visually displayed, they are always factored into workload calculations. A team member on approved leave has zero available capacity for that day, and public holidays reduce available hours for all team members assigned to the corresponding holiday calendar.
Click a Leave Bar
Clicking a leave bar opens a popover with details (type, dates, requester, status, note) and a context-aware action footer:
- Owner, Pending leave: Edit, Recall
- Owner, Approved leave: Recall (transitions through Recalling when the approval workflow is on, or directly to Recalled when it is off). Edit is also available when the approval workflow is off.
- Approver, Pending leave: Edit, Approve, Reject. Editing is symmetric with the on-behalf create path — an approver who can create a leave for their approvee can also correct dates, type, or note before deciding.
- Approver, Approved leave: Revoke
- Approver, Recalling leave: Approve Recall, Deny Recall
Approver action buttons only appear when the viewer is the leave's designated approver and not the leave's owner (the same person can never both request and approve a single leave).
Drag and Resize Leaves
The owner can drag or resize their own leave bars on the timeline to shift dates or adjust duration. The mutability rule mirrors the popover Edit/Recall rule:
- Pending leaves: Always draggable and resizable by the owner.
- Approved leaves: Draggable and resizable only when the approval workflow is off (Settings → Leave Settings). With approval on, the bar is locked — recall and recreate is the only path to change dates.
- Other statuses (Rejected, Recalling, Recalled) are always read-only on the timeline.
Cross-user drags are blocked — you can never reassign a leave to another team member by dragging it. Capacity recalculates immediately after a successful drag/resize.
Color Schemas Back to top
Issues on the scheduler are color-coded by their Jira status category, providing a quick visual indication of work progress across the team.
| Status Category | Color | Examples |
|---|---|---|
| To Do | Blue / Gray | Open, Backlog, To Do |
| In Progress | Yellow / Amber | In Progress, In Review, In QA |
| Done | Green | Done, Closed, Resolved |
The color mapping is based on Jira's built-in status categories, so it works automatically with any custom workflow statuses your Jira instance uses. No configuration is needed.
Admins can override the status-category palette and define their own
color rules — by priority, status, project, assignee, fix version, custom field value,
due date, and more, with AND / OR groups, nested sub-groups, and date functions like
today(). See Issue Colors in Settings.
Anyone — not just admins — can click the palette icon () in the Scheduler header to open the Explain colors dialog, which lists every active rule in priority order so you can see why a bar is painted a given color.
Need Help?
If you have questions or need assistance with the Resource Scheduler, our support team is here to help.
Contact Support