Overview Back to top
The Time Tracking module lets you log work hours against any Jira issue or custom allocation created on the Resource Scheduler. Each entry is called a worklog — it records the issue or allocation, the date, the number of hours, and an optional description.
Key Features
- Weekly grid: Days as columns, issues as rows, hours in cells
- Quick logging: Click "+ Log Work" to record time with quick-select buttons
- Live Start / Stop timer: Run a real-time counter against any Jira issue and let WorkHub fill in the duration on stop
- Jira issue panel: A collapsible WorkHub panel on every Jira issue view with Log time, Start timer, and the full worklog history
- Date-range filters: Today, This Week, Last Week, This Month, Last Month, or Custom
- Excel export: Download worklogs matching the current filter
- Timesheet integration: Worklogs feed into the approval workflow
Logging a Worklog Back to top
Click the + Log Work button in the toolbar to open the worklog form. Fill in the fields below and click Save.
| Field | Details |
|---|---|
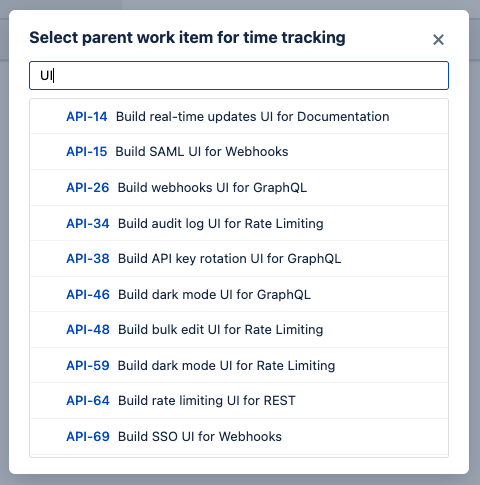
| Issue | Search and select a Jira issue. Type at least two characters to search across all projects — the picker matches issue key and summary. Custom allocations are not returned by this search; to log time on an allocation, click its cell directly on the weekly grid (see below). |
| Time Spent | Enter hours and minutes. Use the quick-select buttons (15m, 30m, 45m, 1h, 2h, 4h, 6h, 8h) for common durations. You can log only minutes, only hours, or both. |
| Date | The day the work was done. Defaults to today. Toggle Log many to repeat the same entry on every working day in a From–To range; if some days cannot be saved, the dialog reports how many went through and submitting again retries only the missing days. |
| Description | Optional text describing what was done. Useful for timesheet reviews and audits. |
| Category | Optional worklog category for the entry (e.g. Billable, Non-Billable). Only appears when more than one category is configured; pre-selected to the project's or organization default. See Worklog categories below. |

- Click "+ Log Work" — open the form from the toolbar at the top of the Time Tracking view.
- Pick an issue — the field opens with your 10 most recently viewed issues, so you can pick one without typing. Or type to search by key or summary, then select the issue you worked on from the dropdown.
- Set time spent — enter hours and minutes, or use the quick-select buttons for common durations.
- Choose date — pick the date the work was done. Defaults to today.
- Add a description (optional) — describe what you accomplished. This text shows up in the grid view and in exports.
- Save — click Save. The new worklog appears immediately in the weekly grid.
Worklog categories
A worklog category classifies the kind of time an entry represents — for example Billable vs Non-Billable, or activity types such as Development, Meetings, or Support. Tagging your time this way lets hours be broken down, filtered, and reported by category later — across the timesheet views, the Worklog Report, and Excel exports — instead of showing up as one undifferentiated total. The category travels with the worklog, so it also carries over into approvals and audits.
You choose a category from the Category field in the Log Work dialog. It is pre-selected to the project's default (or the organization default), so most entries need no change — pick a different one only when the work belongs elsewhere. If your organization has just a single category, the field is hidden and every entry belongs to that default automatically. The categories themselves are created and managed by admins in Settings → Worklog Categories.
Logging Work on Allocations Back to top
Worklogs can also be logged against custom allocations — non-issue work such as training, meetings, or support rotation that was scheduled for you on the Resource Scheduler. Allocations are not available in the issue search inside the Log Work dialog. Instead, every allocation assigned to you appears as its own dedicated row on the Time Tracking weekly grid for the dates it covers, and you log work against it from there.
There are two ways to log time on an allocation:
- From Time Tracking — on the weekly grid, allocations show up as rows under your issue rows (marked with an allocation badge). Click any cell on an allocation row that falls within its scheduled date range to open the Log Work dialog with that allocation already pre-selected. There is no item search in this case — the target is fixed to the allocation you clicked, and you only fill in time spent, date, and description.
- From the Scheduler — right-click on an allocation bar (or on a cell on your own row) and choose Log Work. The dialog opens with the allocation pre-selected, exactly the same as from the grid.
Choosing where the time lands
When the allocation targets a Jira issue or epic, the Log Work dialog adds a small choice near the top that decides where your hours are recorded:
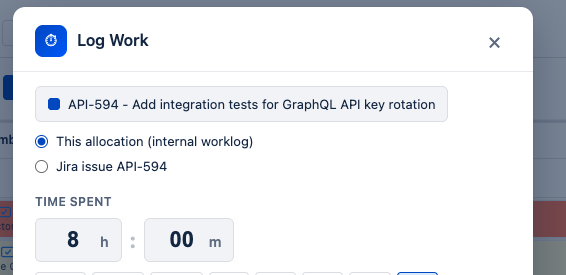
- This allocation (internal worklog) — the default. Your time is kept against the allocation as an internal WorkHub entry. It appears in your timesheets and reports but does not change the Jira issue's own time tracking.
- Jira issue <KEY> — your time is logged straight onto the target Jira issue, exactly like a normal Jira worklog, and counts toward that issue's logged and remaining time instead of the allocation.
Pick the first when you're tracking effort against the planned allocation; pick the second when the work should show up on the Jira issue itself. If the allocation isn't tied to a Jira issue or epic, this choice doesn't appear and the entry is always an internal worklog.
Allocations are personal scheduled work, not Jira issues, so they are surfaced contextually on the rows where they apply rather than mixed into a global issue picker. Allocation worklogs still flow into timesheets and reports just like issue worklogs.
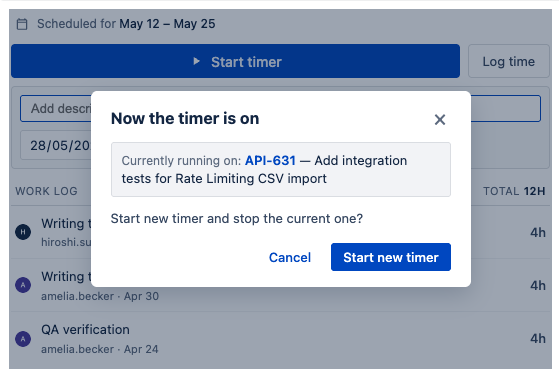
Start / Stop Timer Back to top
Run a live timer while you work and WorkHub fills in the hours when you stop. Available from the Time Tracking toolbar and the WorkHub panel on any Jira issue.
Start
Click Start timer. Pick an issue from the list of recents, or type to search. The timer begins immediately.
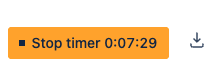
Stop
The button turns orange and shows the live elapsed time. Click it to stop — the Log Work dialog opens pre-filled with the issue and duration so you can adjust and save.
One timer at a time
Starting a new timer while another is running shows a confirmation. Confirm to log the previous timer's elapsed time and switch to the new issue.
Jira Issue Panel Back to top
WorkHub adds a panel on the right side of every Jira issue. Log time, run the timer, and see the full worklog history without leaving the issue.
Scheduled-for date
Shows the start and end date for the issue, as configured under Settings › Field Mapping. The dates can be set and edited right from the panel — use Set dates when the issue isn't scheduled yet, or the pencil icon next to the dates to change or clear them.
Log time
Click Log time to expand an inline form with description, date, hours and minutes — plus a category when more than one is configured — faster than the full dialog when you just need to record a quick entry.
Timer
Same timer as the Time Tracking toolbar. Stopping it from the panel opens the inline log form instead of the full dialog.
Worklog history
Every worklog on the issue, by anyone. The TOTAL at the top sums them up.
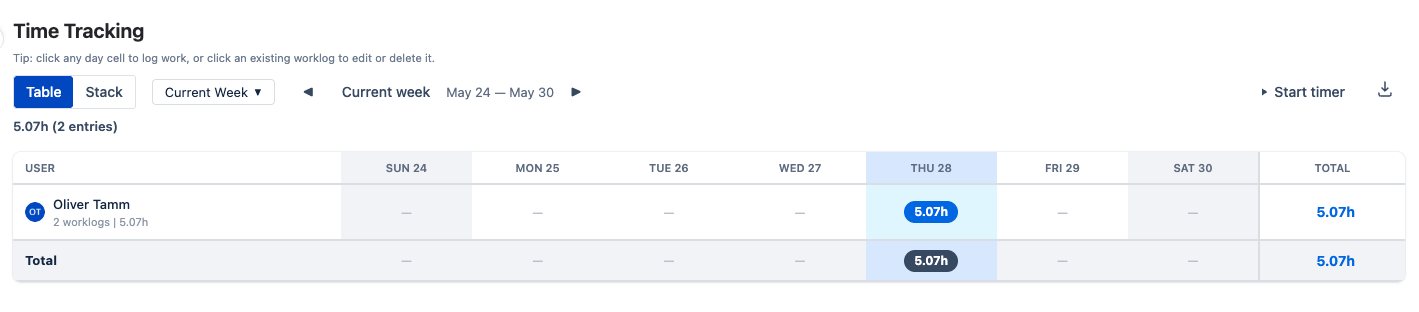
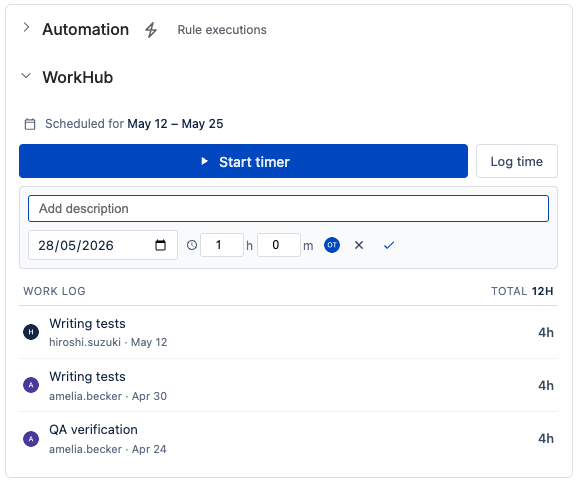
Weekly Grid View Back to top
The weekly grid is the primary layout for time tracking. Issues appear as rows, days of the week as columns, and hours are displayed in cells at the intersection.
- Each issue row represents a Jira issue you have logged time against.
- Each allocation row represents a custom allocation scheduled for you on the Resource Scheduler; the row is marked with an allocation badge and only shows clickable cells on the dates the allocation covers.
- Each "Out of period" allocation row appears when you have worklogs against an allocation that no longer covers the visible week — either because the allocation was deleted (worklogs are preserved for historical reporting) or because it was rescheduled to a different date range. The row is dimmed, labelled Out of period, and read-only: cells with hours are clickable so you can review or delete those worklogs, but you cannot log new time against an absent allocation.
- Each column represents a day of the week (Monday through Sunday).
- Each cell shows the hours logged for that issue or allocation on that day.
- Row totals show the sum of hours for each issue or allocation across the week.
- Column totals show the sum of hours for each day across all rows — including any "Out of period" allocation hours, so the per-day total always matches the sum of every visible row.
- Week navigation arrows let you move to the previous or next week.
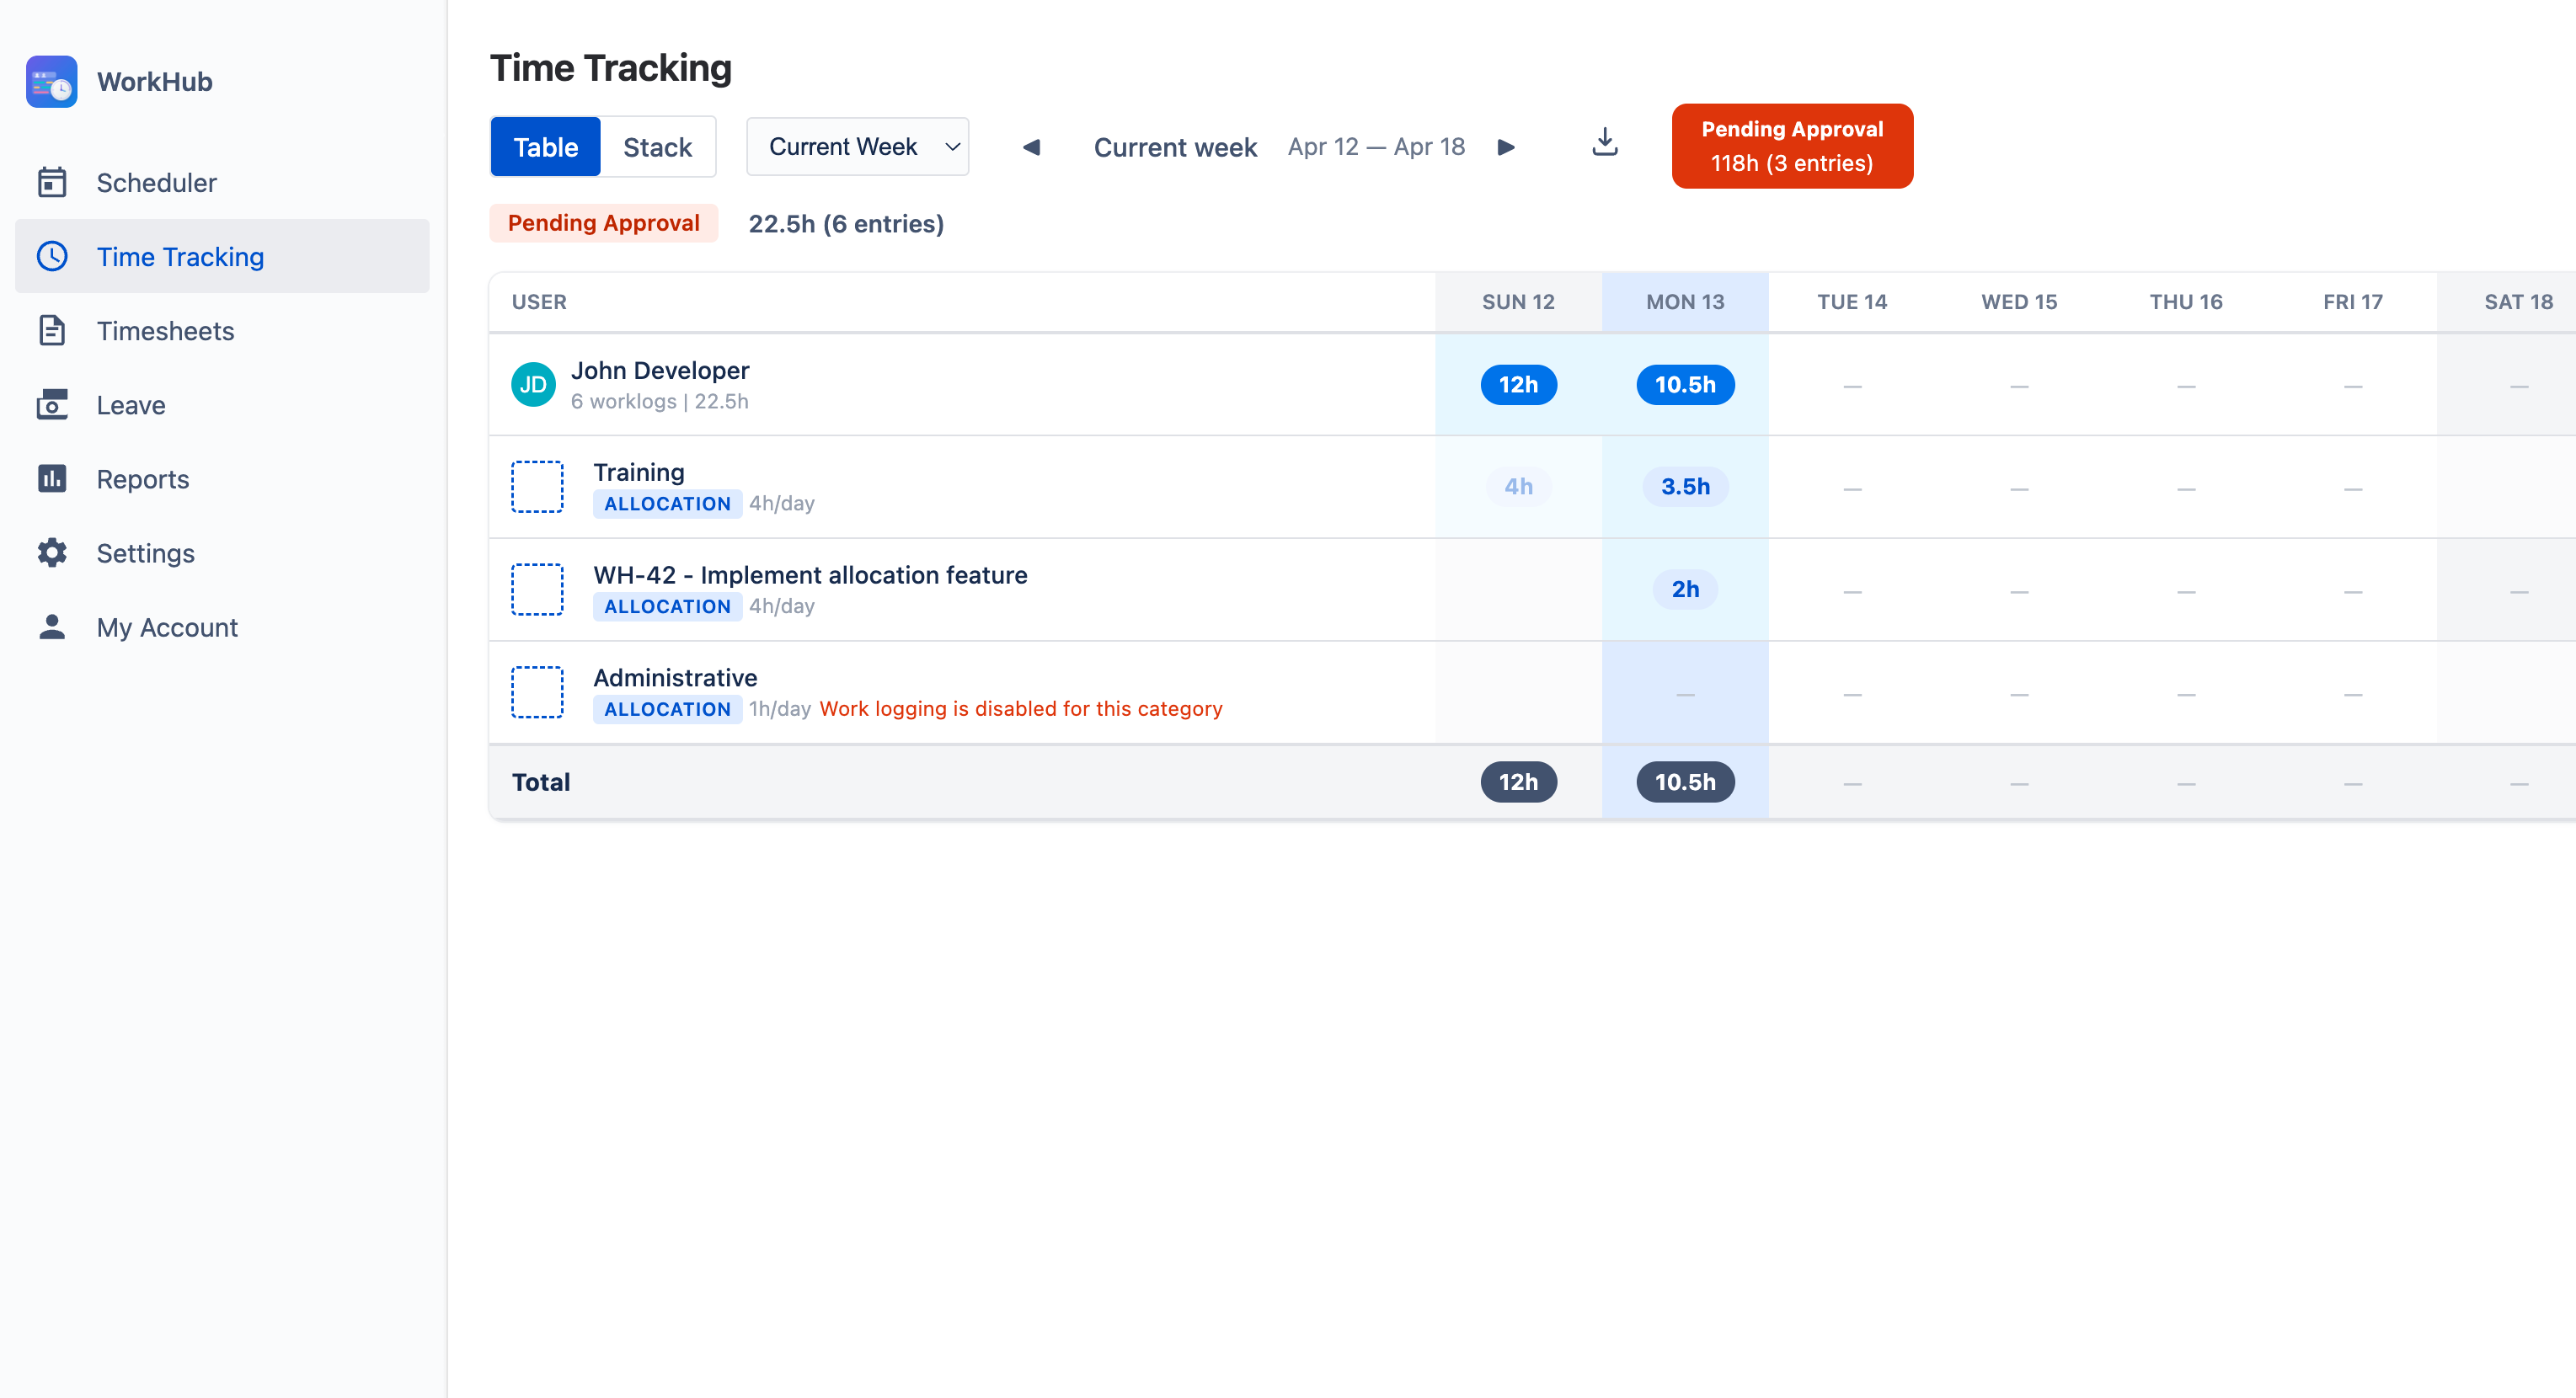
"Out of period" allocation rows
When you have worklogs against an allocation that no longer covers the visible week — either because the allocation was deleted (worklogs are preserved for historical reporting) or because it was rescheduled to a different date range — the grid shows a synthetic Out of period row so the per-day Total cells always tie back to a visible row. The row is dimmed and read-only: cells with hours are clickable to review or delete the historic entries, but you cannot log new time against an absent allocation.
Date Range Filters Back to top
Use the date-range selector in the toolbar to control which worklogs appear in the grid.
Predefined ranges
- Today — worklogs for the current day only.
- This Week — Monday to Sunday of the current week.
- Last Week — the previous full week.
- This Month — first to last day of the current month.
- Last Month — the previous full calendar month.
Custom range
Open the period dropdown and choose Custom Range... at the bottom. From / To date inputs expand inline; pick the start and end dates and press Apply. The grid renders one column per day across the selected range (up to 366 days). The chosen range is remembered across page refreshes; the prev / next arrows shift it by the same length. To edit the range, reopen the dropdown and click Custom Range... again — your previous From / To values are pre-filled.
Custom ranges are useful for billing cycles, sprints, or any period that does not match the presets. To return to a standard period, pick Current Week, Last Week, Last 2 Weeks, Current Month, or Last Month from the same dropdown.
Editing & Deleting Back to top
You can change or remove any worklog as long as it is not part of a submitted or approved timesheet.
Editing
- Click any cell in the grid with logged hours to open the day worklogs dialog — a list of every entry for that issue (or allocation) and date.
- Click the pencil icon on the worklog row you want to change. The Hours and Description cells turn into inputs.
- Update the hours (decimal allowed, e.g.
1.5for 1h 30m) and description, then click the green tick to save or the cross to cancel.
Edits stay inside the time tracking grid — there is no need to open the parent issue. The change is saved through the same backend resolvers that gate worklog locking, so any attempt to edit a worklog inside a submitted/approved timesheet period is blocked with a clear error.
Deleting
- Click the delete icon on the worklog entry.
- Confirm the deletion in the dialog that appears.
- The worklog is permanently removed.
Locked worklogs
Worklogs that belong to a submitted or approved timesheet cannot be edited or deleted. The entry shows a lock icon and the controls are disabled. To make changes, ask your approver to reject or reopen the timesheet first. See Timesheets Approval for details.
Excel Export Back to top
Click the Export button in the toolbar to download your worklogs as an Excel file. The export includes every worklog that matches the current date-range filter. Rows are ordered by date, with Jira and allocation worklogs mixed together like on the grid.
Columns in the export
| Column | Content |
|---|---|
| Date | Date the work was done (YYYY-MM-DD) |
| Project | Jira project the issue belongs to (key and name); empty for allocation entries |
| Issue | Jira issue key and summary (e.g. WH-123 - Fix login), or the allocation's name for allocation worklogs ("title | target" when the allocation has a custom title) |
| Hours (h) | Hours logged |
| Description | Work description text |
- Personal records — export "This Month" for a quick hours summary.
- Client invoicing — filter by a project and export the billing period.
- Audits — export a custom date range for internal or external review.
Need Help?
If you have questions or need assistance with time tracking in WorkHub for Jira, our support team is here to help.
Contact Support