Overview Back to top
Time Tracking is where you record the hours you spend on monday.com items. Each entry is called a worklog. A worklog says what you worked on, on which day, for how long, and (optionally) what you did.
Worklogs are kept by the app, not in a monday.com time-tracking column. They feed Timesheets, Reports and the workload shown on the scheduler.
Managers and approvers can also open and log time for the people they look after. See Viewing and logging another person's time. If your team uses timesheet approval, you also send your period for approval from this page. See Timesheet Approval.
Where to find it
Open the app from the monday.com sidebar and click Time Tracking. Everything you need is in the top bar:
| Control | What it does |
|---|---|
| + Worklog | Opens the Log Work dialog. |
| Table / Stack | Switches between the Table and Stack views. |
| Period (shows Current week at first) | Chooses the dates you are looking at. |
| My time | Shows your own time. People with access can pick another person. |
| ‹ dates › | Moves to the previous or next period. |
| Export (download icon) | Downloads the worklogs of the period as an Excel file. |
| Start timer | Times your work as you do it. See Start / stop timer. |
| Submit for Approval | Shown only when timesheet approval is on and you are looking at one full submission period. See Submitting timesheets. |
Turning time tracking on or off
A new account starts with time tracking off, so a new team sees planning first. An admin turns it on (or off again) in Settings > Timesheet Config > Time Tracking. Accounts that already used the app keep it on.
While it is off:
- Nobody can log, edit or delete time, and there is no timer.
- Time Tracking and Timesheets are not shown in the app's navigation.
- The scheduler has no Log time action. Items show one value called Estimate instead of Original Estimate, Logged and Remaining.
- Workload is based on the estimate only. See Workload without time tracking.
- The Work Log Audit Trail and Planned vs Actual reports are hidden.
Logging a Worklog Back to top
Use this when you want to record time you have already worked.
- Click + Worklog in the top bar. The Log Work dialog opens.
- In Item, type at least two characters of the item's name and pick the item from the list.
- In Time Spent, type the hours and minutes, or click a quick button: 15m, 30m, 45m, 1h, 2h, 4h, 6h or 8h.
- Check the Date. It is set to today.
- Pick a Category if the field is shown (for example Billable). See Worklog categories.
- Optionally describe what you did in Work description.
- Click Submit. The worklog appears in the view straight away.

Shortcuts that fill in the date for you:
- In Table view, hover a day cell and click +.
- In Stack view, click the + of a day.
Logging the same time on several days
Next to Date, click Log many and choose a start and an end date. The same time is logged on every day from Monday to Friday in that range. Saturdays and Sundays are skipped. Click Single day to go back to one date.
Example: You worked on a design task for 4 hours today. Click + Worklog, search for the task, click 4h, pick Billable, type "Wireframes and colour palette", and click Submit.
Start / Stop Timer Back to top
Use the timer when you want the app to measure the time for you.
- Click Start timer in the top bar.
- Search for the item you are working on and click Start. The button now shows Stop, the item name and a running counter.
- When you finish, click Stop. The Log Work dialog opens with the item, today's date and the measured time filled in.
- Change anything you need and click Submit.
- Nothing is logged until you click Submit. If you close the dialog, the measured time is dropped and a message tells you so.
- Only one timer runs at a time.
- The timer keeps counting if you reload the page or open another part of the app. It is remembered in the browser you started it in.
- The measured time is rounded to whole minutes. The shortest is 1 minute and the longest is 24 hours.
- The timer is for your own time. It is hidden while you look at another person's time.
Table View Back to top
Table view is the default. It is a grid with one column per day, a Total column at the end and a Total row at the bottom. The line above the grid shows the number of worklogs and the total time.

- Each day cell shows the time logged that day. The day header repeats the day's total.
- Click a cell with time in it to list that day's worklogs. You can edit or delete each one from the list.
- Hover a cell and click + to add a worklog for that day.
- A dash means nothing was logged. Weekend columns are shaded.
- If you cannot log on a day, hover the cell to see why (see Timesheet status messages).
Stack View Back to top
Stack view shows one column per day and one card per worklog. It is the quickest way to spot a day with nothing logged.

- Each column is one day. Its header shows the date, the number of worklogs and the day's total.
- Each card shows the hours, the item, its board and group, and the description.
- Click a + in a column to log time for that day.
- Each card has an edit and a delete icon.
Choosing the Period Back to top
Click the period button in the top bar (it shows Current week at first) and pick one of these. Both views follow your choice.
| Option | Dates it shows |
|---|---|
| Current week | The week that contains today. |
| Last week | The full week before this one. |
| Last 2 weeks | The two full weeks before this one. The current week is not included. |
| Current 2-week period | The fixed two-week block that contains today. Use it to submit a timesheet when your account's submission period is Biweekly. |
| Current month | The first to the last day of this month. |
| Last month | The whole previous calendar month. |
| Current year / Last year | A whole calendar year. |
| Custom | Any dates. Set From and To and click Apply. |
The arrows next to the dates move one step back or forward. A month moves by one month, a two-week period by two weeks, and anything else by one week.
Worklog Categories Back to top
A category labels the kind of time you logged. The usual two are Billable (time you can charge a client for) and Non-Billable (everything else). Timesheets and reports total billable hours separately.
- The Category field is shown when your account has two or more active categories. With only one, that one is used and the field is hidden.
- One category is the default and is already selected when you log time. A board can have its own default.
- Admins manage categories in Settings > Worklog Categories.

Editing and Deleting Worklogs Back to top
To edit a worklog
- In Table view, click the day cell and then the edit icon of the entry. In Stack view, click the edit icon on the card.
- Change the item, date, time, category or description.
- Click Update.
To delete a worklog
- Click the delete icon on the entry or card.
- Confirm in the Delete Worklog dialog. A deleted worklog cannot be brought back.
Viewing and Logging Another Person's Time Back to top
Use this when you look after other people's time. Click My time in the top bar and pick a person. A message above the grid confirms whose time you see. Click Back to my time to return.
| Who you are | Whose time you can open | Can you add, edit and delete their worklogs? |
|---|---|---|
| Admin (monday.com admin or App Admin) | Everyone | Yes |
| Timesheet approver | The people you approve | Yes |
| Team Manager | Members of the teams you manage | Yes |
| Timesheet viewer | Everyone | No — view only |
| Everyone else | Only yourself | Only your own |
- Approvers and viewers are set in Settings > Timesheet Access. Roles are explained in Permissions & Access.
- If you pick someone you may not see, a message says so and no worklogs are shown.
- A worklog you add for someone else belongs to that person. It is marked Created by: with your name.
- From the scheduler, click an empty cell on a person's row and choose Log time for {name}. The dialog says whose time you are logging and has a Log for myself instead link.
Timesheet status messages
A timesheet is all your worklogs for one submission period (a week, two weeks or a month) sent to an approver. When timesheet approval is on and you look at one full period, a message above the grid tells you where that timesheet stands:
| Status | What the message tells you |
|---|---|
| Draft | The timesheet was withdrawn. Submit it again when ready. |
| Submitted — pending approval | It is waiting for the approver, and whether you can still edit worklogs. |
| Approved | When it was approved and by whom. Worklogs are locked. |
| Rejected | The approver's reason. Fix the worklogs and resubmit. |
| Reopened | Why it was reopened. Review the worklogs and resubmit. |
If the dates on screen are not one full period, a line tells you which period your account uses, so you can switch to it and submit.
A day you cannot log on shows the reason when you hover it: the period is pending approval or approved, you only have view access to that person's time, or the date is in the future and future worklogs are off.
Excel Export Back to top
Click the Export icon (a download arrow) in the top bar. An Excel file with every worklog of the period on screen is downloaded.
| Column | Content |
|---|---|
| Date | The day the work was done |
| Item | The monday.com item |
| Board | The board the item is on |
| Group | The group the item is in |
| User | The person the time belongs to |
| Hours | Time logged, in hours |
| Description | The work description |
This export has no category column. For billable and non-billable hours use the Logged Time report. For a full list with category and approval status use the Work Log Audit Trail report.
Logging Time From an Item Back to top
You can add a Time Tracking tab to monday.com items. People can then see the estimate, log time and run the timer without leaving the item.
Add the tab (once per board)
- Open any item on the board and click + beside the item's tabs. At the bottom of the menu, click Explore more views.
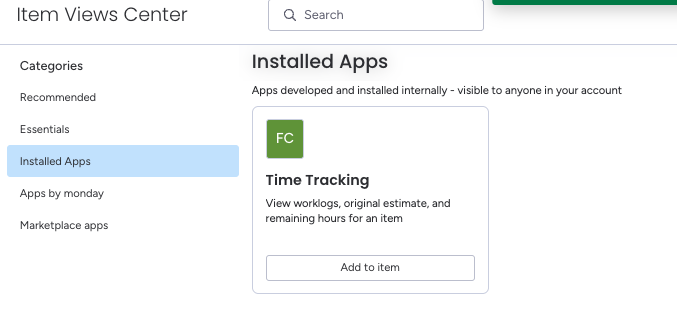
- Open Installed Apps, find Time Tracking and click Add to item.

You do this once. The tab is then on every item of that board.
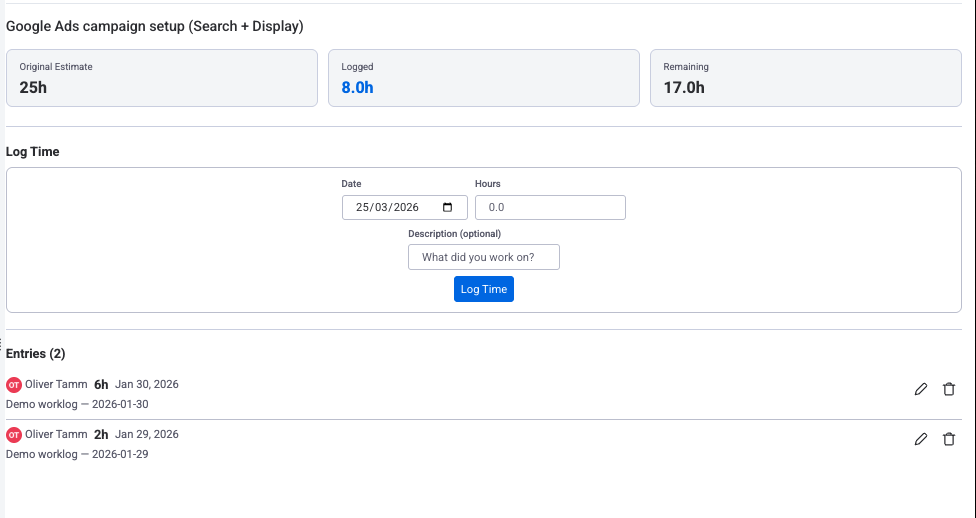
What the tab shows
- Original Estimate — the hours planned for the item.
- Logged — the hours logged on the item so far.
- Remaining — Original Estimate minus Logged.
- Start timer — times this item. When you stop it, the measured time is filled into the form below.
- Date, Time Spent and Description — fill them in and click Log Time.
- Entries — every worklog on the item, with date, hours, description and who logged it.
Mobile Time Tracking Back to top
The same Time Tracking tab works in the monday.com mobile app on Android and iOS. Open the item on your phone and open the tab. There is no separate app to install.

You see Original Estimate, Logged and Remaining at the top, the Log Time form under them, and the Entries list at the bottom.
Need Help?
If you have questions about time tracking or need help with your setup, our support team is here to help.
Contact Support